Einleitung
Ist dein Display gebrochen? Dann folge dieser Anleitung, um die Displayeinheit deines iPod touch zu ersetzen.
Beachte, dass die Fotos in dieser Anleitung einen iPod touch der 5. Generation zeigen. Die 6. Generation ist praktisch gleich, es gibt nur ein paar oberflächliche Unterschiede.
Was du brauchst
-
-
Wenn dein Display gesprungen ist, klebe das Display mit Klebeband ab, um zu vermeiden, dass das Display weiter bricht und du dich möglicherweise daran verletzt.
-
Klebe mehrere überlappende Schichten durchsichtigen Klebebands auf das Display des iPods bis das ganze Display bedeckt ist.
-
-
-
Verwende einen Fön oder bereite einen iOpener vor und lege diesen für ca. eine Minute auf das unteren Ende des iPods, damit sich der Kleber an dieser Stelle löst.
-
Das untere Ende des Displays (nahe dem Homebutton) ist mit starkem Kleber mit dem Gehäuse verklebt.
-
Möglicherweise musst du das Display während der folgenden Arbeitsschritte nochmals aufwärmen, damit der Kleber weiterhin warm und flexibel bleibt.
-
-
-
Setze einen Saugheber mittig auf das untere Ende des Displays, wobei sich der Rand des Saughebers über dem Homebutton befinden sollte.
-
Drücke den Saugheber gut auf das Display und achte darauf, dass dieser gut hält.
Be very careful. I have bought the ifixit kit. Tried with the suction cup and it didn’t work. None of the tools actually helped. Follower the instructions carefully and still ended up with a cracked screen. I wish I could go back in time and not doing any of this. I literally just cried and have no money for a new screen.
-
-
-
Drücke den iPod auf einen Tisch oder eine Bank.
-
Hebe den Saugheber an und ziehe diesen in Richtung oberes Ende des iPods. Sei geduldig und ziehe gleichmäßig fest, bis sich der Kleber löst und das Display sich von dem Gehäuse trennt.
-
Möglicherweise musst du erneut etwas Hitze verwenden, um den Kleber lösen (vor allem in kälteren Regionen). Wenn der Kleber wie Käsefäden von einer Pizza herunterhängt, kannst du ein dünnes Rasiermesser verwenden, um den Kleber abzutrennen.
Step 2.5: Recover iPod from far side of the room due to suction assisted throwing.
thanks, Apple
Did as shown, button switch works fine, when I reinstall button, it's like it won't touch the switch to engage.
What next?
I've got the same problem, managed to get the screen off, transferred the little steel plate to the new home button and put it in. The switch works fine when I press it with my finger, but it won't work with the home button??? - Did you manage to solve this problem?
Tom -
I've got the same problem. Been trying to find a solution for a few days now. Lots of people ask this question, but no one ever answers it. How did you solve it?
tirgang -
It sounds like you need to replace the home button dome switch rather than the actual home button. I'm currently searching for one myself. My customer jammed the home button and now it doesn't click. The dome switch is located on the home button ribbon cable and not on the home button.
The "home button" repair shows the physical button, but it's not actually the repair for the switch, which is what should be shown as the home button repair. The switch has a little black plastic tab that breaks off with excessive presses, and that's why the button plate cannot engage the switch when the screen is reinstalled. You will need to replace the switch, or modify it with something small enough to press the switch when the LCD is lowered.
Rene -
I also ran in to the Home button not working issue. I have not idea what changed with the button, but it would not work (from the outside) after the battery replacement & re-assembling. If you opened the iPod up, you could press the switch directly and it clicked & worked, but it seemed finicky. I ended up putting the tiniest dot of hot melt on the center of the switch (smaller than the switch 'dome', and thin too, maybe 0.6-0.7mm thick), re-assembled, and it works fine now.
Use the hair dryer or a heat gun to loosen the adhesive. This did not work with just a suction cup for me.
I also had to use a heat gun and the opening tool instead of just a suction cup to open the assembly. The rest of the guide worked really well!
When putting back together, make sure the display connector is in firm or you might get lines. And also, perform a hard reset - my power wasn't working, I took it apart and checked the power flex cable, but all it needed was a hard reset when put back together.
Suction cup and hair dryer method never worked for me. Even tried my heat gun. Finger went numb before I gave up. Used thin prying + suction cup and eventually opened it but screen cracked in the process when I was too aggressive opening it.
In hind-sight, it would have been very helpful to know that the adhesive is just in the 2 areas to either side of the home button, nothing along the edges.
Biggest complaint is the time wasted, should have just bought a replacement iPod, better return on my money/time.
The adhesive strips are only located to the left and right of the home button. Imagine two small squares of tape in each corner. Be careful heating. I used a heat gun on the lowest heat, but I think I may have overheated the area and damaged the digitizer on the bottom of the screen. I now have small green lines on that section of the screen. I too had to use a thin metal spudger to release the adhesive.
-
-
-
Fange oben rechts am Gerät an und setze dort ein Kunststoff-Öffnungswerkzeug in den Spalt zwischen Kunststoffrahmen und Aluminium-Rückgehäuse ein.
-
Schiebe das Werkzeug in diesem Spalt nach unten und löse den Rahmen vom Gehäuse.
Careful! This piece is super fragile. It really helps to understand the way the clips work. I struggled for 10 min with not a single un-clip, snapped the plastic frame in 2 places because I didn't understand the clips, and as soon as I figured out how they work the piece was off like a prom dress.
The clips are metal n shapes around the outside of the frame. They need to be pushed away from the center of the device to release the frame. You need to get something in between the plastic and clip to release, a guitar pick is probably too thick. A thin opening device would probably work but I used a razor blade. I'm not sure if these clips are on all of the newer Apple devices, but I've never encountered one before (usually work on android devices.)
I hope this helps prevent someone from having to replace the frame.
I wish I had read this comment before I broke my frame, hah! It made sense once I had the clips out, but while they were still in it was mystifying. Thankfully it won't be too big of a problem since all of the frame will still clip in, it just won't be connected.
-
-
-
Setze das Kunststoff-Öffnungswerkzeug zwischen dem Rahmen und dem Rückgehäuse hinter dem ersten Clip ein.
-
Bewege das Werkzeug hin und her, um den Spalt hinter dem Clip zu vergrößern und ihn vom Rückgehäuse abzulösen.
-
Das wird den Clip eventuell nicht gleich lösen, wiederhole daher diesen Vorgang mehrfach bei jedem Clip.
-
-
-
Wiederhole diese Vorgehensweise bei den beiden nächsten Clips auf dieser Seite.
-
-
-
Gehe nun zur linken Seite des Gerätes über und setze ein Kunststoff-Öffnungswerkzeug nahe an der Oberseite in den Spalt zwischen dem Kunststoffrahmen und dem Aluminium-Rückgehäuse
-
Schiebe das Werkzeug in diesem Spalt nach unten, um den Rahmen vom Gehäuse zu lösen.
-
-
-
Setze das Kunststoff-Öffnungswerkzeug zwischen dem Rahmen und dem Rückgehäuse hinter dem ersten Clip ein.
-
Bewege das Werkzeug hin und her, um den Spalt hinter dem Clip zu vergrößern und ihn vom Rückgehäuse abzulösen.
-
-
-
Wiederhole diese Vorgehensweise bei den beiden nächsten Clips auf dieser Seite.
-
Setze das Kunststoff-Öffnungswerkzeug zwischen dem Rahmen und dem Rückgehäuse hinter dem zweiten Clip ein.
-
Bewege das Werkzeug hin und her, um den Clip vom Rückgehäuse abzulösen.
Hello how are you? I don't know what happens when I go back and put everything I close and the home button doesn't work, I disarm it and check the flex and it works when I press it but with the home button it doesn't.
-
-
-
Benutze die gleiche Vorgehensweise und löse den letzten Clip, mit dem der Kunststoff-Rahmen am Rückgehäuse befestigt ist.
They have the exact same dimensions.
do you think if i use reolacement scren of itouch 5th gen to my itou h 6th gen this would work? i cant find screen for itouch 6th gen so im thnking to use the screen of 5th gen pls help me
-
-
-
-
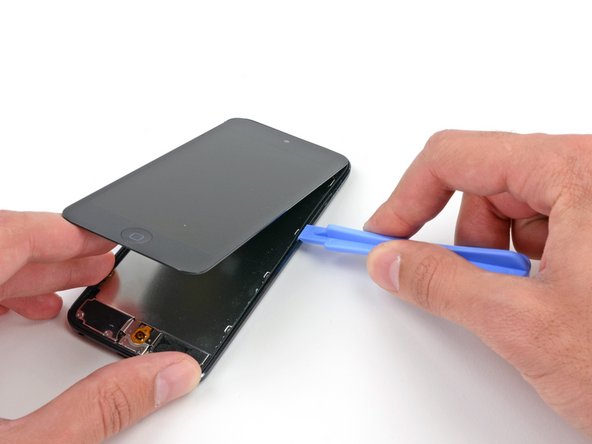
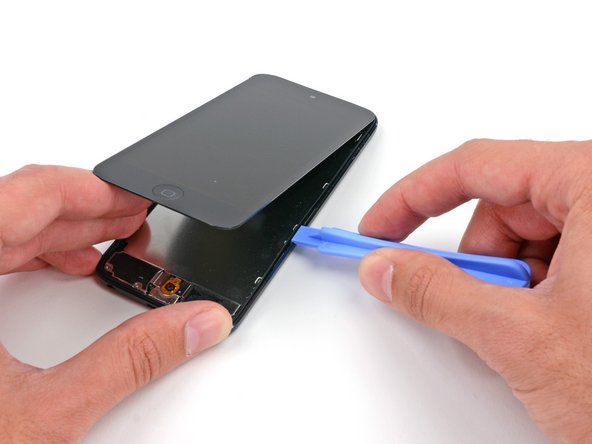
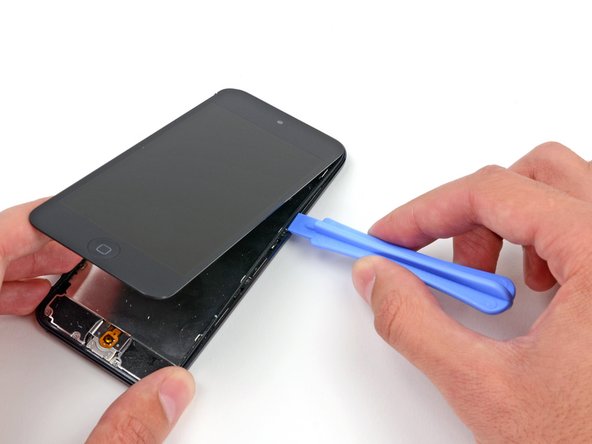
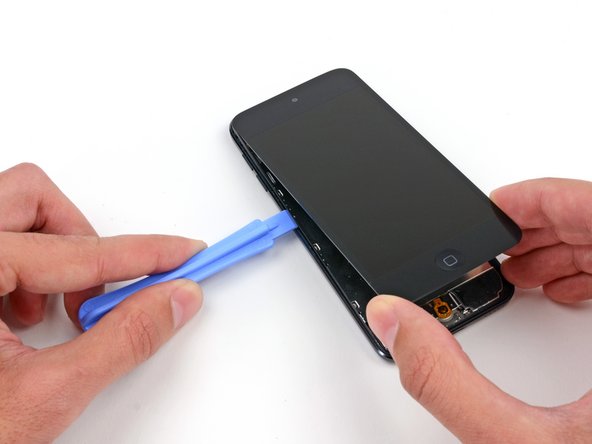
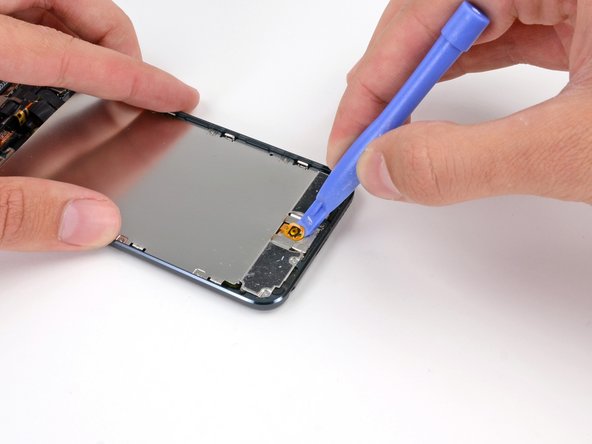
Setze das Kunststoff-Öffnungswerkzeug zwischen der Displayeinheit und dem Rückgehäuse nahe an der Oberseite des iPods ein.
-
Verdrehe das Öffnungswerkzeug leicht, um das Frontpanel vom Rückgehäuse abzuhebeln.
-
Löse die Displayeinheit vom iPod ab.
-
-
-
Wenn dein iPod eine schwarze Home Button Baugruppe hat, und nicht eine orangefarbene wie hier, kannst du diesen Schritt überspringen. Der Home Button ist nicht an der LCD-Platte befestigt und muss daher nicht entfernt werden, um diese Reparatur abzuschließen.
-
Benutze ein Kunststoff-Öffnungswerkzeug, um den Home Button Schalter von der LCD-Platte hochzuhebeln.
-
Eventuell musst du den Kleber auf der Rückseite des Home Buttons mithilfe eines Heißluftgebläses oder eines Föns etwas erwärmen, um ihn zu lösen. Benutze dazu immer die niedrigste Stufe.
If you have trouble lifting the home button switch up with the plastic opening tool, you can try using an opening pick instead.
Hi I just replaced my screen on my ipod touch 5th gen and i connect all the ribbon chords and every thing and when i connect one of the ribbons from the screen to the motherboard the motherboard starts to get hot! The screen isnt actually fully on, I wanted to make sure it turned on before I snapped it back in place. Any ideas? When I disconnect the ribbon the temp goes down. Screen is an OEM screen from Apple. I read somewhere, and i have personally have done it, that you can short the battery on the ipod touch 4th and it fixes it but im not sure on the 5th.
I have the same problem. I am going to change the battery. I let you to know if it solved the problem. Please let me know if you solve your problem. Thanks
Eddie, Did you ever fix this? I have exactly the same issue, Board gets hot and screen remains black. Although i did Hear Siri and iTunes recognises it.
You need to make sure that all the adhesive covers for the battery and the board are on so that it isn't shorting with the metal cover, this may fix some issues with the board / battery heating up a lot and display not working. I just put some electrical tape over the batter solder and screen cables so that it's all in place properly and no shorting of electric terminal points on the board.
Ben -
With some newer versions of the gen 6 iPod, it seems that removing the home button from its adhered position is not necessary. I removed mine and then realized that it was adhered to the metal of the dock, not the actual LCD shield. Just something to keep in mind, might save you some grief later if you have to re-adhere it.
-
-
-
Entferne die folgenden Schrauben, mit denen die LCD-Platte am Rückgehäuse befestigt ist:
-
Zwei 1,2 mm Kreuzschlitzschrauben #000
-
Neun 1,6 mm Kreuzschlitzschrauben #000
-
Eine 2,3 mm Kreuzschlitzschraube #000
-
-
-
Entferne die drei 1,6 mm Kreuzschlitzschrauben #000, mit denen das Logic Board am Rückgehäuse befestigt ist.
Hi, the MPN on that WiFi flex confirms this is not an iPod Touch 6th gen, it is 5th Gen. I am trying to source a 6th Gen WiFi Flex.
-
-
-
Der Akku ist mit zwei Klebestreifen befestigt.
-
Drehe den iPod um und erhitze die RÜCKSEITE des iPod Aluminiumgehäuses mit einem Fön oder einem Heißluftgebläse. Erhitze nicht den Akku.
-
Das Aluminium-Gehäuse muss nicht heiß werden, du solltest alle erwärmten Teile immer problemlos anfassen können.
Instead of a heat gun or hair dryer, I used a rice sock (http://www.wikihow.com/Make-a-Rice-Sock) to apply heat evenly across the entire back of the case while the case still sat upright for me to work on getting the battery loose. It was a lot easier than trying to heat the back of the case, then flip the case over and work feverishly before it cooled.
I'm sure this works, but it doesn't seem like the proper way to do this. I didn't like the feeling of prying on a flimsy battery at all. That's not practical. Instead get some molybdenum wire start it underneath the corners, then wrap the ends of the wire on like 2 pencils then tape them so u dont have to wrap the wire around your fingers because it will hurt lol. then apply heat, i went about 130 degrees is what my infrared gun said. I used a geat gun on low and a good distance away. Then just work the wire down the adhesive obviously lol. This worked out very easily for me and I felt safe and more confident about what I was doing. Good luck.
If you really don’t want to remove the battery, you may lift the mainboard slightly instead and disonnect display, back camera flexes and antenna connector. Then gently pull back camera module out of the seat. This gives you enough room to connect new display and back camera flexes. Back cam module would be hanging while you connect everything that got disconnected. Screw back the mainboard and push camera module to its seat.
-
-
-
Setze ein Kunststoff-Öffnungswerkzeug in die oberer rechte Kerbe und heble vorsichtig am Akku.
-
-
-
Mache an der unteren rechten Kerbe weiter. Setze das Kunststoff-Öffnungswerkzeug in die Kerbe und heble vorsichtig an der Seite des Akkus.
-
-
-
Sobald der ganze Kleber abgelöst ist, kannst du den Akku von der Unterkante her zur linken Seite hin aus dem Rückgehäuse heraus drehen.
-
Klappe den Akku um, damit sein Kabel flach liegt, und lege ihn ab.
-
-
-
Benutze das flache Ende eines Spudgers, um die Frontkamera aus ihrem Anschluss in der Displayeinheit zu klappen.
My camera ceased to work after this. Anybody have the same issue?
A reboot can sometimes work. Once the camera is seen not to be working (say it was connected after the device goes to sleep), the iPod gives up trying to show any live images from the either front or rear cameras
mark -
How do you replace the front facing camera
I have a similar issue, the rear camera doesn't work and the facing camera sometimes works but very slow...everything else works well.
Any ideas on how to fix this problem?
-
-
-
Ziehe das kleine Stück Klebeband, das eine kleine Schraube links von der Kopfhörerbuchse bedeckt, mit der Spitze eines Spudgers ab.
-
-
-
Entferne die folgenden Schrauben, mit denen die Kopfhörerbuchse, der Lightning Connector sowie der Lautsprecher befestigt sind:
-
Drei 2,6 mm Kreuzschlitzschrauben #000
-
Zwei 2 mm Kreuzschlitzschrauben #000
The screw on the right that goes into the headphone jack is a little reluctant to come out
-
-
-
Benutze das flache Ende eines Spudgers, um den Lautsprecher aus dem Rückgehäuse hochzuhebeln.
-
-
-
Fasse das große Flachbandkabel und ziehe die Lightning Connector Baugruppe vorsichtig unten aus dem Gehäuse heraus.
-
-
-
Klappe die gesamte Baugruppe um, sodass die Rückseite des Logic Boards nach oben zeigt.
-
Benutze ein Kunststoff-Öffnungswerkzeug, um das Touchscreen-Kabel vom Logic Board abzutrennen.
When reassembling, the digitizer and display cable connections very easily come loose. Make sure you press them in securely then I held down the logic board with my left hand while rescrewing it down one handed with my right hand otherwise they would disengage. Took several tries to get it right.
-
-
-
Benutze ein Kunststoff-Öffnungswerkzeug, um das Display-Kabel aus seinem Anschluss auf dem Logic Board abzutrennen.
-
-
-
Klappe den Lightning Connector/Logic Board Baugruppe wieder um, sodass die Vorderseite des Logic Boards nach oben zeigt.
-
Das Displaykabel ist leicht oben am Logic Board festgeklebt.
-
Löse das Displaykabel mit dem flachen Ende eines Spudgers vom Logic Board ab.
-


Um dein Gerät wieder zusammenzubauen, folge den Schritten dieser Anleitung in umgekehrter Reihenfolge.
Um dein Gerät wieder zusammenzubauen, folge den Schritten dieser Anleitung in umgekehrter Reihenfolge.
Rückgängig: Ich habe diese Anleitung nicht absolviert.
77 weitere Nutzer:innen haben diese Anleitung absolviert.
Besonderer Dank geht an diese Übersetzer:innen:
100%

Annika Faelker hilft uns, die Welt in Ordnung zu bringen! Wie kann ich mithelfen?
Hier starten ›

23 Kommentare
How on earth do you get a suction on the tape? Mine is in a million pieces. I can heat all I want, but if the suction cup won't stick, it doesn't do any good. I'm going into hour 2 now. =(
YEAH why is this here
How do u replace the battery!
Accidentally missed a step and ripped home button cable
Hello! I was reading about the iPod 5th gen LCD didn't have the exact same camera bezel as the 6th gen.1or something like that? But then the LCD is compatible though?
So what s that then? Like if I use LCD from 5th generation model to replace 6th generation LCD, would it mean that the camera won't function afterwards or something like that?? OR......??
first - it's ipod touch 5 not 6. neralythe same except you don't have undo home button flex.
second - whole guide is misleading - why on earth you'd remove battery and charging port??? undo three screws on logicboard, pull out rear camera and lift the logicboard up - you can reach connectors to connect new screen back. sometimes antenna connector comes off but then you just plug that back on. I've done ipods 5 and 6 w/o removing battery and port and everything.
Can you use a 5th gen wifi antenna on a 6th gen?
can i replace an ipod touch 6th display with an ipod touch 5th gen?
Tried to pry the home button up like directed and broke the home button. Thanks a lot for putting ipod touch 5th gen photos and directions on ipod 6th gen thread. 6th gen doesn’t require you to move the button and btw if you break the button on the cable you have to have it saudered to replace…. This is the first time I have been let down here and the last time I will believe what is said here at ifixit without checking other sources… Wish me luck in figuring out what to do next :|
Nice guide!! One of the most through I’ve seen!!! Kudos!! :-)
This guide is not correct for an iPod Touch 6th Generation. This guide shows an iPod Touch 5th Generation in all the steps, which is misleading for someone trying to fix their screen. The insides of these two iPod look nothing alike and there are steps in this guide that shouldn’t be there because it is either extra work that isn’t needed, or the entire step is completely wrong. For example, the home button step says to take the connector off, but when I did this, it turned out to be unnecessary and i ended up breaking the metal connector off and now the home button no longer works. Be careful if you follow this guide!
This is an exact copy of the iPod 5th gen display replacement guide not a 6th gen
Even though this guide is for the 5th gen I was able to get through the repair with minimal fuss.
Any one have details on how to apply the adhesive gasket that comes with the new touch screen? It seems really big and it’s not clear where it should go. Got through the repair and everything seems to work ok. Also replaced the battery while I was at it. Used a 25 watt iron and cooled the tip with a damp cloth to avoid over heating the delicate pads. All is well except for my adhesive confusion.
Thanks a million,
Dave Campbell
So I finished replacing my display screen but I am having trouble with it attaching to the case with out popping out and I don’t know if it is because I need to replace the lcd plate or do I need some sort of adhesive to secure the display screen to the iPod.
Any guidance would be helpful. Thanks.
Lots of good questions here: Has anyone answered your questions? You all are brave. I got glass replacement kit and now I’m scared to try it!
Followed this guide to change the battery. Had to desolder old one and resolder new one. Extremely difficult. Must have bent the screen too much during opening because it would not register touch after, so had to order new screen and follow this guide again to install. Also several frozen or stripped screws to deal with. Cable connections to logic board come loose very easily when putting back together. Took several tries reassembling. Had to hold logic board down while replacing screws to keep connections. Almost gave up but finally got everything back together and working.
I skipped a few of the steps (24 to 29) but did need to get the battery removed.
Any repair guides for front camera?
ipod touch 5th generation front camera freezes then returns to rear camera. This happened after replacing battery. Any ideas? Tried hard reset & restoring. Nothing worked.
Libby - Antwort