Zum Hauptinhalt wechseln
Gemeinsam reparieren - Jetzt registrieren

the Nikon Coolpix 4600 AV port Replacement

Was du brauchst

  1. the Nikon Coolpix 4600 AV port Replacement, Front and Rear Case: Schritt 1, Bild 1 von 2 the Nikon Coolpix 4600 AV port Replacement, Front and Rear Case: Schritt 1, Bild 2 von 2
    • Locate the six screws on the exterior of the camera. There will be two 3.3 mm screws on the bottom and two 5.25 mm screws either side.

    • Using a Phillips 00 screwdriver, remove all of the six screws.

    Frag FixBot

    Kommentar hinzufügen

  2. the Nikon Coolpix 4600 AV port Replacement: Schritt 2, Bild 1 von 2 the Nikon Coolpix 4600 AV port Replacement: Schritt 2, Bild 2 von 2
    • Gently separate the front and back casing by prying the two sides open with your hands. DO NOT separate them fully, as it could damage internal components.

    • The front case is attached to internal components and cannot be removed independently

    Frag FixBot

    Kommentar hinzufügen

  3. the Nikon Coolpix 4600 AV port Replacement: Schritt 3, Bild 1 von 1
    • Examine the connection between the ribbon cable and the motherboard closely. Identify the two grey tabs on each side of the connecting bracket.

    • Slide the grey tabs toward the bottom of the camera to release the ribbon cable. Gently disconnect the ribbon cable from the motherboard.

    • Once the ribbon cable is disconnected, you can now carefully separate the back case from the front case.

    Frag FixBot

    Kommentar hinzufügen

  4. the Nikon Coolpix 4600 AV port Replacement, LCD screen: Schritt 4, Bild 1 von 1
    • With the lens facing down and the bottom of the camera facing away from you, lift up the right edge of the LCD screen (left side of the screen will be glued down).

    • Be careful not to push the front case too hard on the table when taking the LCD out or the lens will get stuck.

    • Insert plastic tool under the screen and gently pry up the left side of the screen until the glue seal is broken.

    Frag FixBot

    Kommentar hinzufügen

  5. the Nikon Coolpix 4600 AV port Replacement: Schritt 5, Bild 1 von 1
    • Locate the orange ribbon cable and two wires (red and white) attached to the motherboard.

    • Lift up on the black clamp and pull out data cable.

    • Desolder the wires from motherboard. CAUTION: Improper desoldering can result in motherboard damage. Seek help if you do not have the necessary skills.

    • The screen should now be completely free from the camera.

    Frag FixBot

    Kommentar hinzufügen

  6. the Nikon Coolpix 4600 AV port Replacement, Motherboard: Schritt 6, Bild 1 von 1
    • Locate and remove the four 4.25 mm screws on the motherboard using a Phillips 00 screw driver.

    Frag FixBot

    Kommentar hinzufügen

  7. the Nikon Coolpix 4600 AV port Replacement: Schritt 7, Bild 1 von 1
    • Remove the ribbon cable on the top right of the motherboard. To remove the cable, slide the two grey tabs, located on both sides, towards the top of the camera and gently pull the cable out.

    Frag FixBot

    Kommentar hinzufügen

  8. the Nikon Coolpix 4600 AV port Replacement: Schritt 8, Bild 1 von 1
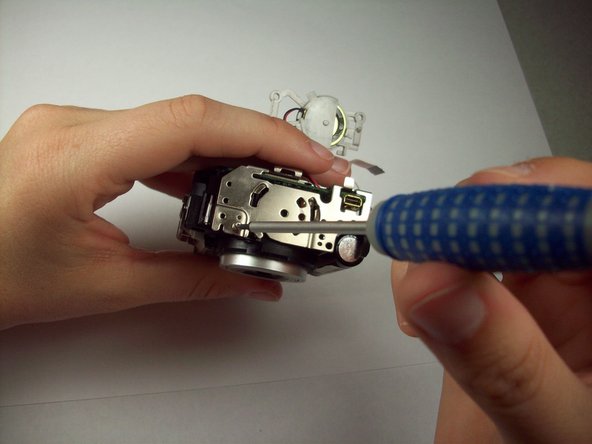
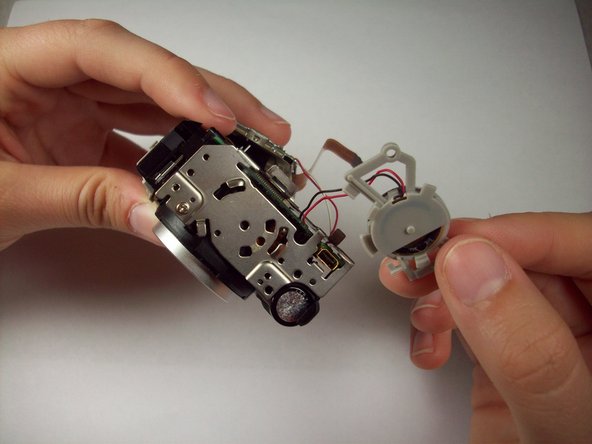
    • Turning the camera to the left and tilting it up, look at the left end of the motherboard to locate the grey bracket.

    • Twist the grey bracket counter clockwise to remove it from the silver LCD bracket.

    Frag FixBot

    Kommentar hinzufügen

  9. the Nikon Coolpix 4600 AV port Replacement: Schritt 9, Bild 1 von 2 the Nikon Coolpix 4600 AV port Replacement: Schritt 9, Bild 2 von 2
    • Using a Phillips 00 screwdriver, remove the 4.25 mm screw on bottom left edge of the LCD bracket.

    • Lift off the LCD bracket and slip the grey bracket through the LCD bracket. The LCD bracket should now be completely removed.

    Frag FixBot

    Kommentar hinzufügen

  10. the Nikon Coolpix 4600 AV port Replacement: Schritt 10, Bild 1 von 2 the Nikon Coolpix 4600 AV port Replacement: Schritt 10, Bild 2 von 2
    • Desolder the wire (both black and red) from the motherboard.

    • Remove the orange ribbon cable. This is done by sliding each side of the lock bar toward the center of the camera. Gently pull on the ribbon cable to remove.

    Frag FixBot

    Kommentar hinzufügen

  11. the Nikon Coolpix 4600 AV port Replacement: Schritt 11, Bild 1 von 2 the Nikon Coolpix 4600 AV port Replacement: Schritt 11, Bild 2 von 2
    • Gently peel back the black tape on the bottom, middle of the motherboard. Underneath you will find a screw.

    • Remove the 4.25 mm screw with a Phillips 00 screwdriver.

    Frag FixBot

    Kommentar hinzufügen

  12. the Nikon Coolpix 4600 AV port Replacement: Schritt 12, Bild 1 von 1
    • Gently pull the motherboard away from the lens.

    • Flip the camera over.

    • Connecting the motherboard to the front case are seven wires.

    • Desolder the seven wires.

    • If you are only removing the motherboard as an intermediate step to get to other components, do not desolder yet, as not all wires need to be removed.

    • Be careful when desoldering the wires. If you do not know how to properly desolder a wire, seek help to prevent damage to the motherboard. Also, make sure the soldering crunches don't fall into the lens case.

    Frag FixBot

    Kommentar hinzufügen

  13. the Nikon Coolpix 4600 AV port Replacement, AV port: Schritt 13, Bild 1 von 1
    • The AV port is soldered directly onto the back of the motherboard

    • Desolder the connection at each corner of the AV port and remove. If you do not know how to solder, seek help to prevent damage to your camera.

    Frag FixBot

    Kommentar hinzufügen

Abschluss

To reassemble your device, follow these instructions in reverse order.

Rückgängig: Ich habe diese Anleitung nicht absolviert.

Eine weitere Person hat diese Anleitung absolviert.

Team

Cal Poly, Team 9-43, Regan Spring 2012 Mitglied von Cal Poly, Team 9-43, Regan Spring 2012

CPSU-REGAN-S12S9G43

5 Mitglieder

12 Anleitungen geschrieben

0 Kommentare zur Anleitung

Kommentar hinzufügen

Seitenaufrufe:

Letzte 24 Stunden: 1

Letzte 7 Tage: 11

Letzte 30 Tage: 62

Insgesamt: 1,640