Zum Hauptinhalt wechseln

Repair guides and disassembly information for Anker's 2-port PowerDrive car charger.

1 Fragen Alle anzeigen

Reversely connect and didn't work after that

I mistakenly while I was fixing the charger house in the car, I connected Anker power drive+2 reversely then I recognized that the connection is wrong .

I have corrected it but after that Anker power drive+2 did not work.

Any one can tell me how can I repair it, Please

Block Image

Update (06/12/2019)

Hi Jafeff,

Thank you for reply and help

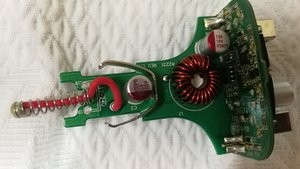
I am attaching here a pictures of the charger and hope if anyone can help.

Block Image

Block Image

Block Image

Block Image

Beantwortet! Antwort anzeigen Ich habe das gleiche Problem

Ist dies eine gute Frage?

Bewertung 0
Einen Kommentar hinzufügen

1 Antwort

Gewählte Lösung

Hi @mnaqil ,

reversing the polarity of the supply would have possibly damaged (destroyed) some components on the circuit board

Post some close up pictures of the circuit board from the device back here and maybe someone can spot the problem.

If not you'll need to trace the circuit from the input through the components using an Ohmmeter etc to determine which component (or components) are faulty.

Hopefully it will be something obvious.

War diese Antwort hilfreich?

Bewertung 4

5 Kommentare:

Hi @mnaqil ,

Use an Ohmmeter and check if component F1 is OK and has not blown. It is a bit hard to tell from the picture.

Usually F is the designation for a Fuse.

Also check that D1 (diode) is OK and not open circuit. Diodes normally test low resistance in one direction when using an Ohmmeter and high resistance in the other direction when reversing the Ohmmeter's test leads across the component.

von

Hi @jayeff

Thank you for your answer.

I have checked the fuse F1, it's burned. For the diode D1, it's working normal as you said, from one side it's value was 0.7 KOhm and on reverse it gives 23 MOhm.

Is there any suggestions for fuse replacement as there's no information written on it? What if I bypass it?

Regards

von

Hi @mnaqil ,

Bypassing the fuse will expose the rest of the device to more damage if there are further problems on the board.

Measure across the input to the device with an Ohmmeter (with the fuse bypassed - shorted out) and check that you don't read a short circuit as this will blow the new fuse immediately.

If you read open circuit then another component has burned out and you will have to do point to point testing with the Ohmmeter until you find out where the open circuit is

The specs state that it has 2 outputs of 1.5A each so therefore the fuse has to be able to carry at least 3A with an input supply voltage of 12V.

I suggest that you look for a supplier of this fuse.

0438003.WRA - FUSE, AEC-Q200, FAST ACTING, 3A, 0603

Not sure if it will physically fit as I don't know the spacing between the F1 solder pads on the board.

You can check on the datasheet (scroll down to dimensions) to see if it will fit.

If it is suitable get 2 or 3 ;-)

von

Hi @jayeff

I have replaced the fuse and now it's working properly.

THANKS ALLOT

Regards

von

Hi @mnaqil ,

Good news.

Thanks for the feedback.

Cheers

von

Einen Kommentar hinzufügen

Antwort hinzufügen

Akil wird auf ewig dankbar sein.
Seitenaufrufe:

Letzte 24 Stunden: 0

Letzte 7 Tage: 1

Letzte 30 Tage: 2

Insgesamt: 296