Zum Hauptinhalt wechseln

Lenovo Ideapad 320-15ABR Fan Replacement

Was du brauchst

  1. Lenovo Ideapad 320-15ABR Fan Replacement, Back Panel: Schritt 1, Bild 1 von 1
    • Before you proceed, make sure your computer is turned off and is not connected to any power source.

    • Remove the single 7 mm Phillips #1 screw securing the optical drive.

    • Be sure to store the screws carefully as they are easy to lose. A magnetic project mat is recommended

  2. Lenovo Ideapad 320-15ABR Fan Replacement: Schritt 2, Bild 1 von 3 Lenovo Ideapad 320-15ABR Fan Replacement: Schritt 2, Bild 2 von 3 Lenovo Ideapad 320-15ABR Fan Replacement: Schritt 2, Bild 3 von 3
    • Carefully remove the optical drive bracket by pulling the bezel away from the laptop.

  3. Lenovo Ideapad 320-15ABR Fan Replacement: Schritt 3, Bild 1 von 2 Lenovo Ideapad 320-15ABR Fan Replacement: Schritt 3, Bild 2 von 2
    • Using the Phillips #1 screwdriver, remove the twelve screws around the back panel from the laptop.

  4. Lenovo Ideapad 320-15ABR Fan Replacement: Schritt 4, Bild 1 von 3 Lenovo Ideapad 320-15ABR Fan Replacement: Schritt 4, Bild 2 von 3 Lenovo Ideapad 320-15ABR Fan Replacement: Schritt 4, Bild 3 von 3
    • Use an opening tool to pry out the back cover.

  5. Lenovo Ideapad 320-15ABR Fan Replacement: Schritt 5, Bild 1 von 3 Lenovo Ideapad 320-15ABR Fan Replacement: Schritt 5, Bild 2 von 3 Lenovo Ideapad 320-15ABR Fan Replacement: Schritt 5, Bild 3 von 3
    • Remove the back panel by pulling it up and away from the laptop.

  6. Lenovo Ideapad 320-15ABR Fan Replacement, Battery: Schritt 6, Bild 1 von 1
    • Remove the four 6mm screws using the Phillips #1 screwdriver.

  7. Lenovo Ideapad 320-15ABR Fan Replacement: Schritt 7, Bild 1 von 2 Lenovo Ideapad 320-15ABR Fan Replacement: Schritt 7, Bild 2 von 2
    • Disconnect the battery connector by pulling toward the battery parallel to the motherboard.

  8. Lenovo Ideapad 320-15ABR Fan Replacement: Schritt 8, Bild 1 von 1
    • Remove the battery.

  9. Lenovo Ideapad 320-15ABR Fan Replacement, Fan: Schritt 9, Bild 1 von 2 Lenovo Ideapad 320-15ABR Fan Replacement, Fan: Schritt 9, Bild 2 von 2
    • Disconnect black and grey wires by simply giving them a light tug.

  10. Lenovo Ideapad 320-15ABR Fan Replacement: Schritt 10, Bild 1 von 1
    • Remove the 6mm Phillips #1 screw connecting the fan to the laptop.

  11. Lenovo Ideapad 320-15ABR Fan Replacement: Schritt 11, Bild 1 von 3 Lenovo Ideapad 320-15ABR Fan Replacement: Schritt 11, Bild 2 von 3 Lenovo Ideapad 320-15ABR Fan Replacement: Schritt 11, Bild 3 von 3
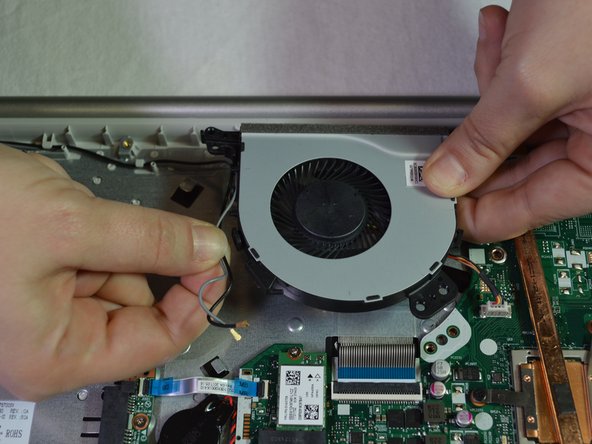
    • Lift the fan slightly and straight upward and unwind the black and grey wires from the fan.

  12. Lenovo Ideapad 320-15ABR Fan Replacement: Schritt 12, Bild 1 von 1
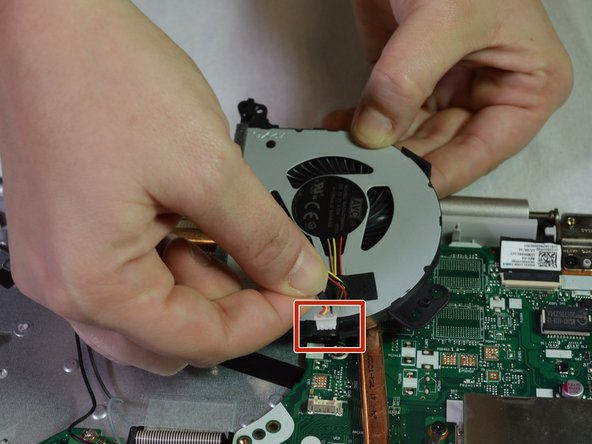
    • Identify the red, black, yellow, and brown wire coming from the back of the fan connecting to the motherboard with a white connector piece.

  13. Lenovo Ideapad 320-15ABR Fan Replacement: Schritt 13, Bild 1 von 2 Lenovo Ideapad 320-15ABR Fan Replacement: Schritt 13, Bild 2 von 2
    • Slowly pull and wiggle the white connector piece until it comes loose from the laptop.

  14. Lenovo Ideapad 320-15ABR Fan Replacement: Schritt 14, Bild 1 von 1
    • Replace the new fan.

Abschluss

To reassemble your device, follow these instructions in reverse order.

Ein:e weitere:r Nutzer:in hat diese Anleitung absolviert.

0 Kommentare

Kommentar hinzufügen

Seitenaufrufe:

Letzte 24 Stunden: 3

Letzte 7 Tage: 17

Letzte 30 Tage: 56

Insgesamt: 5,065