

Taking apart a device for the first time is frightening. Even with one of our handy repair guides available, you might feel like you’re going to break something, it will be your fault, and only experts should do this kind of thing.
We, the fixers at iFixit, want you to know that we have done everything wrong you can imagine doing wrong. We have fallen prey to weird designs, uncertain hand movements, and forgetfulness. We have killed devices. We, too, have biffed it.
But you can learn from us. Specifically, a combined list of the most common things most people do wrong, and which members of our repair community get hung up on. Keep this post bookmarked before your next electronic repair project, and enjoy the wonderful gift of lots and lots of hindsight.
Lose Patience While Heating Up Glue

There is a lot of glue inside modern devices. It’s largely what makes them waterproof. That glue is also strong. Using the iOpener is the safest way to apply even, steady heat to your device without damaging components, like you might with a heat gun. But it often takes multiple applications, even after you get that first pick underneath the glass. Trying to use force to get a screen, battery, glass back, or other piece out while the glue is still cool is a quick path to broken glass, bent parts, or other critical failures.

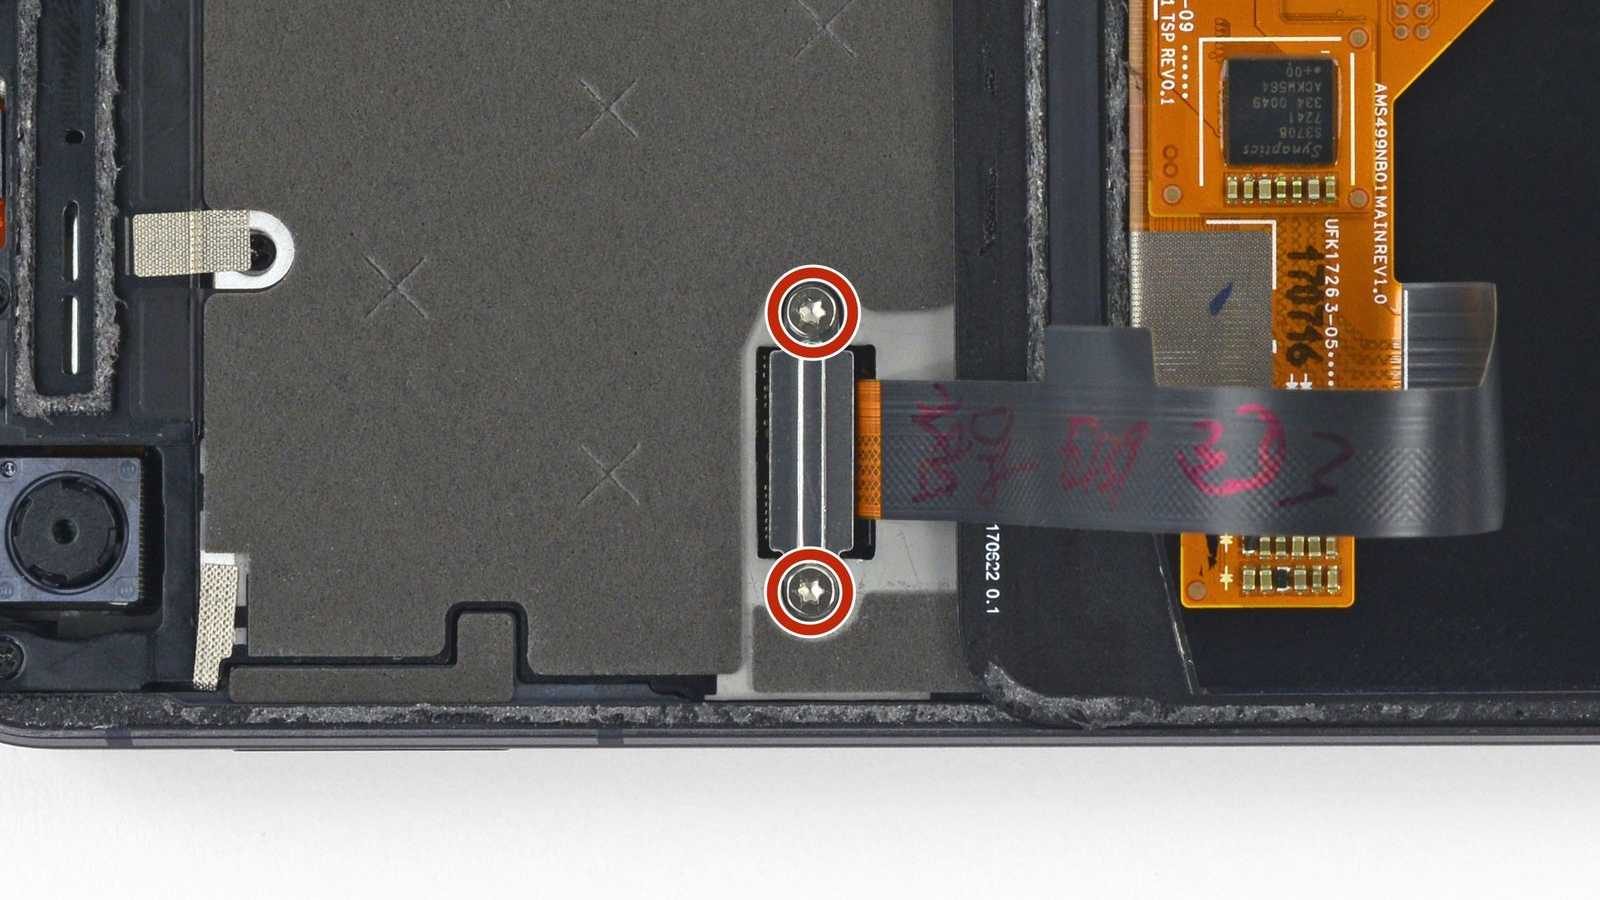
On that note: some devices keep very important components right near the edge of the screen—like the Pixel 2’s OLED display and front-facing camera. It’s not great design, but it’s also why bezels are not always a bad thing—they help hide pieces further in. Always consider where you’re going to make your first insertion into a glued-on screen, and always err on the side of a shallower cut-in.
Lose Track of Screw Sizes (or Just Lose Them)

There are two big mistakes you can make when you start removing screws:
- Assuming that the screws will stay in place on a nearby flat surface
- Assuming that there are only a couple lengths or widths of screws in the device, and that you’ll be able to remember them all.
These mistakes play nicely off one another. You might put all your screws in a little jar, but later find out that your laptop’s case uses three different sizes.. Or you might try separating them on the table, only for a breeze, footsteps, or your clumsy forearm to undo it all. It’s not just a pain to find the little buggers in carpet or behind furniture—the wrong screw into the wrong hole can puncture a component just below where the screw is supposed to reach.
Keep track of exactly which screw came from which hole on your device. Take pictures. Use the diagrams on our repair guides. Keep different screws in different, small containers. An empty egg carton works in a pinch, but we also sell a magnetic screw mat on which you can label, stick, and separate all your little parts.

Pull Open a Device and Snap a Cable
Getting a device to open after multiple, patient applications of heat and gentle prying feels great. Once the glue starts to give, it’s a deep instinct to reach into your leverage point and pull a screen or panel completely off. Do not ever do this. There is always something that connects the display to the main board, especially on phones and tablets.
When you gain the advantage over a screen or panel, always move it a small amount at first, checking underneath to see what cables are connected to it. When it comes time to disconnect that cable, don’t just yank it out. There are many kinds of cable connectors and ways to disconnect them, and patience is worth a lot when you’re wondering why one is so stubborn.
Forget One Last Screw Before Yanking Something Out

Why won’t this thing just come out? Possibly because the universe is cruel, but more practically, there is one last thing keeping it in place. Often it’s a screw that’s hidden under a sticker. Sometimes it’s a screw that has a different color or head shape than the other screws you’ve removed thus far. Or, sometimes, you’re just in a rush. But if you’re trying to extract something and it feels like one part of it just won’t move, pull back and take another look.
A special shout-out to the ribbon cables or thin cables you might leave trapped underneath the item you’re replacing in a device, making you unscrew everything again to free them after you realize it.
Use Wrong Bits or Overzealous Screwdriver Tactics

Not everybody gets a tutorial in screwdriver use when they’re young—I know I didn’t. But you can generally put screws in and get them out, so you forge ahead, stripping a few along the way. This might not burn you much when it comes to cheap shelving, but ruining a tiny screw inside a phone or laptop is demotivating, and a punishment to the next person working with the device…which still might be you.
Use the right screw tip for the right kind of screw, make sure the driver fills up the screw head, keep continuous downward pressure on the screw, and follow other screwdriver best practices. Start with a beginner’s mind and follow the steps closely the next time you’re working on a repair, and you might just get a new lease on your screwdriver prowess.

Damage Tiny Components with Clumsy Prying

Our repair guide team has been putting more warnings into their guides lately, whenever a guide calls for prying a component up from a device. Tiny devices fit their necessary components everywhere. All it takes is a little force to slip off a clip or battery compartment and onto a tiny little module, and now your DIY repair is not something you can do yourself.
Go slowly, always back off and look at something if you’re applying pressure and it’s not working, and check if there isn’t a clip, cable, screw, or something else preventing you from getting your object lose.
Fail to Disconnect the Battery as Soon as Possible

This one’s pretty short and simple, but often overlooked. So much so that I, a person who has seen this step in dozens of teardowns, forgot to do it on my last repair and killed a beloved laptop.
We include this instruction in every repair guide for a device with a battery for a reason. You just don’t know where charge can build up or come through. Your tools may be ESD-safe (at least if they’re iFixit tools!), but your fingers are not. Connecting components while the battery is active can cause shorts and sparks (which, in particular, I can verify). Don’t take the risk.
Remove the SIM Tray Before Trying to Remove Boards
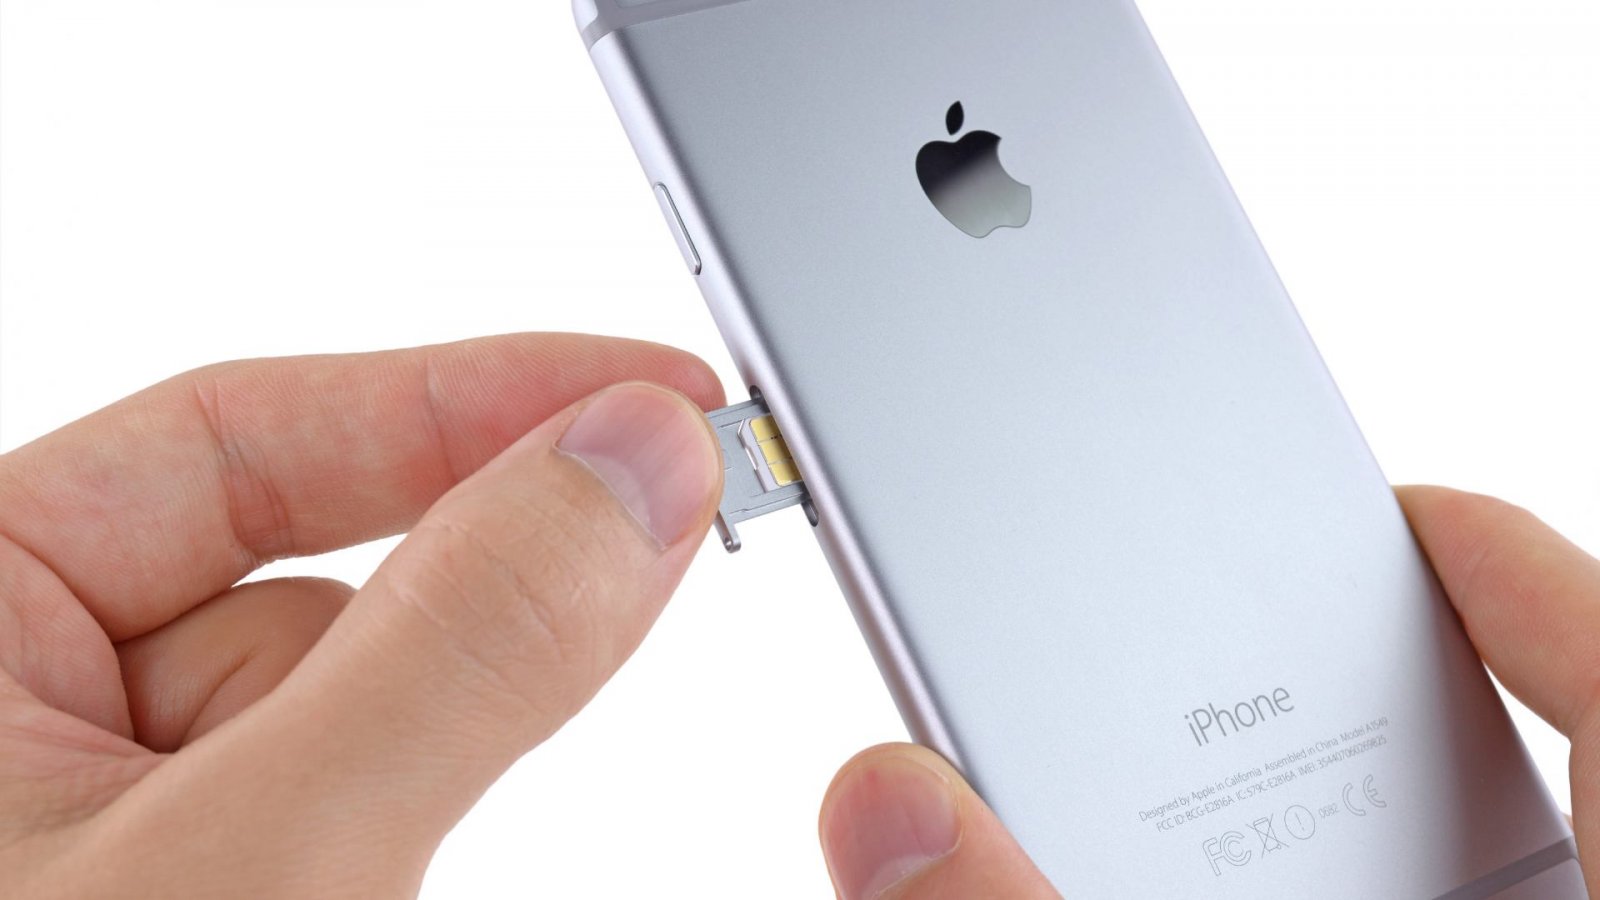
This one comes from iPhones, but applies to other phones, too: the slide-out tray where the phone stores a SIM card goes deep into the phone, and it’s usually made of metal. At least two different iFixit teardown engineers told me that despite writing it into guides themselves, they often forget about it, until they’re wondering what’s keeping the motherboard from coming out smoothly.
Don’t Give Yourself Enough Time to Do the Job
If there was one repair tip every iFixit engineer agreed on, it was this one. For many reasons, you should set aside enough time, probably a bit more than you can estimate, to do the job and clean it up.
Not having enough time can make you do a lot of bad things you wouldn’t normally do:
- Forge ahead with the wrong screwdriver, stripping screws
- Prying at plastic parts with metal tools or knives
- Leave cables disconnected or improperly inserted
- Forget where things go when you come back to the job later
- Leave the device open and allow dirt or liquids a much better chance of getting inside
- Putting it down for later and never getting back to it.
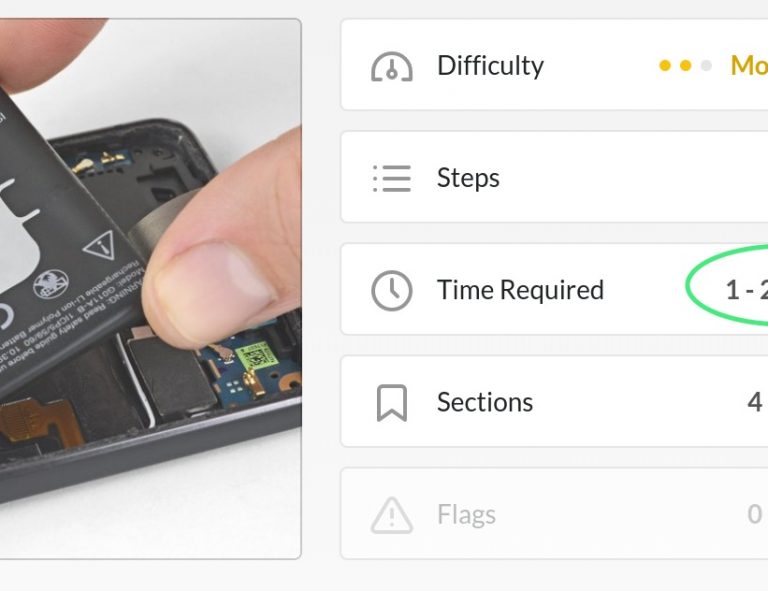
This is not a job you can get done in the 20 minutes before work. Look at the time estimate in our guides, give yourself a little extra, and wait until you have time to really dig in.
Lack Confidence In Yourself
Sure, we list everything that can go wrong, even when you’re an experienced device tinkerer, and then we tell you to get confident?
But you really do have this. If your device is malfunctioning because it needs a new part, there is not much to lose. You can learn a lot by opening up a device and seeing how, even at their most complicated, these things are just parts, cobbled together and sealed away.
Most gadget makers go out of their way these days to make their devices look like something you should never open. Blazing past this assumption is fun, empowering, and something most people can do.


38 Kommentare
“ad for magnet mat”
Corey Peek - Antwort
Perhaps, but I read a lot and I don’t often read things this well written. I have also learned to get over myself. If I see an ad in context I no longer think “ad for magnet mat”, I think; “God, how many times would that have save me, I have 20 bucks for something I will have for the rest of my life”. I am forwarding this to my two, 17 year old boys (only one of which will look at it). I happened on these FixIt people when they were still try to sell paper manuals so admittedly I am biased towards what they are doing.
Richard Bradley Smith -
I did my MBP display a couple weeks ago.
Not sure how but I lost one of the antenna bar screws, no idea where it went.
I also gained 4 other screws which I have no idea where they came from.
Took it apart again 3 times trying to figure it out.
Still none the wiser, however it does work ok.
Robin Bonathan - Antwort
Hehe, I know what you mean. That’s exactly what happened the first time I replaced the display on my Thinkpad years ago. Still runs the library system at my daughter’s primary school. So kind of well done, I guess.
Thorsten Dettmann -
I always put some little tray or cardboard covered with a stripe of double-sided adhesive tape on my repair desk and put the screws head down on the sticky tape in the same order of the repair guides steps. Never missed a screw so far…
Trainer - Antwort
Great idea. It’s always nice to use what you have available to achieve the same thing as something that can be purchased.
andrew074 -
The two side tape is a very helpful idea for techs, especially those just starting out. This is a good site for information and building a community sense of working together.
wynnefield smith -
My method : I take a sheet of paper and draw a quick line picture of the device with identifiable orientation. I circles the screws and label them with the step number and screw type from the tutorial. A drawing may cover a few of steps. Next to each label, pretty much like a legend I tape the screws removed in that step with clear tape. I used to punch the paper with the screw but lost a few like that so not any more. the magnetic mat seems a good option that would match my ways. I guess I’d try to find a sheet of fridge magnet for a fraction of the price though and tape some paper on top.
Clément Marshall - Antwort
All good advice. Magnetic sheet for vehicle signage already has a white vinyl side suitable for dry erase marking.
I use the orientation method for screws as many here do. Also, you can Never have too many pliers, screwdrivers, forceps, etc.
I started taking stuff apart age 5 (much to the parents dismay). Now 61 years later I’m not bad at it, but a solid understanding of what’s too much is one thing experience hones.
Kevin Sargent - Antwort
Trust your instincts on when to abort a repair that isn’t going well. So never go beyond that “point of no return.” You know what I’m talking about.
Breadman - Antwort
The big one I learn recently is to take the battery out of the laptop and leave it on the shelf for a couple of months and it may reset itself. I have a 2 year old Dell that I really liked running dual boot W7/10, but primary Ubuntu. When it died I read everything and tried everything (I am a machine level programmer by trade) to get it to boot anything. At the end of last year I decided to fix it or chuck it. On power up Windows recovered itself (more or less, but who cares?) and it has been my primary Linux laptop ever since.
Richard Bradley Smith - Antwort
I read ifixit from curiosity and in case I need help. Here’s a situation you too can avoid: I have a couple MBP, 2010 model. One I keep as a spare in a drawer. Don’t use it often but recently fired it up just to check it. Bad sign: Trackpad was jammed. Worse - a bulge over the battery. Taking the bottom off the screws popped off as the battery had just short of exploded from blowing out its case. Why? It was the original battery, still worked fine. After googling, found that leaving a battery to go into deep discharge is a leading cause of battery gassing and swelling. Fortunately the Mac case, hogged out of solid aluminum, pretty much popped back into shape, and there was no other damage. Ergo, as was mentioned, to store the laptop for a long period, either regularly recharge the battery or take it out! Taking the battery out is simple with tools and instructions from ifixit.
Why hangon on to a 2010 laptop? See the next post - out of space here. Bruce
Bruce Rayner - Antwort
Post #2: If you like to be able to run your old software on your MBP, the best model you can own is the MBP, late 2010. That is also one of the last models you can get with matte screen. (Don’t how you people use the new shiny screens). If you replace the HD with a new 1TB SSD, you have a really fast laptop! That model was the last to ship with OSX 6 proms, and with the Rosetta app, it wil run anything back to OSX 3 or 1, and up to OSX 12. How’s that for non-obsolescence? Oh, on the battery swelling from the last post - wish I could post a pix of what the battery looks like! Note that Apple still is having issues with battery swelling. It’s called lithium. Same as back in 2010. But, Apple encloses the cells in a very strong, sealed flexible bag that keeps it from leaking in a case like gassing due to deep discharge. Thus, no damage to the mother board. In replacing the battery with a 3rd party part, be careful. the cells may not be sealed. Don’t know. Bruce
Bruce Rayner - Antwort
To add to your list: working on a messy setup. A clean large table to allow you to spread the parts and still keep a good clean working area is fundamental to me.
Igor Antunes - Antwort
I often take a pic b4 I take apart anything and I make a list of the steps I took to accomplish the goal of the moment… this has proved very helpful several times. If magnetism does not affect the task in question, I sometimes use a small magnetic cup for the screws and such that are removed. This is also a very good idea, at my step father’s suggestion. Egg crates work fabulously. One is glued to my work bench just for the purpose of keeping track of small items during a repair. I can fix ANYTHING!
K. D Winter
winter - Antwort
Years ago, our local Marc’s store had small stainless steel containers designed to hold condiment portions that included plastic snap on lids. I purchased dozens. I use them to separate each step of the disassembly and reassembly process for whichever repair I am doing and label each lid with the step in the process. This has proven to be foolproof to keep from mixing up screws or fasteners up and ending up with a handful of extra fasteners or using the wrong one damaging other parts in the process.
Henry Toughguyy - Antwort
Look for ways to just loosen things to replace parts instead of removing parts that are in the way. For example on IMacs, the guide calls for removing the system board (mother board) in order to change memory or for other repairs. This means dealing with several fragile cable disconnects including the very fragile antenna wires that seem to break if breathed upon too hard! Instead loosen all the system board screws and with a small probe mirror available at most auto parts places, release the memory clips and then insert the new ones. I used one of the many common alligator clips soldered to a thich metal wire to hold the memory chips. I bent the wire to the angle required and lined each one up for insertion easily.
Then i pushed them in the final millimeter with my fingers. I insulated the alligator clip jaws with thick cardboard to protect the ic’s plus selecting a blank area on the circuit card.
The guides also say remove power board to replace the drive. Just loosen the board!
Ross
Ross Elkins - Antwort
ok, what I do is print out the pdf. As I take apart the device I label the pdf with a letter of a particular screw or screws of the same ilk. Then shift the screw or screws to an ice cube tray that has the alphabet written on each cube section (or the magnetic mat that ifixit sells -I have both). So screws marked”A” goes into the cube section marked “A” and so on. easy. And I never screw (pun intended) up when I reassemble.
Paolo Alberto - Antwort
@ Bruce Raynor: ditto here on the MBP 2010. i7 2.66 2 core, 1TB SSD, maxed RAM at 8GB. I use it mostly to feed the iTunes monster, so the built in CD/DVD drive is way more than worth the weight and extra thickness. I think it will run 10.13 which I will update to once 10.15 is out to keep up with security updates. Only limitation for higher end graphics/video work is the 8GB RAM. 16 would be nice but no can do. Thanks for the battery tip. This MBP is in daily use but I have older stored laptops that I will check.
John Oldham - Antwort
Getting enough magnification, and enough light into the right places to really study the parts I’m trying to dislodge are two of my biggest challenges
Russell Hodin - Antwort
I feel like you should have mentioned angle as it’s own thing! Angle for unscrewing, angle for detaching cables, angle for prying, angle of reapplication. One of the easiest ways to brick tech is to not think about the angles at which you are working on it.
the_ - Antwort
I use the magnetic mat all the time. Its indispensable for tearing down laptops etc. I can position the screws on the mat as I remove them. One great feature is the ability to use a dry erase marker on the mat for notes or sketching near a positioned set of screws. However, magnetic as it is, you still need to be careful not to leave a screw filled mat where you accidentally brush over it with with your arm, or while repositioning the device or components. I always keep the mat far enough away from the actual work space to prevent those sorts of issues. If a bunch of the screws get pushed aside into a pile accidentally, you probably won’t lose them, but you certainly will lose where they positioned on the mat.
Fred H - Antwort
Would not want to repeat the tough job replacing an HDD with an SSD in my Mac Mini. Tiny connectors, very delicate, tougher than working on mechanical watches that I used to do. Not really for amateurs at all, too easy to break things and spoil an expensive device.
Roberto Guzpacha - Antwort
Great tips from voices of experience. I especially appreciate the tip to leave a refusnik battery on the shelf a couple months hoping it will reset itself.
lumloy371 - Antwort
Where have you been all my life? At 63 yrs old i have been “doing it myself”forever. And couldn’t count the screws lost or heads stripped out. I can’t remember when i learned about the difference in screw types and how important the correct driver really is. I believe the IFIXIT line of tools would be a godsend for any beginning do it your selfer . Keep up the good work !(No pun intended)…RJN
randolph nagel - Antwort
I have been repairing electronic equipment for close to 50 years. Something not mentioned and is similar to setting aside the time to do the repair. Avoid distractions. Turn off the phone, tell your spouse and children not to disturb you and lock out the pets.. A key factor is to concentrate on what you are doing. When you stop to answer the phone or answer a question from a family member, that brief distraction can make you forget what you were doing or miss a step. Invariably, when Im struggling to put a delicate assembly together, my wife would keep calling me and asking me about something. It is the nature of the universe. No one bothers me when I’m free. And people only come to the door when I’m in the bathroom. The key quality one really needs to repair is patience, patience, patience.
cem - Antwort
A lot of these good tips can pertain to anything in life you are trying to do. Thanx. I am guilty of stripping screws, not allowing enough time and not properly lining up parts to put back together. Mostly all haste, a very common thing in life that can really bollux things up!
Barbara - Antwort
What a great article. I in joyed reading this one, because I know I can forget something sometimes.
Micheal Matey - Antwort
a rubber mat to put the device on helps keep it from scratching. Have a few very good lights so you don’t have any shadows.
henry langston - Antwort
Heating up the display cannot be overstated.
Scott Wilkins - Antwort
I got one of those silicon heat resistant mats, they have spots for all the screws with magnets underneath. Only good for small electronics though as the mats are pretty small. I also use the magnetic parts holders from harbor freight, they are very cheap and useful.
Sara Zielinski - Antwort
I’m the kind of person who falls UP the stairs. So, I knew the magnet mat, and the awesome tool kit would act, at the very least, as an ounce of prevention against all unforeseen events that can go wrong, like dropping weensy screws into carpeting (forget about it), my occasional inability to follow directions as stated right in front of my face, and other mini-catastrophes. I can’t say enough about the magnet board - before the magnet board I put the screws in perfect tiny containers, labelled them, and still either forget what they were or became confused over where they went. With the magnetic board, I can write the corresponding step, and where they go right on the board!!!! - without having to find a pen, use paper, etc. And may I say here, just how much I like having the right tool for every step of whichever fixit guide. After several mistakes, I have slowly gained confidence in myself, and am far less stressed. Hey, whatever works!
Leslie L. Gordon - Antwort
Using say nail polish, to “mark” all screws of same length/ thread pitch can assist in reassembly. Put a “dot” of polish on each, same size screw, and another dot next to the applicable screw receptacle.
dave cooper - Antwort
When I am working on my laptops, I get a big sheet of brown paper (off a roll I have) and tape it to the dining room table. Then I draw a rough outline of the laptop. then I place double faced tape on different spots on the brown paper, and as I remove each screw I place within the diagram on the tape. When I get to the battery compartment, for instance, I do a drawing inside the over all one, add more tape and place the screws. OH, and close the doors to the room you are in if you own cats! :-) Thanks for all the great advice from everyone!
Ken Spencer - Antwort
How to not go screwy again no matter how many screws or how complicated the machine may be.
Remove a screw and put it down. Take out whatever part the screw was holding down. Now put the screw back in!
No more having to remember what screw goes where. Yes, you usually need to remove more than one screw to move a component but this tip keeps loosened screws to a minimum.
Dennis Harper - Antwort
I have been using the Ifixit magnetic mat for 2 years now and I find it an excellent solution to organize my work and not lose any metal parts
Miller - Antwort
Here is my experience with the machines that I am not aware of and or have not worked on them, I will take a picture of the cover and motherboard. Then I used double-stick 3M craft tape ***(https://www.amazon.com/Scotch-Double-Sid... where the screw was removed from and stick it on the paper one by one so I don't have missing or spare screws. In addition, it also helps in the cable interconnects in case you don't know where they belong or have trouble connecting. Happy Fixing with iFixit.
Manoj - Antwort
I once found a stripped-head a screw securing the back of the case to the (donated) MacBook Air body. Ergh! Got very frustrated and tried to drill it out, which I think was a bit hasty. Should have asked someone how. I got it out, but now there's one unfilled screw location. Fortunately, the back stays on and the MBA still works.
I always use an empty ice cube tray for the screws—I can number the different cubicles according to the steps in the repair guide. I don't usually try real complicated repairs (replaced an iPod hard drive once—never again!), but if I do, prayer usually helps a lot. Hey, prayer for the easy repairs, too. Keep my bases covered.
Gyandev - Antwort