Pro Tech Toolkit - Magnetic Project Mat - iPhone 4S Dock Replacement


Mein Problem
After many years of use, the dock connector on my iPhone 4s had become corroded and was causing problems with the phone such as poor charging and not being able to shut the phone down (it would just restart itself when you tried to power it off).
Meine Reparatur
The repair went incredibly well. I've built and repaired computers for years but had never cracked a cell phone open until today.
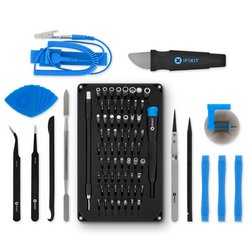
First off, I absolutely love the Pro Tech Toolkit. When I first decided to do this fix myself, I debated on just buying the few tools I'd need for this specific repair or to get the Pro Tech Toolkit in anticipation of doing many more repairs in the future. I'm very glad I chose to get the Pro Tech Toolkit! It is compact but packed with just about everything I'll need in the future and the high quality of the Tool Roll and all the tools inside is obvious when you are holding and using them.
I received the Magnetic Project Mat as a Christmas present this year and it was integral to making my first repair successful by easily organizing and keeping the tiny screws and parts right where I put them. Being able to write right on the mat with the dry erase pen made keeping notes about specific parts a breeze.
Mein Rat
1. Before you do anything, read through the walk-through for your specific repair. There are lots of little pieces of info that make the repair easier.
2. Set up your work area and pull out the tools you know you'll be using so they are at the ready.
3. Lighting - The screws and some of the parts you will be dealing with are TINY so having good lighting is paramount. The lighting in my office is okay, but I hooked up a flexible USB reading light to an external battery and it worked awesome! It was easy to move around and position where I needed it which really helped.
4. Time - Make sure to give yourself plenty of time to make the full repair with as little distractions as possible. This really helped me get through the repair faster.
A few notes about the walk-through.
STEP 3 - The suction cup in the Pro Tech Toolkit is very handy here.
STEP 6 - When you pry up the battery, the adhesive makes a really horrible sound and tries to trick you into thinking you're doing something wrong. It lies, just go slowly and you'll be fine.
STEP 9 - When you are re-assembling your 4S, it is a little tricky to get the dock cable socket to fit correctly when you are putting it back in. My extra light helped a lot here and I used the tweezers to gently position the cable so the socket was oriented correctly before pushing it down with my finger. It should make a soft little snap and it won't wiggle around at all when it's seated correctly.
STEP 12 & 13 - When unscrewing the left side screw for the speaker enclosure, the small black spacer from STEP 13 came up with the screw. Be careful when you are removing this screw so the spacer doesn't get lost.
STEP 14 - During re-assembly, don't forget to clean the metal-to-metal points as directed in the walk-through. You can get a small bottle 99% Isopropyl Alcohol at VONS or Safeway. It is recommended to use 99% Isopropyl Alcohol for sensitive electronics because evaporates very fast so the parts are completely dry before you finish the re-assembly. I used a Q-Tip to apply it and gently scrub the parts.
STEP 15 - I saved this little piece of tape but didn't end up needing it because my replacement part had a new piece right where it needed to be.
STEP 18 - During reassembly, getting the little rubber tube back inside the plastic part was a little tricky but using the tweezers from the Pro Tech Toolkit I was able to get it back in after a moment of fiddling with it.
STEP 20 - This little piece of rubber is VERY tiny. One of the sides is shinier than the other and that is the side with the adhesive on it so be sure to put that side down during re-assembly.
STEP 21 - As the TIP in the walk-through says, you will need to transfer the little rubber casing from your old part to the new part. Lay both parts side by side and examine where you're taking the rubber casing from so you'll know where it goes on the new part. As the walk-through mentions, you can use the fine tipped spudger to loosen the rubber casing from the old part before you transfer it to the new one.
- IMPORTANT NEW PART INFO *****
Before you transfer the rubber casing to the new part, look carefully at the microphone nodule on the new part and you will see a clear protective film that sticks off the side of the nodule. The protective film can be easily removed with tweezers before you transfer the rubber casing.
There will be another piece of protective film on the section of the part that the microphone is connected to. Examine the rest of the new part and you will find several other pieces of protective film that you will need to remove as the re-assembly progresses. Some of the protective film covers adhesive that will keep the new part in the proper place when re-assembly is complete.
I hope these notes help you with your repair!


0 Kommentare