Einleitung
Die diesjährige Ausgabe der Apple Watch kann dein Personal Trainer, Arzt, Bodyguard und jetzt auch noch häuslicher Pflegedienst sein! Wie hat Apple so viele Persönlichkeiten in einer Uhr vereint? Nehmen wir das Ding auseinander und finden heraus, weshalb sich so viele auf diese Uhr stürzen.
Wenn du süchtig nach Teardowns und Reparaturen bist, dann haben wir hier das richtige Rezept für dich: Zwei bis drei Instagrams pro Tag, Facebook beim Mittagessen, ein Newsletter pro Woche und ein Tweet, wenn es gar nicht mehr geht.
Was du brauchst
Einführungsvideo
-
-
Patientenprofil der Apple Watch:
-
LTPO OLED Retina Display mit Force Touch
-
Speziell konzipiertes Apple 64-bit Dual-core S4 SiP (System in Package)
-
Optionales LTE und UMTS, integriertes GPS/GLONASS/Galileo/QZSS, NFC, Wi-Fi 802.11b/g/n 2,4 GHz und Bluetooth 5.0
-
Verbesserter Beschleunigungssensor und Gyroskop, optischer und elektrischer Herzsensor, Mikrofon, Lautsprecher, barometrischer Höhenmesser und Umgebungslichtsensor
-
Wasserdichtigkeit (bis zu 50 Meter)
-
WatchOS 5
-
-
-
Auf den ersten Blick sehen diese schwarzen Vierecke sehr ähnlich aus, aber die Röntgenbilder unserer Experten von Creative Electron decken ein komplett unterschiedliches Innenleben auf.
-
Unser Objekt (links) zeigt bereits jetzt einige Unterschiede zur Series 3 (rechts), denn auf der Rückseite befindet sich mittig ein völlig neuer optischer Sensor, umgeben von der neuen Elektrode.
-
Weitere Unterschiede zur "alten" 42-mm-Version, die sofort auffallen, sind die deutlich weicheren Ecken, die den quadrunden Look unterstreichen, sowie die Tatsache, dass die seitliche Taste nun bündig mit dem Gehäuse ist.
-
Von der Seite gesehen ist die Serie 4 deutlich dünner als die Series 3 (um 0,7 mm), aber immer noch dicker als das Original.
-
So wie es aussieht, liegt die dünnere Bauform wohl hauptsächlich am neuen Display.
-
-
-
Kurzer Faktencheck auf der Rückseite aus Vollkeramik und Saphirglas:
-
Watch, check.
-
Series 4, check.
-
Eine ganze Liste von Features, einschließlich Wasserdichtigkeit bis 50 Meter.
-
Ein optischer Sensor, diesmal genau in der Mitte.
-
Ein großer ringförmiger elektrischer Sensor – das ist neu.
-
In einem der Armbandschlitze finden wir eine neue Modellnummer, A2008, und im anderen die Seriennummer sowie ein kleines Lüftungsloch für den Druckausgleich.
I think the marking and texts are laser engraved.
-
-
-
Wir schwingen unser iOpener-Pendel hin und her, deine Krone wird immer schwerer und schwerer. Deine Armbänder sinken in die Kissen ... Hey Siri, schalte DND ein.
-
So, jetzt können wir unsere Klinge unter den Rand dieses glänzenden Displays setzen, ohne unseren Patienten zu erschrecken.
-
Diese bewährte Methode wurde mehrfach ausprobiert und getestet, obwohl wir noch ermitteln müssen, wie viel Wasserdichtigkeit danach noch vorhanden ist.
-
Nach dem sicheren Ablösen der üblichen Kabel-Dreiergruppe können wir uns das Display genauer ansehen.
They used the iOpener to heat up the screen first and placed it directly on the device for those who did not pick up on it.
Can someone enlighten me on the purpose of that tape holding the ribbon cables? It seems to have a copper sheeting and is also connected to the body of the watch….is it some kind of heat sink or thermal protection for the battery below it?
Hi ,i would also like to know what the purpose of this tape is ,accidentaly ripped one end of it ,the one closer to 3D force touch connector and after this my Watch is stuck at Apple logo ,anyone ?
Mario W -
Hi, I have the same issue also is not possible find the complete flex connector with these two ribbons included
-
-
-
Nachdem der Bildschirm jetzt abgelöst ist, können wir die Konturen des neuen Displays besser sehen. Die zusätzlichen Pixel und das verbesserte Verhältnis von Bildschirm zu Gehäuse werden durch abgerundete Ecken, à la iPhone X, XS und XS Max erreicht.
-
Das Display des 44 mm Modells umfasst nun 977 mm², verglichen mit 740 mm² bei der 42 mm Version der Series 3.
-
Unterdessen verfügt das 40 mm Modell über 759 mm², gegenüber 563 mm² bei seinem 38 mm Vorgänger.
-
Auf der Rückseite entdecken wir drei Chipgehäuse, von denen zwei versiegelt sind, während das dritte hinter seiner Metallabdeckung keinerlei Markierungen aufweist.
-
-
-
Auf unserem Weg zum Akku begegnen wir den zum Standard gewordenen Tri-Point Schrauben. Sorry Pentalobe, anscheinend hat Apple einen neuen Favoriten.
-
Wir lösen ein Kabel, von dem wir zunächst denken, es sei das Akkukabel, sind dann etwas verwirrt, weil der Akku danach immer noch durch sein Flachbandkabel befestigt ist. Was genau haben wir da gerade getrennt?
-
Wahrscheinlich war es nicht wichtig ... oder?
-
Das eigentliche Akku-Flachbandkabel wurde verlegt und befindet sich nun, anders als bei der Series 3, zwischen Akku und Mainboard. Nachdem das jetzt erledigt ist, können wir den Akku rausholen!
Is the Taptic Engine still being used instead of rumble pack.
-
-
-
-
Das ist der integrierte Akku, der die Watch mit Strom versorgt, also kein Automatikantrieb hier!
-
... Es könnten aber auch 1,2 Wh sein, je nachdem, welcher Seite dieses Akkus du glaubst.
-
So oder so ist das ungefähr 17% weniger Kapazität als die 1,34 Wh der 42 mm Series 3 (trotzdem immer noch mehr als der 1,07 Wh Akku aus unserem neuesten Teardown der 38 mm Modelle)
-
So, wer will jetzt die Volumenberechnung machen? 0,7 mm dünner, aber 2 mm größer sind ...
-
... gerade genug, um dem Akku offenbar die tägliche Laufzeit von 18 Stunden zu geben!
Hello.Small correction to the battery.
1.07 Wh is in the watch 38mm series 3.
The watch 42 mm is 1.34 Wh
Series 4 44 mm has 1.113 Wh is less about 20%
Hi Dariusz, you’re right. It is indeed 20% less than the 42 mm Series 3. Our Series 3 Teardown was a 38 mm Version. I will edit the step to avoid confusion.
Official numbers from Apple:
40mm: 0.86 Wh
44mm: 1.12 Wh
38mm: 1.07 Wh
42mm: 1.34 Wh
What about battery capacity of GPS vs LTE?
-
-
-
Nachdem wir jetzt schon mit dem Akkustecker Verstecken gespielt haben, sind wir auch bestens auf das Bäumchen-Wechsel-Dich-Spiel mit der Force Touch Dichtung vorbereitet.
-
Dieser Stecker befindet sich jetzt nämlich in der genau gegenüberliegenden Ecke und verfügt über Doppel-Kabel, die übereinander statt nebeneinander liegen. Sehr effizient.
-
Die Taptic Engine sieht dagegen auch hier noch ungefähr so aus, wie wir sie in Erinnerung haben. Vielleicht ein bisschen zusammengequetscht. Schauen wir doch mal genauer hin.
Hi, what are the twin cables mentionned ? I unfortunately screwed one connecter from the bottom left of the watch (top corner right on the picture step 8, is it replaceable?
Hey Antoine. You have to look for an Apple Watch (44 mm Series 4/5) Force Touch Sensor Gasket. here in the shop
-
-
-
Hier haben wir die Komponente, die für die Vibrationen verantwortlich ist - die Taptic Engine, auch bekannt als elektromagnetisch schwingender Linearantrieb.
-
Im Vergleich zu den früheren Modellen ist hier die Bauform viel dünner, aber auch länger.
-
Teilen Android-Gerätehersteller diese Einschätzung? Offenbar nicht wirklich.
-
-
-
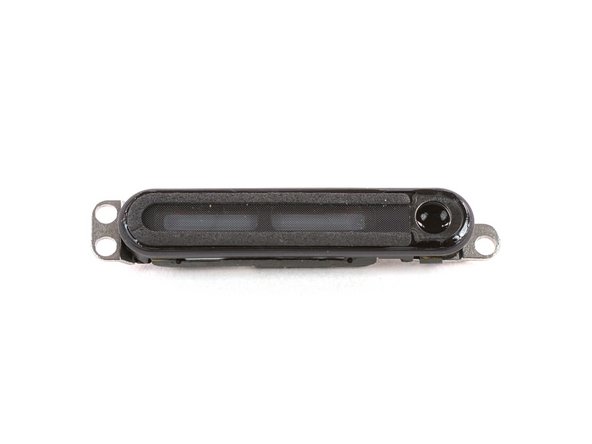
Als nächstes entfernen wir operativ den neuen Krachmacher – er soll ja 50% lauda sein.
-
Nachdem das Mikrofon nun rüber in die Nähe der digitalen Krone gewandert ist, kann der Lautsprecher den freigewordenen Platz für sich nutzen und voll aufdrehen.
-
Ähnlich wie bei der Version vom letzen Jahr wird der Lautsprecher durch eine Gummidichtung abgedichtet, was ihm den Wasserspucker-Trick ermöglicht.
-
Update: Wir haben einen kleinen Kanal gefunden, der von der Lüftungsöffnung aus Schritt 3 durch den Rahmen genau zu diesem kleinen Sensor verläuft. Wahrscheinlich benötigt er deshalb keine Hilfe durch das Lautsprechergitter, wir vermuten aber immer noch, dass es sich mit großer Wahrscheinlichkeit um ein Barometer handelt.
-
-
-
Und endlich kommen wir zu des
PudelsApples Kern: das hauseigene S4 System-in-Package. -
Eine gute Nachricht, Freunde! Das S4 ist nur mit Schrauben befestigt und lässt sich leicht entfernen. Das ist eine willkommene Abwechslung zu den gnadenlos eingeklebten SiPs der vergangenen Jahre.
-
Wie immer ist das Package selbst in einem festen Harzblock eingeschlossen, so dass die meisten seiner Geheimnisse schwer zu lüften sein werden. Glücklicherweise bleiben die HF-Komponenten jedoch etwas besser sichtbar:
-
Avago AFEM-8087 (wahrscheinlich ein Front-End Modul)
-
OU JQ
-
YY MEH ECE (sieht aus wie ein Teil von Bosch, wahrscheinlich der coole neue Beschleunigungssensor und Gyroskop)
-
AE827 I2033 0836
-
ST Microelectronics ST33G1M2 32-bit MCU mit ARM SecurCore SC300—die gleiche eSIM, die wir in der letzten Apple Watch sowie im iPhone XS und iPhone XS Max gefunden haben.
Hey whats the function of the copper sticker und whats the right name of it?
iv been trying to find the answer to this question as well! this is my own wild guess but it could serve as either a heat sink (seeing as it connects to the body of the watch? or maybe some kind of heat protector for the battery thats just underneath or perhaps it serves as some kind of grounding property…. but yeah I too would love to have a definitive answer…
We’re also not absolutely sure, but support Asio’s guess on a combination of a heat sink and grounding element. It may even shield the logic board from external interference.
Quelle est la fonction de l'autocollant en cuivre et quel est le bon nom?
hi I would like to know which is the wifi antenna. Grazie.
Do you have assembly parts for that?
Are the S4 SiPs all the same between different sizes? ( 40mm vs 44mm , nike+ vs no nike)
-
-
-
Beim Versuch, die kleine Ausbuchtung mit dem neuen Herzsensor herauszudrücken, kommt die ganze Unterseite heraus. Das war wohl doch kein Witz als sie sagten, dass man durch die Unterseite besseren Zugang zum Gerät hat.
-
In der Mitte entdecken wir einen Magneten, der die Watch am Ladegerät hält, sowie die Ladespule selbst und ein paar neuen Chips:
-
A88 AY10
-
18206 00D5
-
Das ist eine schicke Reihe an schwarzen Pads unter dem S4 Package – möglicherweise zur Wärmeableitung ? Oder sind das nur gemütliche Kissen zum Stressabbau?
Does it look like the foam is conductive?
It also appears the bottom is just press-fitted with the O ring offering the water & dust sealing and wedge so the back doesn’t come off. For sure a better design than the glued backs in the older series. The trick will be getting the back on without damaging the O ring, a touch of scuba divers O ring grease will be needed.
Any idea what kind of chips the A88 AY10 and 18206 00D5 are and who provides them?
-
-
-
Dieser goldene Donut ist wahrscheinlich eine optimierte Antenne, denn die friemeligen Halterungen oder Goldkontakte vom letzten Jahr sind nirgends mehr zu sehen.
-
Zwischenzeitlich sind wir endlich bei dem Feature angelangt, das die Schlagzeilen beherrscht: den neuen elektrischen Herzsensoren (EKG), die die bereits existierenden optischen Sensoren ergänzen.
-
Diese Elektroden erfassen winzige elektrische Potenzialänderungen, wenn das Herz schlägt. Das S4 interpretiert diese Daten dann, um den Herzrhythmus zu berechnen und zu analysieren.
-
-
-
Zeit sich dieser zweiten Elektrode zu widmen: die völlig neue digitale Krone. Wir entfernen ein paar Teile und finden dann schnell die richtig interessanten Sachen.
-
Schnapp dir deine Lupe, wir betreten jetzt die Mikro-Welt:
-
Der innere goldene Zylinder hat winzige Kratzer, die es einem optischen Encoder (die kleine schwarze Box auf dem Flachbandkabel) ermöglichen, seine Rotation zu verfolgen.
-
Die federnde Halterung hinter dem Zylinder leitet wahrscheinlich das elektrische Signal von deinem Finger durch die Uhr und schließt so den EKG-Kreis.
-
Der winzige Schalter hinter dieser Feder dient als mechanischer Knopf der Krone. Außerdem befindet sich auf dem äußeren Kronenschaft ein hübscher Dichtungsring zum Schutz vor dem Eindringen von Wasser, Staub oder Schmutz.
is there a weak bluetooth signal antenna,
-
-
-
Die originale Apple Watch war bei ihrer Veröffentlichung revolutionär, aber die jährlichen Updates waren meistens geringfügig – bis jetzt.
-
Während die erste Watch noch furchtbarer Schichtkuchen mit viel zu viel Kleber war, wirkt die Serie 4 jetzt viel durchdachter.
-
Der Apple-Experte John Gruber hat dies mit dem Designsprung des iPhone 4 verglichen, und wir könnten sogar noch ein wenig weiter gehen und es ein iPhone 5 nennen: ein Gerät, das seine Prioritäten kennt und von innen genauso elegant aussehen möchte wie von außen.
-
Wenn diese Watch dein Herz nicht höher schlagen ließ, wie wäre es dann mit einem doppelten iPhone Teardown?
-
Ein großes Dankeschön geht an Creative Electron für ihre Hilfe! Jetzt bleibt nur noch eins zu tun. Bitte einen Trommelwirbel ...
-
- Der Austausch des Uhrenarmbands bleibt schnell und einfach und ist sogar rückwärtskompatibel mit früheren Modellen.
- Displaywechsel sind schwierig, aber machbar - das Display ist das erste, was ausgebaut wird, und es lässt sich durch das Abtrennen einfacher ZIF-Anschlüsse entfernen.
- Der Austausch des Akkus ist ziemlich einfach, wenn man erst mal in der Watch drin ist.
- Obwohl keine proprietären Schrauben verwendet wurden, stellen diese winzigen Tri-Point Schrauben dennoch ein Hindernis bei der Reparatur dar. Und sie sind wirklich überall.
- Flachbandkabel mehrerer Komponenten sind direkt auf dem S4 Package befestigt und erfordern fortgeschrittene Kenntnisse im Mikrolöten, um sie auszutauschen.
- Das in Harz gefasste S4-System macht nahezu alle Reparaturen auf Board-Ebene unmöglich.


Fazit
Reparierbarkeits-Index


(10 ist am einfachsten zu reparieren)
Besonderer Dank geht an diese Übersetzer:innen:
94%


Diese Übersetzer:innen helfen uns, die Welt zu reparieren! Wie kann ich mithelfen?
Hier starten ›

Team

52 Kommentare
So how much of the inside is actually accessible and serviceable from the back of the device?
That looks a lot less hard to remove and put back without losing waterproofing (looks like it even has a silicone gasket…)
Besides the sensors attached to the bottom cover, it doesn’t look like you can get to the battery and other components from that side. The S4 blocks everything and it’s much too large to remove from the bottom out. Much of the screw heads are also facing away from the bottom side.
bert -
It is not possible to access the internals from the back, the back is locked to the case with screws from the inside.
Tom Chai -
wait, are you not opening up the SiP?
It is resin encased, not very easy to do.
Dillan -
About the sensor from Bosch, it should be Bosch Sensortek if it is right. Sensortek is the company for consumer electronics, Bosch it self only sells sensors for automotive.
Zu deutsch:
Bei dem Sensor handelt es sich vermutlich tatsächlich um ein Produkt von Bosch. Allerdings verkauft Bosch selbst nur an Automotive Kunden und die Sensoren für Consumer kommen von der Tochtergesellschaft Bosch Sensortek. Einfach der vollständigkeit halber.
Ich habe für Bosch im Halbleiterwerk in Reutlingen gearbeitet und auch solche Chips im Bereich Lithographie bewegt.
appears to be 6; the contacts are visible in the last picture below the speaker on the top left.
Please disassemble the optical sensor which seems to be new, 6 LEDs and 8 photodiodes, please check for wavelength of LEDs (e.g. power them and check out the colors).
Thanks!
Yes, please do that! It’s very important to figure out how much better the sensor is. Thank you!
ps: I think it’s 4 LEDs
Annie B -
So just to confirm, the battery size is DOWN from 1.34 watt-hour of last year’s 42 mm watch to 1.12 watt-hour of this years 44 mm watch, is that the case here?
I’m not sure if the efficiency improvement in the S4 SiP compared to S3 of last year’s model would make up for that 20% battery loss and the 30% larger screen size. I would imagine the actual stand-by time would decrease by a fair margin compared to last year’s model (44 mm vs 42 mm).
I must say I don’t mind the tri-point screws. At these sizes, phillips screws are a real pain - like they aren’t at any size, think on - dropping to just three wings gives the screw a bit more meat.
But then again, I have a similar argument for pentalobe - that screw size is too small for torx or hex, Phillips is bad and wrong - pentalobe makes a nice, solid joint between screw and driver.
IFixit staff sure has a strange concept of that overall ‘repairability’ score. Based on the information I’ve seen, and the fact that you’ve permanently compromised the water proofing by opening the device and not replacing the adhesive pack with a new one that Apple won’t provide, I don’t see how this gets anything higher than a “3”. Looking at the pictures, there was also some pretty rippin’ adhesive in there, looking at the distortion on the battery envelope. 4 years ago, you would have crapped all over this thing.
It’s an optical rotary encoder—basically this sensor watches microscopic scratches on this cylinder and counts passing scratches as the crown turns to figure out when and how much it’s turning.
hi, so what was the gps (GNSS) chip used please?
The ECG sensing facility is an amazing addition to a consumer device. It isn’t obvious from usage or the tear-down when ECG pick-up is resistive i.e. the crown and rear pads are resistively coupled to an input, or whether it is capacitive i.e. the crown/rear pad is a dielectric with the finger acting as a capacitor plate. It is probably resistive, but anyone know for sure? The rear pads appear to be a pair, I wonder why?
is it more durable than the 3 in terms of water resistance? i’m hard on my watch from a sweat and swim perspective. I always have a popped screen. the 3 actually cracked from the inside all the way around the screen. will the 4 do better with battery swelling (which i suspect this is but haven’t dismantled it until i’m positive its out of warranty) and general water exposure?
To change the battery stays marks... I will not buy!
Is there any chance replacing the display against a new one without loosing the NFC functionality for apple pay? Is there a way to register the new nfc part of the display to the watch for getting back NFC? Does Apple help customers with this issue after installing a new display?
To reduce the likelihood of problems (no guaranty), delete all your ApplePay account info before the replacement, and then re-enter it with the new display installed (test functionality before closing the watch with new adhesive). But there is also a user guide to replace the NFC chip on a new display with the one from the old damaged display (Series 3 NFC on Series 2 display).
What is the black tape with two screw connectors that’s taped on the flex cable?
You mean in the final picture the second part from the top on the left? That’s the service port flex cable (with six golden contacts) that hides behind the display flex cables.
Anntena wifi, and Bluetooth. Where ?
On Step 11, there are 5 ribbon cables shown in the picture. What are the two side ones for (the ones that attach down with screws)? What would happen if one of those ripped?
Hello Pavlin, those might be a combination of grounding and heat distribution. Probably not a big thing if one rips, but if both are damaged your could get warmer than usual.
Hi .
Is it possible to swipe between the scrollbar and the main body of the clock, Something happens to the scroll????
I poked the little hole next to the button with a sim car ejector…(idiot)
would I have damaged anything I’m worried about it’s waterproofing if there is any there?
Hi Tom, behind the hole there is the microphone. If you can still “talk” to Siri and she understands you, your mic is in good condition (let that be your first test). If not you might have damaged the mic. Depending on how hard you pushed there is a slight possibility that you’ve pushed the mic inwards a bit. If that’s the case I would not take the watch for a swim (or shower with it).
other than acids, any recommendations on epoxy removers to expose the chip-set on the board, post removal?
I have broken the glass on the back of the watch that covers the sensors, could this be easy removed and replaced without a total strip down?
This would come close to a total strip down—display, battery, taptic engine, and the logic board need to come out before being able to take out the bottom part. Assuming you’ll find a replacement part.
Hi.
I changed my 40mm Watch 4 stack screen and when I put the new one it stopped giving image.
The watch works because it vibrates and the iPhone recognizes it to match it, but I don't see anything on the screen. I put the old one back on, but nothing appeared on the screen either. The problem is not on the screen, but I don't know what it can be. Can anybody help me?
Thank you.
The display cables are very delicate and rip easily. also, there are two additional contacts to each side that ground to the frame which are equally fragile (see step 11). But to start with you might want to check the proper seating of the connectors in the ZIF sockets and that the contacts are clean.
hi I would like information if possible. in practice after replacing the display the AW does not remain connected if I move away from the iphone about 1mt and the wifi the same thing. I looked but I can't locate the antenna. can you tell me where it is? thanks
The NFC chip is on the back of the display. Did you unpair before the repair? Maybe unpairing with the old display and then pairing again with the new one might help. But that’s just a guess, the Apple Watch is quite tricky when it comes to NFC communication.
I’m not sure if you can answer this, but, does it look like the heart sensor array is the same on the 5 as on the 4? I have a 4 with busted sensor and the back of a 5 laying around and am interested in getting a working watch out of it!
I can’t say for sure (lockdown—don’t have both models at hand right now). But even if those sensors are similar, I doubt it is possible to fit S4 parts into an S5 case. Judging from this step in the S5 teardown compared to step 13 in this guide I’d say: Not compatible.
Where is located WiFi & Bluetooth antenna
Ok one comment my apple watch series 4 just lost the sticker seal and fell off even disconnected from ribbon cable… everything is working fine but (heart sensor) won’t stay any tips on a new seal or anything similar?
Esa banda negra fina que une los tres conectores de pantalla y que va atornillada ¿Sirve para algo?, en la mayoria de videos se rompe y no se reemplaza.
If I replace the rear glass which cracked after a fall, will the waterproof or water resistance be gone? I like using my apple watch to track my swim laps.