Zum Hauptinhalt wechseln

Was du brauchst

Dieser Teardown ist keine Reparaturanleitung. Um dein Car and Drivers Auto HandHeld Vacuum Bagless zu reparieren, verwende unsere Fehlerbehebungsseite.

  1. Car and Drivers Auto HandHeld Vacuum Bagless Teardown, Car and Drivers Auto HandHeld Vacuum Bagless Teardown: Schritt 1, Bild 1 von 3 Car and Drivers Auto HandHeld Vacuum Bagless Teardown, Car and Drivers Auto HandHeld Vacuum Bagless Teardown: Schritt 1, Bild 2 von 3 Car and Drivers Auto HandHeld Vacuum Bagless Teardown, Car and Drivers Auto HandHeld Vacuum Bagless Teardown: Schritt 1, Bild 3 von 3
    • Locate the four screws locate outer gray shelll

    • ''I REMOVED THE SCREWS WITH PH #OO SCREWDRIVER FROM (IFIXIT)

    • New PLace four screws to the side

  2. Car and Drivers Auto HandHeld Vacuum Bagless Teardown: Schritt 2, Bild 1 von 1
    • Here are the four screws from vacuum

  3. Car and Drivers Auto HandHeld Vacuum Bagless Teardown: Schritt 3, Bild 1 von 3 Car and Drivers Auto HandHeld Vacuum Bagless Teardown: Schritt 3, Bild 2 von 3 Car and Drivers Auto HandHeld Vacuum Bagless Teardown: Schritt 3, Bild 3 von 3
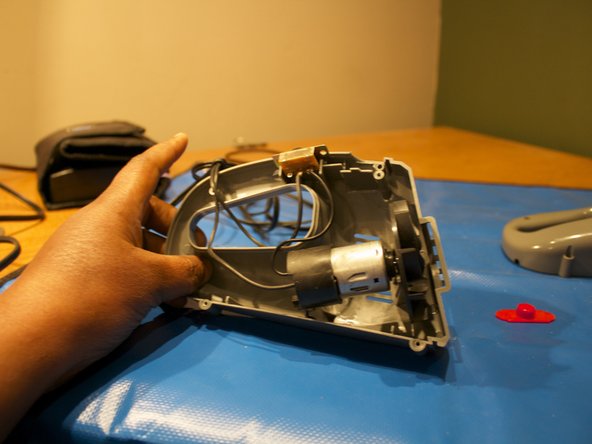
    • Remove the top grey shell of the vacuum

    • Place a red tab to the side

    • Let start looking at the 9volt motor with wire and on/off switch.

    • I remove the outer shell . I remove the motor and wires and on/off switch.

  4. Car and Drivers Auto HandHeld Vacuum Bagless Teardown: Schritt 4, Bild 1 von 1
    • This it complete teardown on Car and Driver HandHeld Vacuum bagless!

kempc8

Mitglied seit: 11/22/13

899 Reputation

7 Anleitungen geschrieben

Team

K and K Fixit Mitglied von K and K Fixit

Business

1 Mitglied

11 Anleitungen geschrieben

0 Kommentare

Kommentar hinzufügen

Seitenaufrufe:

Letzte 24 Stunden: 2

Letzte 7 Tage: 4

Letzte 30 Tage: 7

Insgesamt: 1,010