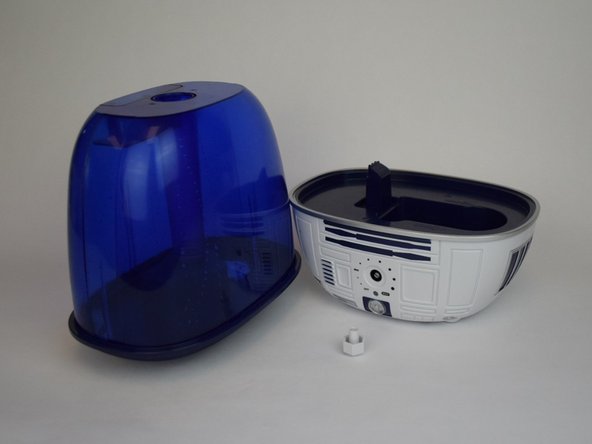
Zum Hauptinhalt wechseln

Was du brauchst

Dieser Teardown ist keine Reparaturanleitung. Um dein EMSON ​Star Wars R2-D2 Ultrasonic Cool Mist Humidifier (One Gallon) zu reparieren, verwende unsere Fehlerbehebungsseite.

  1. EMSON ​Star Wars R2-D2 Ultrasonic Cool Mist Humidifier (One Gallon) Teardown, EMSON ​Star Wars R2-D2 Ultrasonic Cool Mist Humidifier (One Gallon) Teardown: Schritt 1, Bild 1 von 2 EMSON ​Star Wars R2-D2 Ultrasonic Cool Mist Humidifier (One Gallon) Teardown, EMSON ​Star Wars R2-D2 Ultrasonic Cool Mist Humidifier (One Gallon) Teardown: Schritt 1, Bild 2 von 2
    • Gently lift the cover off the humidifier

  2. EMSON ​Star Wars R2-D2 Ultrasonic Cool Mist Humidifier (One Gallon) Teardown: Schritt 2, Bild 1 von 1
    • Grip the dial and pull away from the device.

  3. EMSON ​Star Wars R2-D2 Ultrasonic Cool Mist Humidifier (One Gallon) Teardown: Schritt 3, Bild 1 von 2 EMSON ​Star Wars R2-D2 Ultrasonic Cool Mist Humidifier (One Gallon) Teardown: Schritt 3, Bild 2 von 2
    • Gently pull the water tank off the base

  4. EMSON ​Star Wars R2-D2 Ultrasonic Cool Mist Humidifier (One Gallon) Teardown: Schritt 4, Bild 1 von 2 EMSON ​Star Wars R2-D2 Ultrasonic Cool Mist Humidifier (One Gallon) Teardown: Schritt 4, Bild 2 von 2
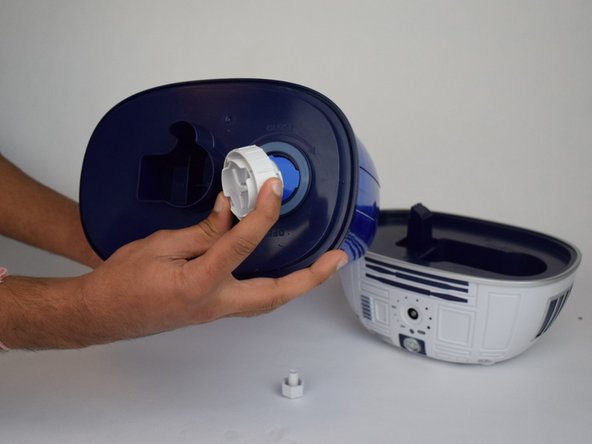
    • Locate the valve at the bottom of the tank.

    • Twist the valve counterclockwise to remove it.

  5. EMSON ​Star Wars R2-D2 Ultrasonic Cool Mist Humidifier (One Gallon) Teardown: Schritt 5, Bild 1 von 3 EMSON ​Star Wars R2-D2 Ultrasonic Cool Mist Humidifier (One Gallon) Teardown: Schritt 5, Bild 2 von 3 EMSON ​Star Wars R2-D2 Ultrasonic Cool Mist Humidifier (One Gallon) Teardown: Schritt 5, Bild 3 von 3
    • Flip the base upside-down

    • Connect the 4 mm nut driver to the 4 mm aluminum driver. Then, connect the PH1 head to the 4 mm nut driver.

    • Insert the driver into each of the 4 holes and twist counter clockwise to remove the screws.

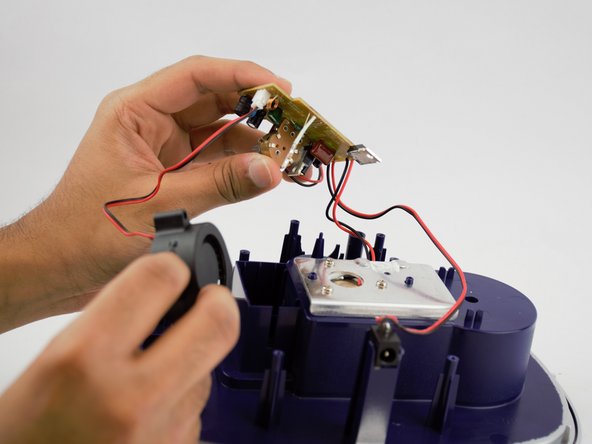
    • Flip the base upright and pull off the top.

  6. EMSON ​Star Wars R2-D2 Ultrasonic Cool Mist Humidifier (One Gallon) Teardown: Schritt 6, Bild 1 von 2 EMSON ​Star Wars R2-D2 Ultrasonic Cool Mist Humidifier (One Gallon) Teardown: Schritt 6, Bild 2 von 2
    • Connect a PH1 head to the 4 mm aluminum driver

    • Unscrew the circled screws of both the circuit board and heating plate(metal plate)

    • Gently remove the circuit board

  7. EMSON ​Star Wars R2-D2 Ultrasonic Cool Mist Humidifier (One Gallon) Teardown: Schritt 7, Bild 1 von 3 EMSON ​Star Wars R2-D2 Ultrasonic Cool Mist Humidifier (One Gallon) Teardown: Schritt 7, Bild 2 von 3 EMSON ​Star Wars R2-D2 Ultrasonic Cool Mist Humidifier (One Gallon) Teardown: Schritt 7, Bild 3 von 3
    • Gently pull out the fan (located in the red rectangle)

    • We recommend removing the circuit board before attempting to completely remove the fan.

    • Unplug the pin, connected to the circuit board, to remove the fan.

    • Note: Remove the pin cautiously, the edges may hurt your fingers.

  8. EMSON ​Star Wars R2-D2 Ultrasonic Cool Mist Humidifier (One Gallon) Teardown: Schritt 8, Bild 1 von 2 EMSON ​Star Wars R2-D2 Ultrasonic Cool Mist Humidifier (One Gallon) Teardown: Schritt 8, Bild 2 von 2
    In diesem Schritt verwendetes Werkzeug:
    Tweezers
    $4.99
    Kaufen
    • The LED is connected to a pin that is connected to the circuit board.

    • Upon close inspection, you can see that the LED's two ends are bent (red circle of the second image) to prevent it from slipping off of the pin.

    • Use blunt tweezers to bend and straighten the two ends.

    • Once the two ends are straight, gently pull the LED out of the pin.

  9. EMSON ​Star Wars R2-D2 Ultrasonic Cool Mist Humidifier (One Gallon) Teardown: Schritt 9, Bild 1 von 2 EMSON ​Star Wars R2-D2 Ultrasonic Cool Mist Humidifier (One Gallon) Teardown: Schritt 9, Bild 2 von 2
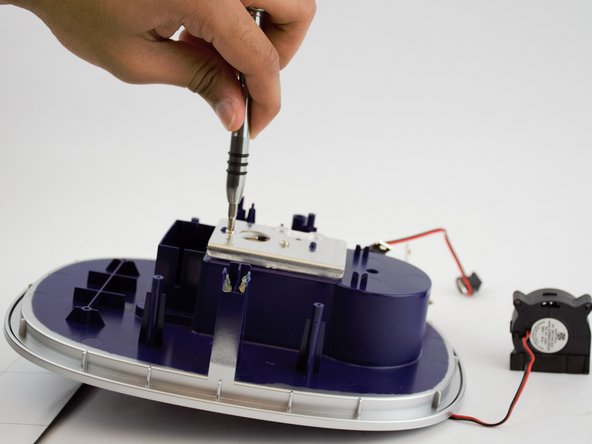
    • Remove the screws (located in the red circles) off of the heating plate with a 4 mm aluminum driver with a PH1 head.

    • Once the screws are removed, gently pull off the metal plate.

  10. EMSON ​Star Wars R2-D2 Ultrasonic Cool Mist Humidifier (One Gallon) Teardown: Schritt 10, Bild 1 von 1
    • All the inner components of the humidifier.

Paul

Mitglied seit: 02/15/17

127 Reputation

1 Anleitung geschrieben

Team

USF Tampa, Team 8-5, Eyestone Spring 2017 Mitglied von USF Tampa, Team 8-5, Eyestone Spring 2017

USFT-EYESTONE-S17S8G5

4 Mitglieder

5 Anleitungen geschrieben

Ein Kommentar

thank you this is helpful

tostypinapple - Antwort

Kommentar hinzufügen

Seitenaufrufe:

Letzte 24 Stunden: 0

Letzte 7 Tage: 0

Letzte 30 Tage: 11

Insgesamt: 2,156