Einleitung
Der heutige Tag bringt für uns zum ersten Mal einen Teardown eines Smartphones, das komplett von Google entwickelt worden ist: das Pixel "XL". Was erwarte uns wohl? Auf den ersten Blick erinnert es mehr als nur ein wenig an ein iPhone - aber uns interessiert vor allem das, was drinnen ist. Schnapp dir ein Nougat, es ist Zeit für einen Teardown.
Folge uns weiter auf Facebook, Instagram oder Twitter und du bist in der Reparaturwelt immer auf dem Laufenden.
Was du brauchst
Einführungsvideo
-
-
Erste Berichte über die Pixel Smartphones fallen positiv aus —und wenn wir auf die Daten schauen, überrascht uns das nicht:
-
5,5" AMOLED Display mit einer QHD 1440 x 2560 Auflösung (534 ppi) und 2.5D Gorilla Glass 4
-
Quad-Core, 64-bit Qualcomm Snapdragon 821 Prozessor (2,15 GHz + 1,6 GHz) mit 4GB LPDDR4 RAM
-
12,3-Megapixel, f/2.0 Hauptkamera mit Phasenerkennungs-Autofocus und Laser gesteuertem Autofocus; 8 MP Selfie-Kamera
-
32 GB oder 128 GB interner Speicher
-
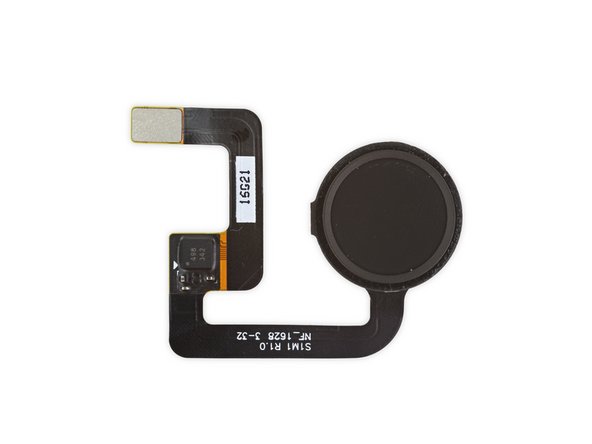
Pixel Imprint Fingerabdrucksensor auf der Rückseite
-
USB -C Anschluss und 3.5 mm Kopfhörerbuchse
-
Android 7.1 Nougat
-
-
-
Obwohl es behauptet von innen und außen ganz Google zu sein, gibt es doch einiges was wohl gewisses fruchtiges Vorbild hatte.
-
Lassen wir mal das ähnliche Design außer Betracht, dann gibt es doch ein paar Unterschiede zum meistens rosigen Konkurrenten:
-
Es gibt keinen Home Button — Google entschied sich für on-screen Buttons, dadurch hat es eine klare Vorderseite ohne physische Tasten.
-
Einen Fingerabdrucksensor auf der Rückseite und eine einzige Rückkamera (ohne hässliche Erhebung)
-
Zwei schlitzförmige Lautsprecheröffnungen — keine löchrigen Gitter — und einen USB-C Anschluss, keinen proprietären Lightning Port.
-
-
-
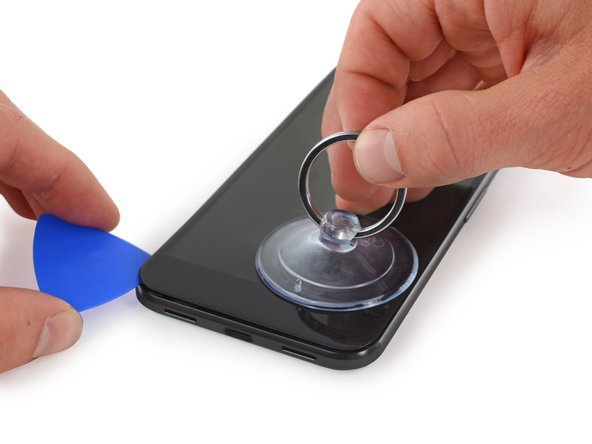
Wir sind mit iPhone-ähnlichen Geräten ja gut vertraut, und so ist es schon fast überheblich, als wir eine Anleihe bei unseren iPhone 7 Plus Anleitungen machten, den iOpener erwärmten und unser glücksbringendes Plektrum herausholten.
-
Eine Minute haben wir erwärmt und eine Minute gehebelt, dann konnten wir das Smartphone oben öffnen und hofften dabei, dass die inneren Bestandteile sichtbar werden.
-
Aber leider hat uns eine verschraubte Halterung am Displaykabel ausgebremst. Jetzt mussten wir unseren Schraubendreher vom Staub befreien und ein wenig tiefer einsteigen.
-
-
-
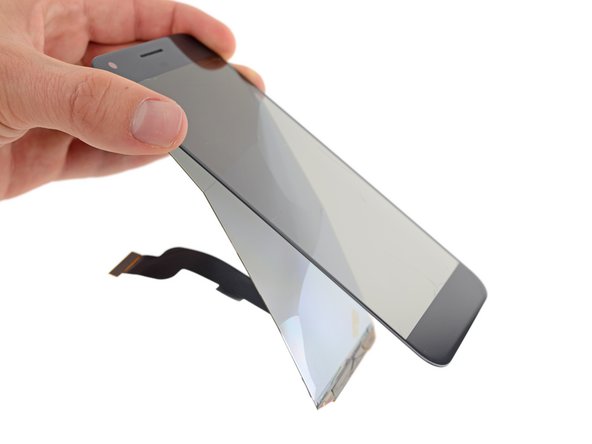
Unser Weg zum Sieg ist vorgezeichnet: die Halterung ausbauen, das Display herausholen, Sieg. Die Werkzeuge aus unserem 64 Bit Driver Kit machen kurzen Prozess mit den Torx T5 Schrauben.
-
In diesem Fall war das OLED Panel für unseren Geschmack etwas zu leicht vom Touchscreen abzutrennen. Die Bauteile sind superdünn und durch keinen Rahmen oder Blende dahinter verstärkt. Der Ausbau wird dadurch sehr holprig - wir arbeiten an einer Methode, mit der es beim nächsten Mal besser gelingt.
-
Und huckepack auf der Rückseite des Displays: ein Synaptics ClearPad S3708 Touch Kontroller.
Is the display no longer usable or can it be refurbished?
What the copper pad opposite the camera - I mangled it up a little. antenna?
-
-
-
Dieser dünne und stabile Mittelrahmen ist vermutlich aus Magnesium, und ist (richtig fest) auf das Gehäuse des Smartphones geklemmt.
-
Auf der linken Seite ist am Mittelrahmen ein mysteriöser Flachbandstecker und ein Ohrhörer-Lautsprecher befestigt.
-
Und an der rechten Seite das restliche Smartphone, komplett mit der Hauptplatine in mattschwarz.
To check whether it's Magnesium or not, try dripping a little (hydrochloric) acid on a scratched section of the metal, or cut some shavings off to test for more excitement.
-
-
-
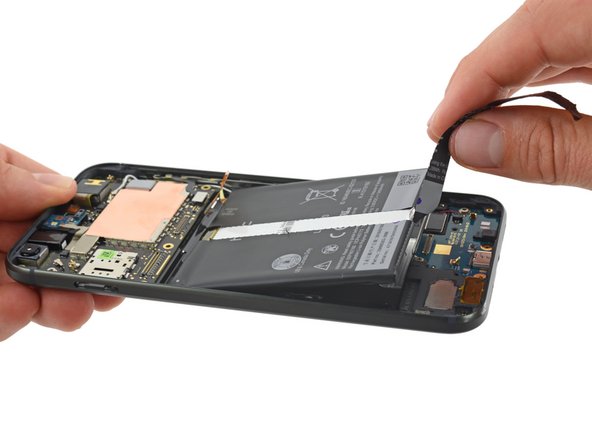
Google geht mit "Ziehe zum Entfernen " Laschen am Akku anders um: ein perforierter Teil der Hülle wird zur eindrucksvollen Zuglasche, wenn er abgezogen wird.
-
Der von HTC hergestellte Akku ist mit zwei recht starken Klebestreifen befestigt, die Zuglasche erledigt ihre Arbeit aber ohne Erwärmen. (Und dient vielleicht auch als Nachweis für Reparaturversuche?)
-
Dieser 13,28 Wh Akku schlägt die 11,1 Wh des iPhone 7 Plus, nicht aber das Galaxy S7 Edge mit seinem 13,86 Wh Antrieb.
-
-
-
-
Wir picken uns ein paar Pixel-Stückchen heraus.
-
Als erstes kommt ein eigenartiges Teil heraus: eine Kombination aus Laser-Autofokus und Microfon-Platine.
-
Als nächstes kommt die 3,5 mm Kopfhörerbuchse heraus. (Da schaut ihr, Lightning-Kopfhörer.)
-
Und zum Schluss die 8-Megapixel Front- (Selfie) Kamera.
That strange one is a "Laser-AF" module :) you can see the lights through a camera. :)
can also solves mystery holes on the backplate :D
The headphone jack - is it OMTP or CTIA? Someone on support forums elsewhere says the headphone jack is OMTP. Can't find this spelled out anywhere.
I believe the Pixel is OMTP, which despite being the less popular option, is the more common sense option in my opinion. I'm only going off my Reddit scanning though.
Matt -
-
-
-
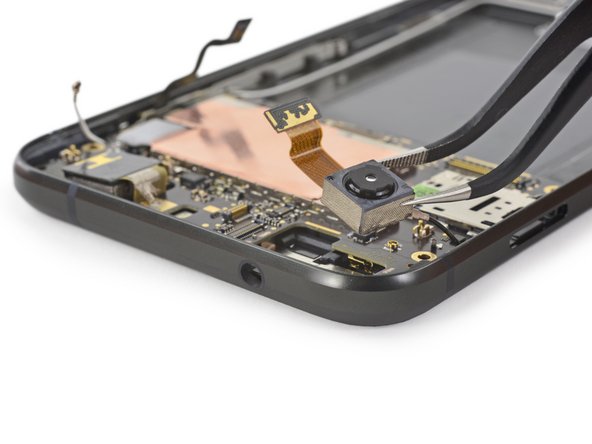
Wir würden ja gerne die Hauptplatine nur ansehen, eine kleine Falle für Doofe (ganz wie bei Apple) in Form des Fingerabdrucksensorkabels störte uns dabei! Sie war aber leicht zu entschärfen.
-
Als nächstes ist eine kleine Platine dran, die das Mikrofon und den Entfernungsmesser, der den Laser-Autofokus des Pixel XL aktiviert, enthält.
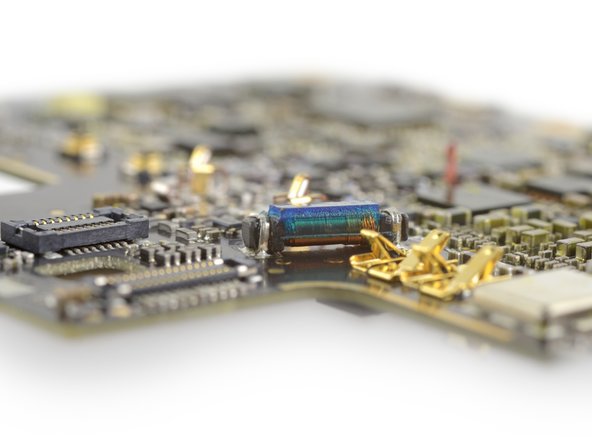
The mystery component looks more like an antenna to me than an inductor....
The blue "mystery" component appears to be an inductive coil antenna. It is located behind the glass-backed portion of the phone, so I suspect it is the NFC antenna.
What component is used for the rangefinder?
Thanks for the awesome teardown!
Mystery component might be a telecoil for hearing aid compatibility.
-
-
-
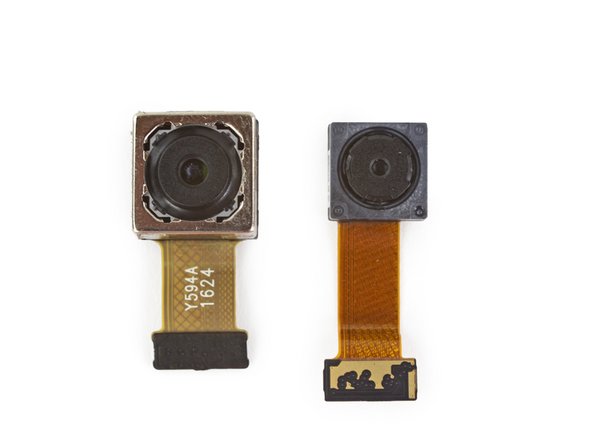
Endlich können wir die hochgelobte Rückkamera entfernen! 12,3 Megapixel sind kein Klacks — es fehlt aber der tolle Mechanismus zur optischen Bildstabilisation, der in den aktuellen iPhones zu finden ist.
-
Hier liegen sie zum Größenvergleich nebeneinander: Rück- und Frontkamera Seite an Seite
-
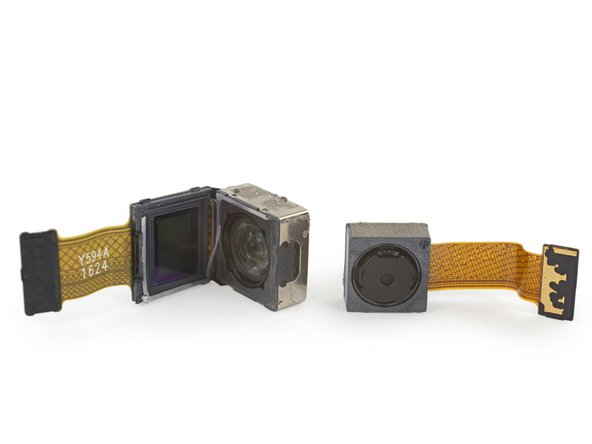
Und ein schneller Blick auf den Sensor und die Optik der Hauptkamera!
-
-
-
Chips auf der Vorderseite der Hauptplatine:
-
Samsung K3RG2G20BM-MGCJ 4 GB LPDDR4 mobiles DRAM mit einem quad-core Qualcomm Snapdragon 821 Prozessor darunter (Zwei Cores getaktet mit 2,15 GHz und zwei mit 1,6 Ghz)
-
Qualcomm PMI8996 IC zur Leistungsregelung und Qualcomm SMB1350 Quick Charge 3.0 IC zum Regeln des Schnellladens
-
NXP TFA9891 smart Audioverstärker.
-
Qualcomm WTR4905 LTE RF Transceiver
-
3207RA G707A (sieht nach Wi-Fi aus)
-
NXP 55102 1807 S0622 (vermutlich ein NFC-Kontroller)
-
Bosch Sensortec BMI160 low power IMU
Awesome! Unnanounced Quick Charge 3.0 support
Interesting that there's a tiny surface-mount capacitor next to the upper right corner of the Qualcomm WTR4905 chip that seems soldered in an incorrect position. Either the automated optical quality assurance systems used after the reflow soldering process are imperfect, or that single capacitor has been unsoldered and dislodged when the large shield cover plate covering that area of the PCB was unsoldered and removed by iFixit. Note that none among the other SMD caps, including much smaller ones, seem to have shifted their position at all, so it's pretty hard to tell whether iFixit (presumably careful) removal of the EMI shield plate is the cause of what looks like a soldering / manufacturing defect...
Scary catch there, fingers crossed google did their homework and don't give us the next round of boot loop issues(would be interesting to see how the Google/LG blame throwback would change if google made a similar soldering defect).
Owen M -
iFixit takes the utmost caution when removing EMI shields, but given this components proximity to the EMI shield's solder pads, it is likely that the capacitor was knocked off during disassembly.
The chip above the Samsung DRAM (red box), labeled with 1YN-TS, is the Inertial Measuement Unit BMI160 by Bosch Sensortec.
-
-
-
Und auf der Rückseite:
-
Samsung KLUBG4G1CE 32 GB Universal Flash Storage (UFS) 2.0
-
Qualcomm PM8996
-
Avago ACPM-7800 Leistungsverstärker
-
Qualcomm WTR3925 LTE RF Transceiver und Qualcomm RF360 Dynamic Antenna Matching Tuner (QFE2550)
-
Qualcomm WCD9335 Audio Codec
-
Skyworks SKY77807 Quad-Band Power Amplifier Module (PAM)
-
Bosch Sensortec BMP280-Serie Luftdrucksensor
You're right, and it's fixed now! Thanks for the heads-up.
So what is the giant blue-potted ferrite core inductor for? Tons of turns of tiny wire so it's not power related. 150khz RFID antenna?
NFC antenna, methinks
You will find Bosch Sensortec's BMP285 barometric pressure sensor in the metal-can package under the power amplifier
Is it possible to remove the hard drive in my dead pixel and replace it in a working pixel?
I know this phone is ancient at this point, but might anyone know which of the spring contacts are for the GPS antenna (if any)?
-
-
-
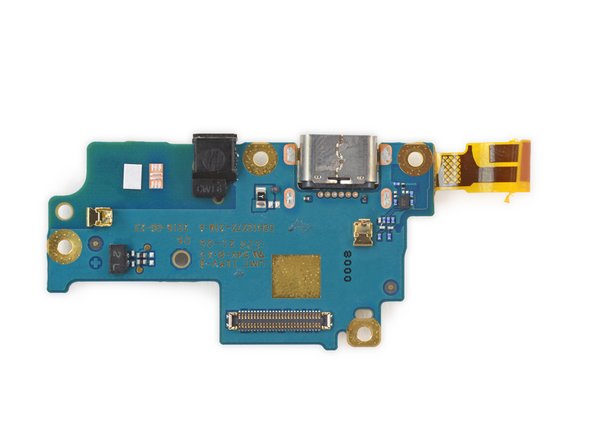
Die Tochterplatine kommt ziemlich leicht aus dem Gehäuse heraus, so dass wir an den USB-C Anschluss und das Mikrofon herankommen.
-
Das ist ein ziemlich simples Einzelteil, was bedeutet, dass der USB-Anschluss leicht ausgetauscht werden kann. Bisher waren diese Anschlüsse eine häufige Fehlerquelle (obwohl USB-C sich vielleicht in dieser Hinsicht als robuster erweisen könnten.)
-
Auf der Tochterplatine haben wir ein Stück Silizium gefunden: einen Qualcomm QFE2550 Tuner mit dynamischen Antennenabgleich.
-
-
-
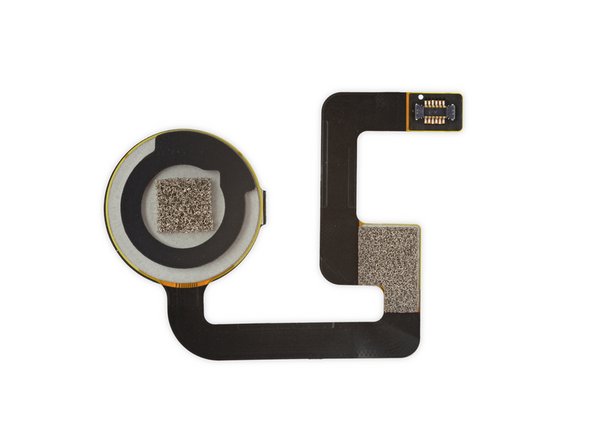
Wir geben dem Pixel Imprint Fingerabdrucksensor einen Schubs und lassen ihn wie eine Dachhaube vom Rückgehäuse abspringen.
-
Von Nahem sieht er anders aus, aber erinnert doch an die aus früheren Google Smartphones.
-
Obwohl HTC eine bedeutende eigenständige Marke ist, sieht es doch so aus, als ob HTC diesmal keine Spuren hinterlassen hat, außer auf dem Akku. Als Googles stiller Partner wurde HTC auf den gleichen Status herabgestuft wie Foxconn.
-
-
-
Am Rahmen des Pixel XL ist weiterhin der linear oszillierende Vibrationsmotor befestigt - da soll er auch sein, weil wir ihn mit ein bisschen Röntgenzauber in Aktion sehen können.
-
Unsere hochgeschätzten Mitverschwörer bei Creative Electron haben dieses süße Video gedreht, bei dem der Vibrationsmotor des Pixel mit der neuesten Taptic Engine des iPhone 7 Plus verglichen wird. Schau es dir an!
-
-
-
Teardown Update: Ihr habt gefragt und wir geben die Antwort — hier ist eine vergrößerte (und weniger verwackelte) Aufnahme dieses Vibrationsmotors.
-
Die metallglänzende Hülle des Vibrationsmotors hat uns nicht so sehr beeindruckt, wir haben sie daher im Dienste der Wissenschaft mit einem Rotationswerkzeug bearbeitet.
-
-
-
Nur für dich: ein pixelreiches Bild einiger prima Pixelteile.
If I just want to replace the back panel of the phone because the glass broke, is that possible or is it linked specifically with the phone.
It's not integrated into the case, just glued on @dmitrygr was able to do it with some heat and careful prying. Check out his comment on the teardown.
-
- Viele Bauteile sind modular und können leicht ausgetauscht werden, wenn die Displayeinheit erst mal entfernt ist.
- Der Akku hat eine Zuglasche zum Entnehmen und ist nicht zu stark verklebt, was den Ausbau vereinfacht.
- Alle Schrauben sind Torx T5.
- Zum Öffnen muss man an einer dünnen, wenig verstärkten Displayeinheit hebeln, wobei leicht Schäden entstehen können.
- Zusätzlich zu den Schrauben ist der Mittelrahmen mit eng sitzenden Kerben befestigt, welche es mühsam machen, (und auch die nachfolgenden Reparaturen) ihn zu entfernen.


Fazit
Reparierbarkeits-Index


(10 ist am einfachsten zu reparieren)
Besonderer Dank geht an diese Übersetzer:innen:
73%

Diese Übersetzer:innen helfen uns, die Welt zu reparieren! Wie kann ich mithelfen?
Hier starten ›

76 Kommentare
I didn't see any mention of the vibration module?
I was looking for the same thing.
It appears to be mounted in the rear frame of the device. They didn't remove it or the main speaker from the rear frame nor did they remove the earpiece speaker from the midframe.
I'm 99% sure that the vibration motor is the part I indicated in this photo: http://imgur.com/Sm9Ybn0
abqnm -
it should be the motor in angle on step 11
it should be the blue motor in angle in step 11 photo
Did you guys see the Phandroid video of the Pixel in water for 30 minutes?? How is this possible without glue and a good seal?
Keeping a phone alive underwater for short periods of time is not difficult—if the water is relatively pure it will not be highly conductive (and therefore not cause shorts). The real damage will show up weeks or months down the line when residual moisture causes corrosive damage. Although their ingress-tested Pixel seems to work fine now, I'd wager it won't be fully functional a couple months from now.
does anybody know, what this crazy little bluish thing on the mainboard is?
Same question, what is this ?...
It looks like a fuse of some sort. I wonder if its a fuse that blows if the system is modified. Kinda like what samsung has/had?
We added a close-up shot of that component and it looks like an inductor.
This might be the what I was looking for. This might be their IMU. It should be noted that in order to provide the same accuracy and sample rate as the Gear VR the would have to bring one of the more expensive IMUs possibly from Bosch, which is also used in the Oculus and HTC HMDs
NFC antenna.
Any info on the GPS antenna?
was the phone and/or display functional when you tried to re-assemble it? If I missed anything in that regard, I was hoping for clarification.
Can someone tell me what this circled component might be in my linked image?
Did we get any information on the vibration motor or the "X Axis Haptics"
The circled component is the loud speaker.
I'm fairly certain the vibration motor is the other component that was not removed from the rear case. http://imgur.com/Sm9Ybn0
abqnm -
Just saw your site....nice. Informative and takes away a little of the fear of the unknown while trying to save yourself a bundle on repairs.
Minor point, but Avago as a company doesn't exist anymore and is now all Broadcom Ltd since the acquisition.
Do you see the Avago/Broadcom wifi/Bluetooth combo chip in this phone ? I think it has been replaced by Google in-house designed chip because I did not recognize the model name
I would like to know that too. Need to attempt intrusive wifi repair, heat.
Sergei G -
Camera Manufacturer Please ?
Another fine teardown. I appreciate all the detail and photographs. Thank you.
I don't know if there is enough resolution for me to check the other components on the board in your large images. If not, could you check to see what IMU package they are using?
One thing that sets the Gear VR apart is running its IMU at 1000 Hz and being externally shielded from the internal RF, heat and magnetic fields of the phone itself. It would be interesting how they counteracted these effect in their design as well providing the same accuracy and sampling rate.
Thanks
Mike
All Things 3D
Have you thought of talking with Google about some small changes that would improve the repair-abilty?
Seems to me as though some of this would actually be cheap, and high repair scores would seem like a big marketing win (as well as happier customers).
Apple don't care, but Google just might - another way to differentiate themselves.
job well done!
Why would they make the screen so brittle? And what is the point of the midframe, if it's so flimsy does it really do anything?
The thermal engineering looks pretty bad when compared to Samsung's recent products or a lot of other devices.... I wonder whether it throttles.
Hello Guys really appreciate what you are doing, very neat and educational ... after discovering ifixit i never buy electronics without seeing the interiors first, you make it look like art. the phone looks pretty good from outside, but on the inside I find it more RF oriented than heat dissipation, i find that pretty HTC-esh and was actually surprised because i thought the aluminium and glass blend was more functional than that.
I find also your score of 6 is pretty generous for a phone that might -or might not- require a screen replacement if you want to replace the battery (in six steps)
The one thing that frustrated me most about this phone was the lack of a microSD slot... but interestingly it looks like the mainboard may have room allocated for one of the dual microsd+nanosim readers...
Ifixit, can you guys provide a to scale sidebyside of the sim card/sd readers on the Pixel XL and the GS7?
Yet another too-small, badly designed, and badly built piece of junk. Sorry.
Anyone could tell me which sensor is the geomagnetic sensor here? I'd like to know if the geomagnetic sensor is the same as in the 5X (I think in the 5X it was the BMM150)
Thanks!
Do you know where I can find a replacement glass for the back side that goes over the camera? Mine came into contact with cement and cracked the glass over the camera and now all indoor photos have a lens flare from the crack. Also, can you show us how to remove this glass too? Awesome tutorial!!
Any chance you could show how to separate rear glass from the metal?
I happen to have cracked mine, AND have a spare broken Pixel whose rear glass is not broken. I want to try to swap. Heating it and pulling did not help. Would you mind seeing how it is attached please?
+1 for the rear glass separation please? it'd be great to see how it comes off! Thanks!
wright9999, @dmitrygr , Iliyan Hristov, check out our standard Pixel blog post, we remove the glass panel there. It's quite sturdy, and with heat and thin prying tools you can remove it without damaging the antennas, it also helps to push lightly from the inside of the phone.
Alright - I managed to do it. Photos: https://goo.gl/photos/CTb2qVUBUpWWEh5Z6
Materials: hot air rework station (220 deg C), goo gone, vodka, 2 metal spudgers, utility knife, paper towels, 3M VHB tape, tweezers, needle
Process: heat all around the glass. Suction cups will do you no good (too much glue), use thin needle near plastic antenna insert on the right side (with phone face down) to raise right side of glass. insert spudger. with spudger and hot air station work around the glass from right to left via bottom. Then carefully raise it while heating on top. Do not spudger near top to avoid hurting camera. Carefully use tweezers to remove glue pieces from glass and phone. Use goo gone to clear off remaining glue. Use vodka to clear off goo gone, and clean camera lens from debris and dust. Carefully cut out as many VHB shapes as needed to cover all flat areas on the phone. Adhere them to the phone but keep the protective film on them on top.
(2/2) Once done, remove protective film from the tape pieces, carefully place glass on top of them. Squeeze.
Enjoy. :)
DO NOT scratch too hard against the back of the glass while you clean it. The whiteness of the white glass and the blackness of the black glass are just some sort of a coating on it, somewhat like paint. While peeling it off the phone and while cleaning it, you can scratch it and make transparent holes in said paint that look weird (see my photos - I did this a little on accident)
I did this WITHOUT opening the phone since I was afraid of breaking the screen.
Dmitry, so glad to finally see someone doing it! Have you seen a replacement rear glass part only sold anywhere? Unfortunately I do not have a spare one and still cant find it... looks doable, so i'd definitely try it out once parts become available
Can those chips be bought separately by an individual?
Sadly, not that I know of currently. I did ask internally about it. But this did happen, at least: https://www.ubreakifix.com/google-repair... :)
I purchased a Google Pixel XL at Verizon but cancel service due to lack of reception. I have not paid the entire balance on the phone yet so the warranty is no longer valid. That being said, the vibration motor has stopped working. I now need to fix this. Does anyone know where I can locate the part to replace? I've called several places but don't have that part in stock. Your feedback would be appreciated.
7/10 and you can't take the digi off without breaking it? lol ok fanboys
Sure you can, just takes time and an HTC spudger!
How could I remove the 32 GB hard drive from my broken pixel and put it into a working pixel to retrieve lost data?
You really cant. There is no hard drive in phones, only flash memory. There are some places that will use a reflow station to swap the flash modules but it is usually pricey and does not always work. Unless you have data of real value it is probably lost. For the future, make good, regular backups of any data you need just in case you ever lose/break the device.
Hi! How do we reassemble the screen on the phone? We need some special glue? Thanks
I dropped my phone in the toilet. I retrieved it quickly and it is working fine again except the camera lens has water build up and clouds up the pictures. Any suggestions?
i would buy a replacement back glass as that is able to come off, get the condensation out, and put the new one in
David -
Can the screen be pulled off the digitizer as my screen is cracked but phone works
Thx
Steve
where can i buy wifi chip “3207RA G707A (looks like Wi-Fi)” ?
Can anyone tell me, what is the black thing beside the mic on daughterboard??
I see no images for the back glass removal or the ribbon I just ripped during removal. It outlines the fingerprint scanner but is not associated with it. What did I tear?
Hey Michael, this is not a guide and should not be used as instructions. Our step-by-step repair guides are over here. From your description I can’t tell for sure what’s damaged, but you can try submitting a question in the Pixel XL section of the Answers forum. Good luck!
Hi guys! I have replaced my battery following this guide, but it won’t charge now. It is now totally empty, and if I put it on the charger, only the red light flashes. I tried putting back the original battery, it’s the same issue.
Also, if I not connect the battery at all and just put it on the charger, the red light flashing the same way.
I have measured the battery connector with multimeter and there is current in it (also there is still some current in the battery).
The phone eat out the initial charge of the new battery so the issue now is only with charging.
I have also replaced the charging board (bottom module with the USB-C connector in it) with a refurbished one but the issue still persist.
Is it than a motherboard issue?