Einleitung
Apples beliebter Sprachassistent ist wieder zurück, dieses Mal in Form einer Toilettenpapierrolle eines Mac Pro mit Jacke. Siri kann jetzt deine Fragen mit 360°-HiFi-Sound beantworten (oder es zumindest versuchen). Wie konnte Apple einen so großen Sound auf so kleinem Raum unterbringen – und warum hat das Unternehmen so lange dafür gebraucht? Vielleicht müssen wir es einfach auseinandernehmen, um das herauszufinden!
Hey Siri, wo kann ich weitere Teardown-News bekommen? Besuche uns auf Facebook, Instagram und Twitter. Wenn du deinen Teardown direkt in dein Postfach geliefert kriegen willst, melde dich für unseren Newsletter an.
Was du brauchst
Einführungsvideo
-
-
Welche Art von Technik hat Apple hier drin versteckt? Hier ist, was sie uns gesagt haben:
-
4 Zoll High-Excursion, nach oben abstrahlender Tieftöner
-
Sieben-Hochtöner-Array mit Beamforming
-
Sechs-Mikrofon-Array mit Beamforming
-
Niederfrequentes Mikrofon für die Echtzeit-Tieftönerkalibrierung
-
Oben montierte Touch-Fläche
-
802.11ac WiFi mit MIMO + Bluetooth 5.0
-
-
-
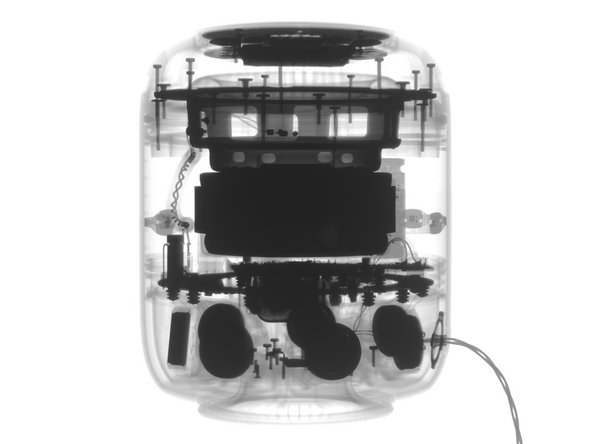
Er ist weder der erste smarte Lautsprecher noch der größte noch der kompakteste. Aber er ist sicherlich der Apple-igste.
-
Wie alle anderen besitzt er die zylindrische Grundform typisch für 360-Grad-Lautsprecher.
-
Der vielleicht offensichtlichste Unterschied ist, dass er, anders als Amazon Echo und Google Home, ein eingebautes Netzteil mit fest verbundenem Netzkabel besitzt. Update: Zeigt sich, dass es doch rausgeht, wenn man nur fest genug dran zieht.
Power cord IS apparently removable if you pull hard on it., and you can plug it back into a proprietary connector. What else to expect from Apple.
Actually, letting high voltage run along the power cord into the device without protecting earthing ground is a safety issue. Converting the voltage down inside the wart already fixes that.
Double insulation ftw! See Class II devices: https://en.wikipedia.org/wiki/Appliance_...
Oy…I’m confused with the switching to top to bottom top to bottom… If one wanted to get out the main board with the A8 on it, what’s the least destructive and relatively easier path…work from the bottom or work from the top?
You work from the top. I wrote up a disassembly guide, it’s on the device page. Remove the top touch surface cover, then the actual touch pad/LED portion and then the logic board is directly underneath. :)
-
-
-
Wir finden eine Menge regulatorische Informationen unauffällig unterm Geräteboden:
-
FCC, Elektronikschrott, Regulierungsmarkierungen aus EU, Australien und anderen Ländern - trotz des festinstallierten US-Steckers an unserem Modell - und ein Hinweis auf doppelte Isolation.
-
Neue Modellnummer, A1639.
-
Und ein paar winzige Löcher.
What’s the FCC ID?
The tiny holes must be present to prevent a vacuum from forming when the base rests on a flat surface like a glass top.
I am 100% agree with Leonard, this tiny little hole is to release vacuum.
As everybody know, silicone is a super sticky rubber, it has to have special treatment to reduce stiction.
The vacuum will not only appears on glass furniture any sealed surface will create this issue.
As we see the “residue gate“ currently have on wood furniture. The silicone will release some oil or “blooming“ on rubber technology. These oil is intends to let the elastomer softer as an internal lubricant(an internal lubricant is to soften the silicone rubber) but they will gradually release over time.
-
-
-
Als Nächstes werfen wir einen genaueren Blick auf Apples nahtfreies 3D-Akustikmesh.
-
Ein schickes Touch-Bedienfeld (falls Siri eine Pause benötigt) und eine bekannt erscheinende LED-Anzeige sitzen oben auf dem HomePod.
-
Dank der Röntgenstrahlen von Creative Electron können wir einen Blick ins Innere werfen - und es sieht so aus, als gäbe es hier einige enorme Magnete (erkennbar an den schwarzen Flecken).
-
-
-
Unsere Röntgen-Aufklärung zeigte uns einige Schrauben unter dem Standfuß, also haben wir unsere Untersuchung auf die Klebeflächen konzentriert, die ihn halten. Erst nach ordentlichem Hitzeföhnen waren wir in der Lage, den Fuß langsam freizubekommen und abzuheben.
-
Sogar mit dem Wissen, dass die Schrauben da sind, haben wir uns nach dieser aufreibenden klebrigen Nummer auf das Schlimmste vorbereitet...
-
..., sind aber erleichtert, reparaturfreundliche Torx-Schrauben zu finden. Ebenfalls unter der Bodenplatte befindet sich ein 14-Pin-Anschluss, vermutlich zum Testen oder Programmieren von HomePods auf Pogo-Pins beim Zusammenbau.
yes any news on the pogo pins connection? No leaked schematics? It might be helpfull to connect the homepod to a pc for a firmware update like it’s possible with the mini?
There is no way to downgrade them because the IPSW isn't public
Shim -
-
-
-
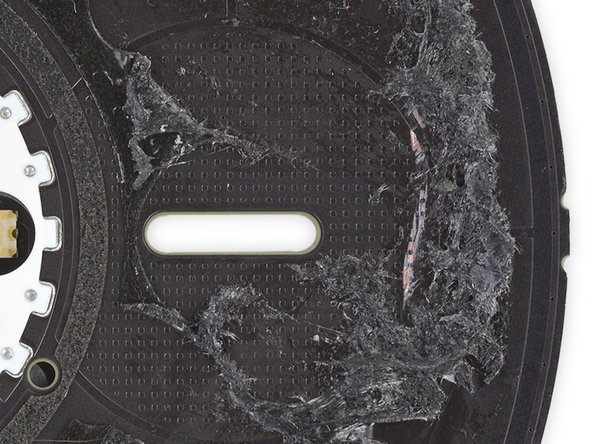
Vielleicht sind diese Schrauben nicht so freundlich wie gedacht. Nach dem Ablösen ist die Kunststoffplatte. die sie halten,... immer noch fest. Scheint, als ob das Mesh die Zugangsplatte ebenfalls festhält.
-
Wir wollen den Bezug wirklich nicht zerschneiden, also lassen wir ein Plektrum die verklebte Kante des Bezugs entlang gleiten und ziehen die Kappe ab. Der Preis? Mehr undurchdringlicher Kunststoff, der sich nicht bewegen lässt.
Those particular screws are T5. We didn’t encounter any security screws—just standard Torx.
Mine has 3 smaller screws on the bottom as well
-
-
-
Vermutlich etwas Scharfes. Wir gaben unser Bestes, um den Bezug nahtlos zu halten, aber ohne Ergebnis. Nun, dies wird nicht das erste Mal sein, dass wir durch irgendeinen schicken Stoff schneiden mussten.
-
Beim Schneiden durch das dichte, drahtartige 3D-Gewebe finden wir eine zweite, innere Stoffhülle.
-
Diese dünnere, flexiblere Hülle klemmt unter der oberen Kappe, also bleibt sie erstmal, wo sie ist.
-
Zum Glück ist das innere Gehäuse nicht so nahtlos wie das Gewebe und wir finden ein paar mehr Torx-Schrauben, verborgen unter (echt schönen) Gummistöpseln.
Before you cut the fabric you can remove the cable! It’s a snap-in design which you can see here: https://www.youtube.com/watch?v=gjxILSOf...
If there’s a solid wall of plastic behind the mesh, why does it matter if the mesh is “acoustically transparent” or not?
The mesh covers the openings for the speakers and microphones as well, they’ve just extended the mesh from those areas to uniformally cover the entire device except the touch controls area.
Urname -
Urname, but those slit openings appear to be only for the microphones, are you sure, looks like from the photos that the tweeters have to blast through the plastic which would very much explain the muffled sound the HomePod produces.
-
-
-
-
Unser Nutzen der neu erzeugten Naht: wir können sehen, welche Faser-Magie in dieser Umhüllung steckt.
-
Keine Hexerei, aber wir sehen, dass das Gewebe oben und unten aus einer netzähnlichen Schicht besteht, zwischen denen sich dünne Drahtspiralen befinden.
-
Jetzt, wo das Gewebe runter ist, sehen wir, dass es eine umlaufende Zugschnur hat! Heißt das, dass es einen nicht-zerstörerischen Weg in den Deckel gibt?
Yes, the sleeve slides off as shown in Kelsey’s video above this guide. :)
The outer mesh looks very similar to the paper based rope used in their retail bags.
Yes, it has a drawstring! Oops!!!
-
-
-
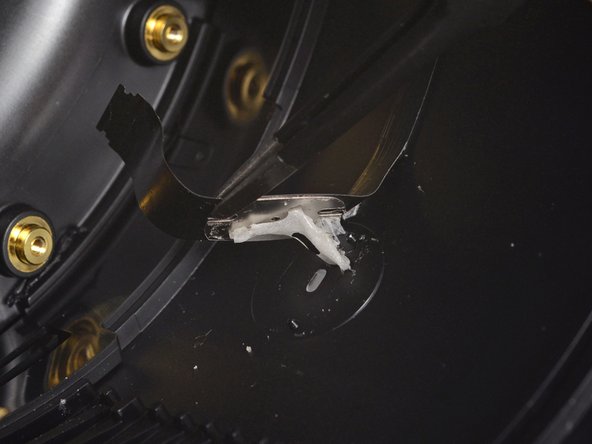
Auf der Suche nach dem Eingang, ziehen wir den verklebten Deckel ab, um auf noch mehr Schrauben zu stoßen, die - naja, scheinbar ins Nirgendwo führen.
-
Nach noch mehr Hitze und noch einem Klebedeckel tauchen wir noch tiefer ein und finden endlich etwas Substanzielles.
-
Unter Tür Nummer drei kriegen wir: eine gut geschützte Platine, ein breites Flachbandkabel und die Poller der Zugschnur
How does the top plate respond to touch - it looks like a piece of plastic that isn’t connected to anything
Great question. We think there’s a capacitive grid on the board below—see Step 10 for some updated info. But you’re right, the touch surface itself isn’t wired to anything.
Great teardown! I’m super interested in how the light gets passed through from the “+ -” symboles shaped holes in the pcb, all the way out of the cover plastic.
I have a hunch that it’s a transparant part, where they used a black film on the back side, with the + and - marks cut out, but I’m not sure.
do you happen to know if they used a multi-layered material for the cover plastic?
The LEDs are mounted to the board and diffused through the clear plastic light guide you see to the left of the board in the first image in step 10, all the lights on the board shine through the semi-transparent plastic lid.
The LEDs are mounted to the board and diffused through the clear plastic light guide you see to the left of the board in the first image in step 10, all the lights on the board shine through the semi-transparent plastic lid.
-
-
-
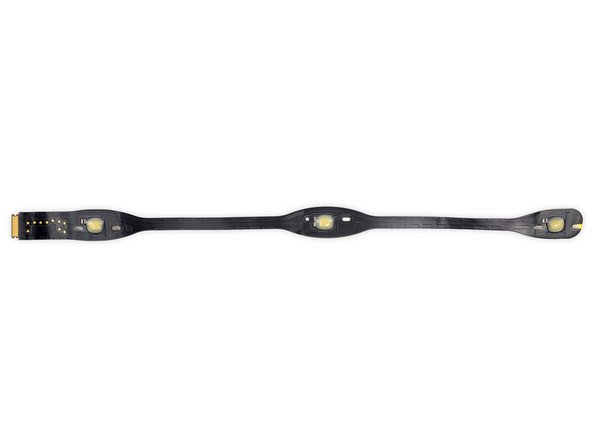
Das Lösen der Platine zeigt uns das Spielzeug, das die Lichtshow auf dem Deckel betreibt:
-
Texas Instruments TLC5971 LED-Treiber
-
Cypress CY8C4245LQI-483 Programmierbarer System-on-Chip, vermutlich für die Touch-Steuerung
-
ON Semiconductor FPF1039 drehzahlgeregelte (slew rate) Lastschaltung
-
Texas Instruments TPS62135 4 A Abwärtswandler
-
Die Rückseite der Platine beherbergt die LEDs und den Diffusor, der der Anzeige ihren verwaschenen Look gibt.
-
Die Oberseite der Platine (zweites Bild) beinhaltet ein sauber angeordnetes Muster kleiner Elemente - vermutlich ein kapazitives Raster, wie auf dem Google Home, um deine Berührungen und Bewegungen auf der Oberfläche darüber zu registrieren.
it looks like the + and - buttons have their own lights on the bottom side of the board (those 3 led bars on each side). if they wre lit purely from the array, how are they lit when the array is off, and how do they turn off when the array is on?
I think you’re right about that! We didn’t look closely enough. The teardown has been updated to make that bit more accurate. Thanks for the tip!
-
-
-
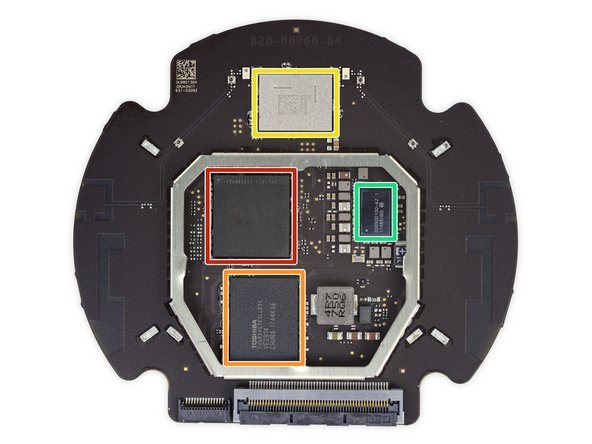
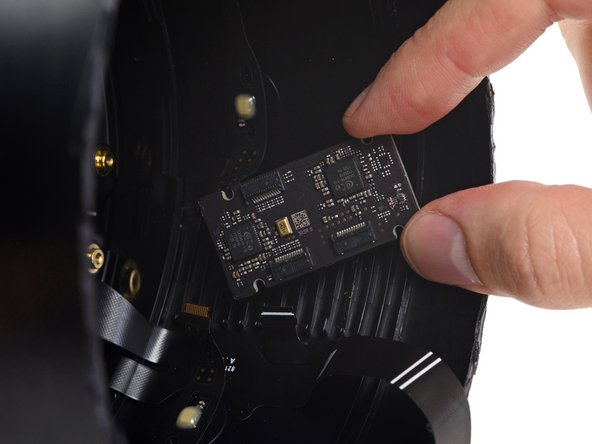
Die nächste Scheibe, die einem entgegenkommt, enthält die ausgefuchsten Zugschnurpoller - und dahinter die Hauptplatine
-
Chip für Chip sehen wir:
-
Apple A8 APL1011 SoC (haben wir schonmal gesehen, aber hier hat er einen anderen Job), vermutlich gekoppelt mit 1GB RAM (darübergelegt in typischer PoP-Konfiguration)
-
Toshiba THGBX4G7D2LLDYC 16 GB NAND Flashspeicher
-
USI 339S00450 WiFi/Bluetooth- Modul, vermutlich mit Broadcom BCM43572 innendrin
-
Apple/Dialog Semiconductor 338S00100-AZ PMIC
-
Interessanterweise gibt es auf der Rückseite ein paar unbesetzte SMC-Sockel für einige Chips und Passivbausteine. Ob der HomePod in letzter Sekunde noch Designänderungen unterworfen war?
-
-
-
Nach viel fruchtlosen Herumprobierens mit Hitze und Verdrehungen aller Art sind wir ratlos, wie wir weitermachen sollen. Schließlich werden wir ungeduldig, schnappen uns die Bügelsäge (und den Ultraschallschneider) lösen die kraftvolle Bassmembran.
-
Wenn der Magnet des Bass-Chassis groß aussieht für einen Lautsprecher dieser Größe, dann weil er es ist. Tiefe dramatische Bassklänge kommen daher, dass ein Lautsprecher eine Menge Luft bewegen kann.
Kinda disappointing that they cheeped out with a ferrite magnet and not neodymium.
This guy manages to disassembly in a non-destructive way: https://youtu.be/3AnAy6HvlbI?t=634
il suffit de chauffer doucement , pour séparer les éléments
Caution!!!
This is not the way to open the lid.... There is an non destructive way look at Nic's Fix he has mastered it. https://www.youtube.com/watch?v=FfGiuh_Q... 7:52 in -
-
-
Nach dem wir uns schneidend und biegend den Weg ins Innere dieser Lautsprecherfestung gebahnt haben, erreichen wir das letzte Hindernis: einen geschraubten Ring.
-
Wir sind gezwungen zu beschließen, dass - zu einem bestimmten Zeitpunkt - der HomePod dazu vorgesehen war, für eine Trennung der Steuerung-/Bass-Einheit und der Hochtöner/ Netzteil-Einheit aufgeschraubt zu werden.
-
Wir fühlen uns nicht besonders schlecht, etwas gröber rangegangen zu sein; ausgehend vom Klebeband an der Unterseite der Röhre ist das Gewinde nicht für den Endkunden vorgesehen - hier wurde alles für die Ewigkeit geklebt.
Has anyone figured out a non destructive way inside? The fabric/mesh can be removed and reinstalled with out damage as can the brains, but there is no way I know of to access the speakers, power supply or amplifier board.
@ouimetnick Someone did! See the update to Step 12, above.
This guy manages to disassembly in a non-destructive way: https://youtu.be/3AnAy6HvlbI?t=634
Thiago -
-
-
-
Die nächste Schicht unserer HomePod-Zwiebel (oder vielleicht Parfait?) ist die zweiteilige Spannungsversorgung, bestehend aus innerem Ring für den Gleichrichter und äußerem Ring für die Leistungsverteilung an die acht Lautsprecher.
-
Die Elemente auf der Platine des Wechselspannungseingang sind mit Epoxy geflutet, vermutlich damit sie von den entstehenden Vibrationen nicht kaputtgeschüttelt werden. Die Schaltung schickt Leistung an die Ringplatine über leitende Schraubstellen à la Mac Pro 6,1.
How come you conclude “durability is not an issue” with a mofset GLUED, to a capacitor ?!
How can you miss that ? This is why most electronic appliance fail after a few year.
Judging from the appearance of the surface, the filling between the components is probably Silicone not Expoxy. Epoxy is avoided nowadays because of the toxic base components, difficult curing behaviour, bad flexibility after curing and limited thixotropy.
-
-
-
Wir haben Teil Zwei der Spannungsversorgung, den
Stargate HaloRing für Leistungsverteilung, am Haken. -
Die kondensatorbesetzte Seite unserer intergalaktischen Netzteilplatine beheimatet eine STMicroelectronics STM32L051C8T7 Ultra-Low-Power ARM MCU.
-
Und auf der anderen Seite finden wir:
-
International Rectifier PowlRaudio 98-0431 AudioVerstärker
-
Cirrus Logic CS4350 Stereo-DAC mit integriertem PLL
-
Und über den Umfang verteilt sind sieben Analog Devices SSM3515B Audioverstärker - scheint, als seien diese die jeweiligen Verstärker für die Hochtöner!
-
Maxim Integrated MAX9938 and Texas Instruments INA210 Stromsensor-Verstärker
-
Texas Instruments TPS54560 5 A Tiefsetzsteller
-
-
-
Wir lösen eine kleine Platine vom Kleber, mit dem sie am Gehäuse befestigt ist, und erkennen zwei Conexant CX20810 ADC-Chips von Synaptics für das Mikrofon-Array.
-
Die Karte verfügt über ein eigenes Mikrofon - wahrscheinlich das Tieftonmikrofon für die Kalibrierung des Tieftöners.
-
Zurück zu den restlichen Mikrofonen: Sie kommen in zwei langen Streifen mit je drei Mikrofonen. Jeder Streifen ist fest mit der Innenseite des Gehäuses verklebt, wobei die Mikrofone über trichterförmige Kanäle positioniert sind.
-
-
-
Wir ziehen einen weiteren Gewindering aus dem HomeBody und erhalten schließlich Zugang zu
Schneewittchen undden sieben Hochtönern, komplett mit ihren Stromversorgungspfosten. -
Richtig - diese goldenen Gewindepfosten liefern Strom an die Hochtöner.
-
Beim Blick auf einen der Schalltrichter haben wir ein ganz dummes Gefühl bei der Sache. Vielleicht ist aber auch nur der Hochtöner nervös.
-
Zeit, den Ultraschallschneider rauszuholen und diese Einheit aufzuschnibbeln.
-
-
-
Mit der geöffneten Tweetet-Baugruppe haben wir einen besseren Blick auf den Hochtöner mit Horn und Lüftungsöffnungen, der dem HomePod seinen "präzisen" Sound verleiht.
-
Die Öffnungen an den Seiten der Schwingspule und die vier Löcher auf der Rückseite des Hochtöners verhindern den Aufbau von Luftdruck hinter der Hochtöner- Kalotte, wenn sie sich bewegt.
Is this oil at the edge of a voice coil?
I think what you’re referring to might be the potting epoxy. The golden brown liquid-looking stuff on the coils?
Ted -
Also I’m baffled by a sentence in the post linked about diamond tweeters, what does “accurately reproducing audio above and beyond the limits of human hearing” even mean? Isn’t that a little paradoxical?
Ted -
I guess its for your dog who’s hearing is better than ours ;-}
Dan -
Maybe we have to update the adage “If a tree falls in a forest beyond the limits of human hearing, does it make a sound?” :P
the oil is probably ferrofluid to cool the tweeter and improve it’s magnetic properties
Ohh, right that makes more sense… It would sound horrible if it was solid the way it’s so thick and uneven on the coil. Scratch what I said about “potting epoxy”
Ted -
You gotta wonder though, with the vents on the other side of the driver, doesn’t this mean that the ferrofluid would degrade that much more quickly? Maybe it’s only meant to be used for 5-7 years, which is reasonable for laptops, etc, but if I’m going to buy a speaker, I’d want to get one that sounds great, and keeps sounding great for a long time…
Ted -
There is no oil in that photo.
-
-
-
Und damit haben wir alle Teile, die aus einem Siri-Haus einen HomePod machen.
-
Weißt du, wie Apple sich an so etwas heranarbeitet? Haben wir irgendeine Lautsprecher-Weisheit verpasst? Teilt uns das in den Kommentaren mit und lasst euch das Teardown-Video auf YouTube nicht entgehen.
-
Zum Schluss ist es wieder Zeit, den Reparierbarkeits-Score zu vergeben. Trotz einiger positiver Punkte, steht fest, dass wenn die Öffnungsprozedur wirklich unumkehrbar ist, wir das entsprechend bewerten müssen.
Salut Apple,Je suis André!
j’ai mon Home pad il s’allume mais il ne foctionne pas,ça arrive brusquement.que puis je faire?
-
- Der HomePod ist wie ein Panzer gebaut. Haltbarkeit dürfte kein Thema sein.
- Die äußere Stoffhülle kann trotz Fehlens von Nähten unbeschadet entfernt werden dank einer ziemlich coolen Zugschnur.
- Alle Schraubverbindungen gehören zur Standard-Torx-Familie - keine ärgerlichen Sicherheitsschrauben an dieser Stelle.
- Das sehr schlaue Verwenden von leitenden Gewindebuchsen vermindern den Kabelwirrwarr, der mehrfach gestapelten Komponentenschichten.
- Sehr starke Verklebungen sichern die Touch-Abdeckung, die Mikrofon-Anordnung, den Gummifuß und (am ärgerlichsten) den Hauptzugang im oberen Gerätedeckel - der ansonsten eher so aussieht, als ließe er sich einfach abschrauben.
- Obwohl es so aussieht, als gäbe es einen beschädigungsfreien Weg ins Innere, haben wir diesen nicht entdecken können. Ohne Reparaturanleitung sind die Erfolgschancen gering.


Fazit
Reparierbarkeits-Index


(10 ist am einfachsten zu reparieren)
Besonderer Dank geht an diese Übersetzer:innen:
100%


Diese Übersetzer:innen helfen uns, die Welt zu reparieren! Wie kann ich mithelfen?
Hier starten ›
82 Kommentare
Thanks guys, very interesting report!
The power cable is actually user removable and replaceable. You just have to pull on it *really* hard. https://www.youtube.com/watch?v=gjxILSOf...
Very good teardown! Thanks!
Apparently the AC cable is replaceable, yet not meant to be user-replaced: https://9to5mac.com/2018/02/10/remove-ho...
What is the DAC?
My best guess would be Digital to Analog Converter :)
Rok -
I can’t seem to understand how the sound from the tweeters comes out. The whole thing looks like a solid plastic tube except at the top where the woofer is. I see the tiny holes for the microphones, but how is sound dispersed from the tweeters?
I was wondering the same thing. I remember The Verge mentioning that the tweeters actually fire downwards and reflect off the table, but I can’t figure out how that works either…
Jared -
It does seem like they’re down firing out of the bottom. It’s just odd there’s so much “transparent mesh” all through the sides of the speaker and no sound actually coming from the sides.
Look closely at the step 7, this thing has vents on the top and bottom
In step 17 you can see two small trapezoid/squares at the bottom that match the vents in the tweeter, these are the only openings in the bottom (the test port being plugged by the rubber foot). I think Gleb is confusing the gaps in the top (to the left where the mesh is still attached) for the bottom.
“It does seem like they’re down firing out of the bottom. It’s just odd there’s so much “transparent mesh” all through the sides of the speaker and no sound actually coming from the sides.“
that is for the microphones…see the holes around the outside of the cylinder?
It looks like if you had opened the top first you might have been able to release the draw string and not have to cut the mesh…
Yep! We did mention that in the teardown. ;)
But the guide still says that you have to cut it. Might want to edit that out.
Hi Zachary! This is not a guide, and isn’t meant to be used to repair a device. Teardowns are just meant to be a look at our first attempt to disassemble something, rather than explaining the best way to replace a part like a guide would. In the interest of giving readers a genuine look at our experience, we like to leave teardowns as they are, mistakes and all.
Step 15: Think you should look for what amplifiers drive the tweeters; looking closely at the underside of that PCB there are some parts labelled “SSM” - which may be Analog Devices IIRC?
Good catch! Thanks for the tip. We’ve added a note to that step.
I know ifixit wants everything to be repairable but I also want everything not to fall apart. Your comment about all the adhesive holding things in place is why I would consider getting this outrageous speaker. I suggest you add a second score for durability and give it at least a 9 until you can determine if the power cord can actually be removed and replaced for less than $300. I’d like to see how durable all the other speakers are. Just because you can repair them doesn’t mean everyone WANTS to have to repair them. Even if a couple of the tweeters fail, I’m sure you’ll still get some really good sound out of it.
I’m with you on this…seeing how well this is constructed, tightened and sealed up to prevent the many vibrations from loosening things up, that, if not done that way, could easily have caused this to make vibration noises or break over time. This is some pretty ingenious engineering —hardware, and, from what I’ve read, software — if I could, I’d run out and buy a couple of these right now!
Do you recall the 1 TB Time Machine? I thought that thing was built solid, but it lasted exactly one day past the warranty expiration date. Failed due to a massive design flaw (no fan). With that much power going to drive the huge magnet on that speaker, I doubt it will last. The epoxy will solidify with no way for the heat to escape, then break apart after repeated use of playing music. You may say air will flow through with the movement of the cone, but I don’t think it will be static enough to properly cool over repeated use. That thing will break one day after the warranty expires.
Thanks you very much !
I think, we must be take care of our HomePod.
Would using a hack saw to open, pretty much basically make this un-repairable? I would think that would be a 0 for repairability
It gets 1 point for the few things you can get at non-destructively. It only gets 1 point because that’s a small fraction of the total system.
You guessed that the epoxy keeps the speaker from rattling its power supply apart, but it might just as likely prevent buzzin/rattling sound from vibrating parts , since this thing seems to be quite the power shaker.
Is it really built like a tank? Wow!
The idea that everything has to be repairable is utter nonsense and needs to go away. Just stop it with that. 99.9% of consumers cannot repair things, for gods’ sakes so many people don’t even know how to cook! The reason things are hard to repair these days is because of 3 main factors:
1) They would be more expensive to manufacture if they used lots of nice machine screws all over rather than glue. This cost would be passed to us.
2) If they were built weaker to make it easier to take apart, unless they are designed in a more expensive way, they would be less durable and in the case of this speaker, you’d hear buzzing and rattling noises after a while. No thanks.
3) Repairing would require detailed repair manuals, spare parts that are packaged for individual resale, logistics of all that resale. And out of millions how many need repair before outdated? Have you taken these facts into account? Easy to just want want want, how about think through what that desire actually entails and how complex it would be!
Horses for courses. I think 99.9% is way off. I have been tearing stuff apart since childhood and love to DIY. Curiosity is a huge factor. It does not always end well but iFixit has been invaluable and I consider it another tool in my repair kit! Another great job.
With respect, this is a ridiculous thing to say. You’re at a website called iFixIt. What do you THINK people care about here? If this were a random tech site, then sure— repairability is probably not a priority. But at a website dedicated specifically to repairing electronics… I think you’re in the wrong place, my friend.
This kind of attitude is why there are overflowing landfills, chemicals in our water, and plastic in our oceans. The unfortunate thinking of racing headlong toward disaster being averted by some new magic technology to reverse our foolish ways—or we’ll move to Mars—is a sad commentary on our society today.
1) When devices that are put together with screws already, and then glued or taped shut (iMac,) so as to avoid repair, 99.9% of the reason why is to force consumers to buy again.
2) No speakers I own cannot be repaired, and the drivers are easily more powerful than those on the HomePod.
3) Actually, this argument sounds like a direct plug for iFixit.com! Repairing isn’t for everyone, but many used to have this necessary skill and many still have an interest. Clearly, we are a consumer society who are not meant to be self-sufficient, lest our benevolent-overlord companies lose profit margins (aww, poor, sad Apple.) Planned obsolescence also goes against the very nature of we who would like to repair.
I’m just tired of DIYers insisting that non-DIYers subsidize the extra cost of making everything repairable. If you want to repair something, figure out how to do it, but don’t ask everyone else to subsidize your tinkering hobby.
Benf -
Hey Benf! This isn’t just about hobbies and personal repairs! Every one of these devices will eventually need to be retired, either recycled and shredded, or put in a landfill. If the device is too hard open, it’s usually too hard to recycle, it’s not monetarily worth it to attempt it. That means the device, and all the manufacturing energy and materials are going to waste. Repairability means thinking about the full life of the device. Plenty of manufacturers are successfully building repairable devices—Apple included, with little visible cost to the user (Compare a Note8 $950 USD, score of 4, to an iPhone 8 Plus $800 USD, score of 6). Also as a note: I would guess that leaving the glue out of the threads is probably not a wild cost increase that requires customer subsidy.
Sam Lionheart, I agree with you. Sadly, I highly suspect the reason for the repair costs being as high as they are is because Apple won't even try to repair your old unit if it breaks. They'll just throw it in the bin and ship you a new one.
Anton -
It’d be fun to see how it is built!
I wonder if Apple could be “persuaded” to do that - to make “assembly videos” for all to see? Or maybe - given that it’s Apple - for a 1.99 Apple iTunes purchase. $0.99 if you just want to see one, $2.99 gets you six, $9.99 gets you the whole lot. Not sure how many people they could get to pay once the novelty had warn of though.
jimwitte -
I’m really curious what was supposed to be on the unpopulated SMD slot on the back of the main board. Also, the shieldings on the side hasn’t been opened in the shot.
The tweeter firing direction is pretty clearly downward per the see-through picture on https://www.apple.com/homepod/
I do see that, just seems like such a small area (per image in step 7) for all the sound to come out compared to the size of the speaker, but I guess that’s part of the magic of getting the mics to work while sound is blaring.
HF sound doesn’t need a big space, the wavelengths are quite short, so the tweets flowing out the bottom seems logical. The horns will control dispersion somewhat, and possibly add efficiency (not much really), plus essentially they are there to change the direction of the sound.
Also re: getting mics to work while sound is blaring, that’s the easiest part to conceive of how to do. Since the sound is digital and it knows what’s playing, it should possible to “subtract” that sound from the incoming waveforms from the mic(s) in real-time, so it can “hear” you no matter what is playing or how loud.
ed -
You have it all wrong. There is no right to repair. Apple made it durable. JRX16, great comment. I find it far more dubious that a company that sells tools and repair knowledge is agitating for legislation that gives consumers repair rights than a company that uses adhesives to manufacture a durable and well made product. iFixit is the solution in search of a problem.
Just a random person on the internet here: I want to be able to repair stuff I buy.
Repairability is good for the environment.
I think you’re on the wrong website. This site exists for those of us who DO believe that there is a right to repair, and who DO put value in products that can be repaired easily, whether that’s by someone with some skill, or by a layman who doesn’t want to fork out 85% of the cost of his product again to get it fixed.
While it is absolutely your right to disagree with this view, you are the one on this site, looking at this teardown, of your own free will, so if you don’t put any stock in what this site, or it’s many users think, then you are more than welcome to go, buy your durable adhesive secured speaker and not worry about us. But, please keep those views to yourself as the other 99% of the users here would very much like to be able to repair our speakers.
- Also, just an aside, the repair information on this site is available for free.
Joe -
Repairability is good for the environment only if the number of people willing and able to do repairs is high enough to offset the greater materials cost of building something both durable and repairable. Repairability has a cost of its own that can’t be ignored.
I’m very skeptical that enough DIYers exist to offset the higher cost, but it’s not an issue of opinions but simply a factual question that requires research.
The other aspect to consider is that DIYers are asking non-DIYers to subsidize the extra cost for them of making a repairable device.
Benf -
A picture of a hacksaw, seriously? Why include a sensationalist picture of “hacking at the device to fix it”? That’s very misleading to those who miss the details that a hacksaw was NOT used. I understand that not everyone is going to have a sonic cutter; but that leads me to my next point…
iFixit was so rushed to get this article out on Monday that they just King Kong’ed their way into it without re-evaluating what was the correct way. Couldn’t you have heated the outer edge of the unit to loosen the glue on the thread of the sub? Couldn’t you have unglued the top to gain access to the draw string so that you didn’t have to cut the fiber mesh?
It sounds like the major complaint was use of adhesive everywhere; but I do not believe it is unreasonable to consider Apple would do that for a device that instead to have a high rate and amplitude of vibrations, like a multi-driver speaker.
People use these tear downs as guides for fixing their device. I hope iFixit redos this article with a more sane approach.
This is not, in any way, meant to be used as a guide. That’s clearly stated in the banner right at the top. ;) If someone decides to take a hacksaw to their HomePod, that’s on them. Regarding the glue, unfortunately there’s no way to see where it’s located or even that there’s glue at all until you have the thing open.
iFixit explicitly states at the top of each of their tear-downs: “This teardown is not a repair guide.” I for one love the humor iFixit exhibits in their tear-downs. Maybe you should take a look at one or two others, you will see various forms of this humor reproduced throughout.
I’ve got a bone to pick, and it’s possible there’s a logical explanation to this I’m not seeing. Why did this score a 1/10, but the Surface Laptop scored a 0/10. I’m pretty sure both of these were destroyed to disassemble them. I don’t want to cry “fan-boy” but I consider both of these absolutely non-self-repairable and both are overpriced for their respective category. !&&* you cannot even replace a single component on this, at least the surface adapter’s AC cord can be swapped for a non-us plug (or vice-versa).
It had a few bits accessable without the hacksaw. They weren’t able to get at anything in the Surfacebook without cutting the fabric earning it an even worse score.
Great post! A question posed here rather than another site simply because there are smart folks here… Why are mics inside the unit being used to tune/modify the woofer? Why not instead do software-side processing before the sound is put out, based on analysis of the soundwave and clear understanding of the internal acoustics during hardware design? If anything, I would think once the sound is emitted from the speaker you might take into account external factors like specific room acoustics, or even air pressure(?) and then accordingly modify the sound. In that case, I’d think the mics are on the outside, not the inside. But what do I know.
somehow the speaker/microphone combination reminds me of the motion-feedback speakers that Philips promoted in the mid 1970’s.
Seems to me that the 6 Mics listen to the outside through little tubes in the housing. They are glued over little openings, which can be seen in the second picture of step 7.
> Why not [tune/modify the woofer] software-side processing before the sound is put out, based on analysis of the soundwave and clear understanding of the internal acoustics during hardware design?
Is that really possible though? The acoustics I presume (might) be affected by whether it's sitting on glass or wood (or hung from the ceiling?!), whether it's next to a wall, maybe air dynamics (pressure, humidity, etc). And then there's maybe a "random factor" - most of us here have probably seen plots of the famous Lorentz Attractor.
But then, what exactly does "tuning the ["sub"]woofer" even *mean*? I would assume identifying whether it's creating some frequency that's making a buzz with relation to the case/table/whatever, and getting rid of it. But is there anything else going on?
jimwitte -
I don’t understand the comments about products not being repairable.
There does not need to be a conflict between product lifetime, ease to repair. IFixit compared the HomePod to a tank. Well in fact you can repair tanks. And you can repair comparable speakers - for example the Sonos 3.
In the past, basically all speakers have been repaireable. And I haven’t heard “buzzing and rattling noises ” being a problem. Also with more easy to repair high-end connected speakers eg from Sonos or Raumfeld, rattling noise is not an issue.
I indeed believe it ultimately comes down to cost. Cheaper production. And not wanting to stock spare parts. Apple want to maximise their profit - which of course is their right. In fact that is the goal of every company, I guess. Even though a gross margin of ~40% or ~88,000,000,000 US$ should allow for adding a few screws.
Joking aside - I think we have a responsibility for our children, reducing waste, by products repairable and recyclable - for both glueing is not the best choice.
There are pros and cons about product repairability against cost efficiency as well as build quality. We have seen the failure of modular phone (project Ara?) which is a clear indicator that modularity/repairability (since you can swap out any component) evidently not the best selling point. Consumer prefer a neat, smooth and well built product which doesn’t break when get dropped, bent when seated on than an average, highly repairable product. It’s just not ‘sexy’ to be repairable and we have to deal with it.
That aside, why do we want repairability in the first place? Actually we don’t… but the environment need it. Imagine top of the line product that is sold in number of 100 millions get depreciated and broken after 2-3 year because 1 hard to replace component is design to fail in that period of time (planned obsolescence), we’d get ~1,7 thousand tons of electronic waste every single year.
If you as a company design unrepairable stuff, step up your game with environmental responsibility.
Was anyone able to identify the maker of the microphones?
I want to know the MIC brand!!
Nao -
Great tear down!
Super informative and humorous!
Very cool! Hopefully I will never buy one, so I will never need to fix it ;)
Personally, I believe it is everyone right and responsibility to be able to repair just as its their right not to do so if they choose. The point in question is choice. If wr are not given choice then hardware becomes more like software and is only ever leased. In my view a slippery slope designed simply to extract more money and condoning poor or inadequate design.
A bit of an example from history on repairability …
The 1970s British TV manufacturers used to make fine TVs featuring a main chassis with daughter boards for the various bit and bobs - making them very repairable.
The Japanese manufacturers, e.g. Sony, competed making sets using as few boards as possible - not very repairable.
The British sets often experienced problems caused by issues associated with the various boards, those issues *required* repairs - which though easy to perform meant expensive engineer callouts and downtime!
There were, essentially, zero British TV manufacturers pretty soon, everyone wanted the cheaper, more reliable - yet less fixable - Japanese models!
YES repairability is GOOD, but surely not so if in achieving that repairability the kits becomes unreliable!
^ this ^
Funny that the Japanese were at first bashed for being unrepairable!
The argument against repairability has added weight for a high-quality speaker. You really don’t want anything inside to move that is not supposed to move, least you get vibrational resonances that can cause buzzes or distort the sound. And you want everything to stay put during many years of service under lots of good vibrations. That is a compelling reason to eschew easily removable covers and fasteners and go for lots of glue and epoxy. Sounds like the HomePod is built to last, but $39 for the second year AppleCare warrantee may be a wise investment.
So I guess you should’ve started from the top-down instead of the bottom-up. Also, there are no pictures or view of the underside of the HomePod after you removed the access plate. Would like to have seen how the opening of the tweeters looked and how the sound is dispersed. I sort of see some fins or slots but that’s about it.
Apple claim that the rings from HomePod on furniture is the result of oil coming out of the silicone pad on the bottom. Does that pad appear to actually be made of silicone? There should not be any oil in silicone to have such a reaction. Some variant of SEBS rubber could. That is the over mold found on power tools or a hacksaw handle.
Replying to
“
[…]
The 1970s British TV manufacturers used to make fine TVs featuring a main chassis with daughter boards for the various bit and bobs - making them very repairable.
The Japanese manufacturers, e.g. Sony, competed making sets using as few boards as possible - not very repairable.
The British sets often experienced problems caused by issues associated with the various boards, those issues *required* repairs - which though easy to perform meant expensive engineer callouts and downtime!
There were, essentially, zero British TV manufacturers pretty soon, everyone wanted the cheaper, more reliable - yet less fixable - Japanese models!
YES repairability is GOOD, but surely not so if in achieving that repairability the kits becomes unreliable!
[http:///User/2379205/Guy|Guy]
“I repaired video games in the 1980s. The CRTs were from Japan and card based. Repair=card swap. This, the norm in commercial gear. Consumer gear is throw away.
Now the HomePod appears to be quite modular. One just can’t get into it in 15 seconds as it should be.
so there is only a tiny opening in the case in front of each tweeter, which seem to block the sound, then they put a mesh around the case to let sound move freely …
Super random, specific question: where do you get replacement blades for your ultrasonic cutter??
Thx!
So far we’ve not had to replace the blade on our unit, but, for the one we have, these blades should fit the bill.
Anyone figure out a non destructible way into this? No easy truck discovered 2 years later?
Any way to remove the brains, microphone, and amp and output to external speakers? I’d like to 3D print a smaller enclosure that forgoes the homepod’s speakers and leverages in-wall or in-ceiling speakers.
Unlikely. The microphones in the enclosure work with the A8 to provide the best sound for the woofer and 7 tweeters. This is their adaptive EQ/spatial sound. This isn’t a dumb speaker like SONOS or regular Bluetooth speaker. If it didn’t have an adaptive EQ/Spatial sound, you probably could. What you are looking for is a HomePod mini with an AUX out jack, and they don’t exist. Closest thing is an AirPort Express, but it doesn’t have Siri or a touch surface. Basically Apple needs to make something like Amazon’s Echo Input device.
Hello
mine is 110V and I was travelling in Europe and there is 220V , Which part should be changed ?
Thanks
Do you think it would be possible to disconnect the MEMS microphones to have a Homepod with all the features without any capability to listen?
This teardown should be re-done to accommodate for the much more clever approach to open the box – without any destruction! I have rarely seen a more destructive teardown than this one...
Could you guys give a more in-depth review of the logic board and the inter connectivity of it with the other components? I am wondering if it’s hackable to get rid of Siri in fevour of snips
Daniel Shapira - Antwort