Einleitung
Vor zwei Wochen haben wir das neue 13" MacBook Pro Einsteigermodell auseinandergenommen und dabei festgestellt, dass es dünner, leichter, schneller und (leider) auch weniger leicht zu reparieren war, als die meisten anderen Profi-Laptops. Heute wenden wir uns seinem zur gleichen Zeit erschienenen, mit Touch Bar ausgestatteten Kollegen zu. Wird uns dieses Gerät mit ein paar upgrade-freundlichen Features überraschen, oder haben wir hier einen Wegwerfartikel, der genauso zum einmaligen Gebrauch gedacht ist wie der Karton, in dem er verpackt ist? Es gibt nur eine Möglichkeit, das herauszufinden: Es ist Teardown Zeit!
Folge uns auf Facebook, Instagram, oder Twitter und bleib immer auf dem Laufenden mit den aktuellsten News zu Teardowns und Reparaturen!
Was du brauchst
-
-
Die 1 Million Euro Frage lautet heute: Handelt es sich um eine verbesserte Version des 13 Zoll "Escape" Modells oder um eine verkleinerte Version des 15 Zoll Touch Bar Modells? Hier mal die technischen Spezifikationen:
-
13,3” LED hintergrundbeleuchtetes IPS Retina Display mit einer Auflösung von 2560 × 1600 (227 dpi), P3 Farbskala
-
2,9 GHz Skylake dual-core Intel Core i5 (Turbo Boost bis zu 3,3 GHz) mit integrierten Intel Iris Graphics 550
-
8 GB 2133 MHz LPDDR3 Arbeitsspeicher (eine 16 GB Konfiguration ist erhältlich)
-
256 GB, 512 GB oder 1 TB PCIe-basierende SSD
-
Vier Thunderbolt 3 (USB-C) Anschlüsse, die Laden, DisplayPort, Thunderbolt, USB 3.1 Gen 2 unterstützen
-
Touch Bar mit integriertem Touch ID Sensor
-
Force Touch Trackpad
-
-
-
Eine rudimentäre Untersuchung des Außengehäuses zeigt die erwarteten FFC Zertifizierungen und eine neue Modellnummer: A1706.
-
Psst: Wenn du Apple nichts erzählst, dann sagen wir's auch nicht..
-
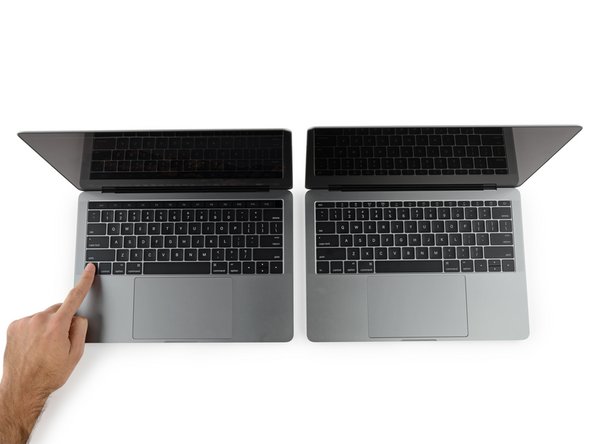
Es juckt uns schon in den Fingern, die Schraubendreher zu schnappen und uns an die Arbeit zu machen, aber zuerst holen wir das andere 13" Retina MacBook Pro von Ende 2016 heraus, um ein paar schnelle Vergleiche anzustellen ...
-
-
-
Apple zufolge sind die Maße dieses MacBook Pro genau die gleichen wie die des "Escape" Modells, das wir vor ein paar Wochen auseinandergenommen haben. Glauben wir da etwa auch nur eine Sekunde dran? Ja, das tun wir.
-
Vermisst du deine Funktionstasten? Dann halte die Taste "Funktion" gedrückt und deine vermissten Funktionstasten tauchen wieder auf. Chamäleon-Modus aktiviert.
-
Es gibt etwas, das sich deutlich unterscheidet, und zwar natürlich die Port-Situation auf der Steuerbordseite. Dieses mit Touch Bar ausgestattete Gerät verfügt über zwei zusätzliche Thunderbolt Ports, sodass du doppelt soviel Platz hast, um deine Dongles einzustecken.
-
Und zum Schluss vermerken wir noch zwei seitliche Lüftungsöffnungen auf der Unterseite der Touch Bar Version, ähnlich denen, die wir bei früheren Retina MacBook Pros gefunden haben, die jedoch beim Funktionstasten-Modell fehlen.
-
-
-
Wir wirbeln durch den Pentalobe-und -Saugheber-Tanz, der normalerweise für iPhones reserviert ist, und entfernen die Abdeckung mit einer vertrauten Schiebebewegung.
-
Komm wir spielen "Finde den Fehler". Links haben wir das Touch Bar MBP und rechts das Escape Modell.
-
Beim Touch Bar Modell sieht es so aus als könnten wir nur das Trackpad und den Kopfhöreranschluss entfernen, bevor wir aufs Logic Board treffen.
Seems to bad that they put a *smaller* battery into the Touch Bar model. It has a faster processor (2.9 to 2.0 i5), which presumably uses more power. It has a faster memory bus - that might change power usage, and it has two more thunderbolt/USB-C ports (or maybe two thunderbolt/USB-C and two USB-C-only) I don't know whether that would add a bigger power drain unless all four ports are being used.
Could Apple have simply added half an inch thickness and stuffed in more battery cells without turning it into a "thermal bomb"? (Of course they'd never do that because Apple's thin-ness obsession..)
Why does Escape Edition MBP has only one fan where as Touch bar MBP has two?
Escape edition has a TDP of 15W, while the Touch Bar edition has a TDP of 28W. Almost twice the heat, so need two fans during heavy duty tasks.
Yin Wang -
-
-
-
Anscheinend ist 2016 das Jahr des neuen Steckers, denn das ist das zweite Mal, dass wir dieses neue Konzept der Akkuverbindung sehen.
-
Die Kupfer-Pads dienen als negative und positive Anschlüsse für den Akku.
-
Apple hat noch einen Stecker hinzugefügt, der führt ... nirgendwohin?
-
Könnte das ein Diagnoseanschluss sein? Schaltkreise und Firmware müssen getestet werden, obwohl wir genügend Testpunkte gesehen haben, die normalerweise völlig ausreichend sind.
-
Wir finden ebenfalls den modularen Kopfhöreranschluss, dieses Mal ohne Mikrofon-Anhängsel. Und wir dachten, sie würden der Vergangenheit angehören.
Too many lines to be a diagnostic port, look at the shielding as well, this is a high speed interface.
I'm thinking Apple realized it need a means to access the soldered SSD if the rest of the system died. So this is a jumper block to connect the onboard SSD to either the onboard CPU or externally to another system to access the data on the SSD via the connection. Its also possible it may allow one to add in a daughter board, additional SSD storage.
That would be my thought as well Dan, they have to give themselves some way out when you fry your machine.
Add in a daughter board *where*? (Unless they want to go the way of Google's sadly defunct Ara project..)
jimwitte -
Dan, diagnostic ports often have high speed interfaces (e.g. JTAG and HSSTP) in order to debug onboard controllers.
Yes, thats true it would be on the faster side, but not so fast as to need the extra shielding. Also look at its location and besides a diagnostic port would have fewer lines. I'm very sure you are looking at a 8 lane PCIe interface given the number of lines (1x8+2x4). That would leave the two 4 lane interfaces are for the Thunderbolt chips.
Dan -
Until someone gets access to the service manual or training we are just guessing here. Common sense and experience can lead us to the most probable function.
Gaining access to a dead systems SSD is a likely function, the other would be for diagnostics. I'm discounting the diagnostic function as one only needs about 20 lines to setup HSSTP for a low end setup. Remember the MacBook Pro is not that complex a device to need more than the basic setup (this connector is offering 42 pins + 4 grounds as well as a full shield)
Here’s the special SSD access tool! https://9to5mac.com/2016/11/24/apple-spe...
-
-
-
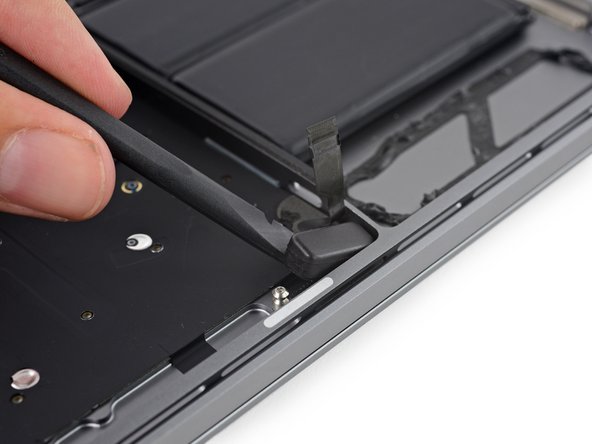
Ganz wie im Modell mit Funktionstasten lässt sich das Trackpad in der Touch Bar Einheit nach dem Entfernen von zehn T5 Torx Schrauben mühelos herausziehen.
-
Und wir können auch die frohe Kunde bringen, dass die Trackpads dieser beiden Modelle identisch und höchstwahrscheinlich miteinander kompatibel.
-
Falls du es verpasst haben solltest sind hier noch einmal die ICs, die wir beim ersten Mal identifiziert haben:
-
STMicroelectronics STM32F103VB ARM Cortex-M3 MCU
-
Broadcom BCM5976C1KUFBG Touch Controller
-
Maxim Integrated MAX11291ENX 24-Bit, 6-Channel Delta-Sigma ADC
-
Monolithic Power Systems MP24830 Treiber für weiße LEDs.
Wheres the taptic engine? There's three settings for feedback level, so it's in there somewhere.
-
-
-
Touchpad IC Identifikation, Fortsetzung:
-
Bosch Sensortec BMA282 Beschleunigungssensor
-
Texas Instruments TMP421 localer/entfernter Temperatursensor
-
Macronix MX25L2006EZUI-12G 2 Mb serieller NOR Flashspeicher
-
Maxim Integrated MAX9028 Komparator
-
-
-
Wir sind bereit, die restlichen Peripheriekomponenten zu entfernen. Es wäre toll, wenn wir einen Blick auf den Akku, die Lüfter, den Kühlkörper und die Lautsprecher werfen könnten. Aber leider geht das nicht.
-
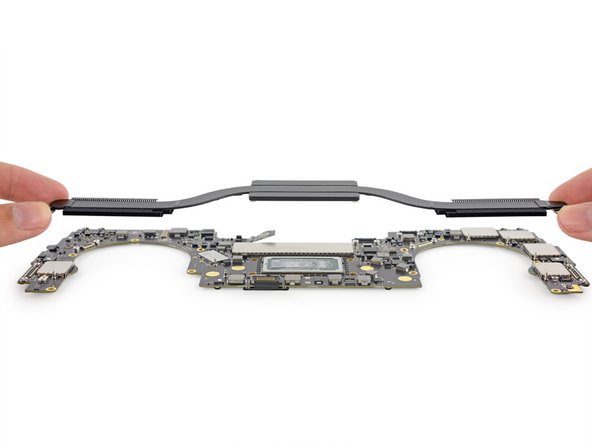
Das symmetrische Logic Board bewacht die restlichen Komponenten, sodass wir zunächst mit dem Spudger die Verbindungskabel lösen und das Logic Board aus dem Gehäuse herausholen müssen.
-
Der Kühlköper ist unten mit Schrauben am Logic Board befestigt. Nach dem Ausbau des Logic Boards aus dem Gehäuse können wir den Kühlkörper entfernen, um ihn genauer zu untersuchen. Ein Wärmerohr führt in jede Richtung, das heißt es hat doppelt soviel Rohrlänge wie das Einsteigermodell.
-
-
-
-
Wir sehen uns jetzt
den Schnurrbartdas Logic Board an, um herauszufinden, welche Chips dieses MacBook zu einem Pro machen: -
Intel Core i5-6267U Prozessor mit Intel Iris Graphics 550
-
Intel JHL6540 Thunderbolt 3 Controller
-
SanDisk SDRQKBDC4 064G 64 GB NAND Flash Speicher (x2 für insgesamt 128 GB)
-
Samsung K4E6E304EB-EGCE DDR3 DRAM (4 x 2 GB für insgesamt 8 GB)
-
Texas Instruments SN650839 66AL7XWGI und TI/Stellaris LM4FS1EH SMC Controller (Ersatz-Codename für TM4EA231)
-
Murata/Apple 339S00056 Wi-Fi Modul
-
Vermutlich ein Apple-eigener SSD Controller unter (ebenfalls vermutlich) einem Micron R4432ACPE-GD-F 512 Mb Speicher, wahrscheinlich ähnlich diesem hier.
Why are they using 4x2 GB RAM modules? Is this making any sense? Didn't they just use one?
That is JEDEC LPDDR3 spec and the spec intel processor supports.
The LPDDR3 chip supports 32-bits data width and to support 128-bits LPDDR3 data width intel processor supports . It needs 4 four LPDDR3 chips.
JJ Wu -
A couple of possible reasons:
- Wiring for 4 chips would be necessary to support the 1TB SSD option (4 x 256GB)
- Access is faster when solid state storage is spread over more chips (wider bus).
Not sure I follow you here. The RAM interface is independent of the SSD interface (PCIe).
Dan -
Intel Core i5-6267U processor only supports LPDDR3 upto 1866Mhz (base on Intel link). If the LPDDR3 in the MacBook Pro has maximum data rate is 2133Mhz. Is the maximum data rate 2133 or 1866 Mhz?
Apple control so much of what they use that it gives them potential to go a long way outside the box.
Given that they totally control the SSD controller, then there are things that they could do to greatly improve paging performance to fast SSD. And those things could well involve wanting the widest memory path that they can get.
which network card is in it?..........
-
-
-
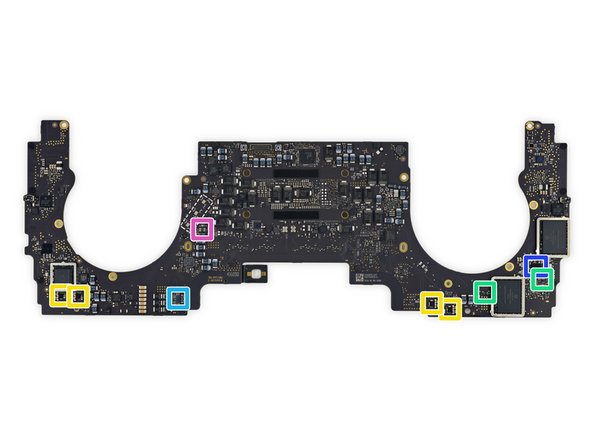
Auf der anderen Seite des Logic Boards mangelt es auch nicht an Komponenten:
-
SanDisk SDRQKBDC4 64 GB NAND Flash Speicher (wie in der entfernbaren SSD der Escape Edition)—insgesamt bis 256 GB
-
APL1023 343S00137 (wahrschienlich der Apple-eigene T1 Chip, der mit der Touch Bar gepaart ist)
-
2x Texas Instruments TI CD3215C00 68C7QKW G1 USB-C-Controller (zwei weitere auf der Rückseite)
-
Intersil 95828 HRTZ Intel CPU PWM Controller
-
Apple 338S00193-A1 Leistungsmanagement
-
Winbond W25Q64FVZPIQ 64 Mb serieller Flash Speicher
-
NXP 66V10 NFC Controller, enthält Secure Element 008 und NXP PN549 (wie beim iPhone 6s)
Does the NFC chip mean that the MBP could theoretically be used with Apple Pay? Or is there some other reason they would have included it? (Apple, *futureproofing*? The devices are almost hermetically sealed, so there's probably no possibility of even an "Apple blessed" upgrade option) Chipworks has their docs on it, but they cost many hundreds or thousands of dollars each (do they perhaps have a student discount?)
It's only for the secure element. If my memory is right, the iPad also has a similar controller but doesn't support NFC.
I want to buy this. Where can I find it? Can you help me?
2x Texas Instruments TI CD3215C00 68C7QKW G1
-
-
-
Und noch mehr Chips:
-
2x Pericom PI3WVR12612 HDMI 2.0, DisplayPort 1.2 Video Switch
-
Cirrus Logic CS42L83A Audio Codec
-
National Semiconductor LP8548B1 Treiber für die Hintergrundbeleuchtung
-
Texas Instruments TPS51916 Memory Power synchroner Buck Controller, und TPS51980A synchroner Buck Controller
-
Texas Instruments TMP513A nah/fern Temperatursensor
-
2x Fairchild Semiconductor FDMC7570S 40A N-Kanal MOSFET
-
Fairchild Semiconductor FDMC86106LZ 7,5A N-Kanal MOSFET
Does anyone have a datasheet for the audio logic? (CS42L83A) I cannot find one on the internet.
-
-
-
IC identification, Teil 2:
-
Vishay SIC635 Leistungsstufe
-
Vishay SIC535 Leistungsstufe
-
Analog Devices SSM3515B 31 W Class D Audioverstärker
-
Texas Instruments TMP102 Temperatursensor
-
Renesas (früher Intersil) ISL9239 Akkuladesteuerung
-
Apple Leistungsmanagement (Vermutung)
-
Texas Instruments INA214 Stromrichtungsverstärker
-
-
-
IC Identifikation, Teil 3:
-
Macronix MX25U3235F 32 Mb serieller NOR Flashspeicher
-
Winbond W25Q80DVUXIE 8 Mb serieller NOR Flashspeicher
-
Macronix MX25L2006EZUI-12G 2 Mb serieller NOR Flashspeicher
-
Texas Instruments TPS3895 regelbarer Spannungswächter
-
Diodes Incorporated PI3USB102E 480 Mbps USB 2.0 Switch
-
Texas Instruments SN74LVC1G02 Einfach-NOR-Gatter
-
Vermutlich ein Hallsensor
-
-
-
Ein weiteres neues Feature des MacBook Pro mit Touch Bar ist die Touch ID.
-
Die Hardware, die dieses schicke Feature unterstützt, verfügt über eine Taste, die mit kapazitiven Sensoren gepaart ist, die zwischen Fingern unterschieden können. Ein Hoch auf die Biometrik.
-
Die Touch ID Taste ist mit Saphir-Kristallglas bedeckt, was den Fingerabdruckscanner vor Kratzern schützen sollte.
as if capacitive buttons just break
Samsung and Micron/MicronPC/MPC laptops had fingerprint readers and security software using them since the late 1990's. Dunno if Samsung continued to do so after MPC went out of business in 2008, cutting off that channel for selling Samsung's high end laptops in the North American market.
Hi everyone
What is the black “plastic” which be two black screws hold?
Is it make button more elasticity?
Thank you
-
-
-
An jeder Seite des Logic Boards befindet sich eine kleine modulare USB-C Karte.
-
Jetzt können wir endlich die Lüfter herausholen. Diese hochgepriesenen Lüfter haben einen Durchmesser von 43 mm, einen bisschen weniger als der 45 mm Lüfter, den wir im MacBook Pro Ensteigermodell gefunden haben (aber hey, du kriegst zwei davon).
I think it was a big mistake to loose the MagSafe concept for the power cord. I've tripped on my cord a few times thankfully the cord disconnected before the laptop took a spill.
Could the USB-C hardware-connector spec be made with a magnetic clasp? Or does Microsoft have a patent on doing that for something with more than 5 pins?
jimwitte -
-
-
-
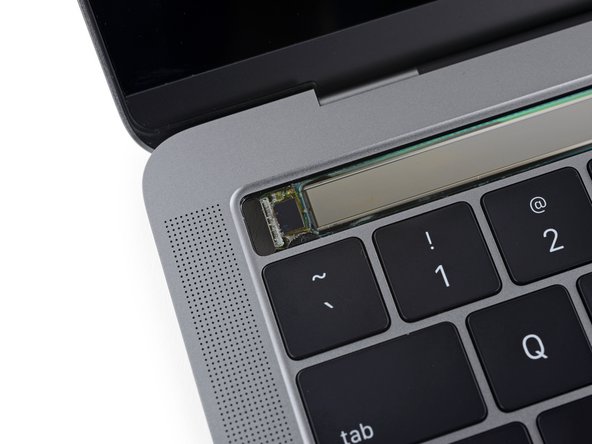
Behutsam zwischen die Kante des MacBooks und die Tastatur gebettet befinden sich zwei Lautsprechergitter. Es handelt sich um sorgfältig ausgearbeitete Öffnungen, die die Klangwellen aus dem MacBook Pro leiten und zwar direkt zu ... äh, Moment mal.
-
Die Lautsprecher befinden sich nicht unter den Lautsprechergittern. Das Lautsprechergitter geht nicht einmal durch das Gehäuse.
-
Diese Lautsprecher geben ihren eindrucksvollen Ton wahrscheinlich durch die seitlichen Lüftungsöffnungen ab.
It looks to me like these speakers are simply ported— a common technique used in home theater speakers to achieve bigger sound. Also, the way this is laid out the speakers are further away from the logic board too, which might allow Apple to crank the bass further up, knowing that potentially chip-breaking low-frequency sound waves have more distance to dissipate.
All those perforations probably shave off quite a few grams of weight compared to a solid slab of aluminium.
Perhaps - then why didn't they put *more* of them in? Since weight seems to be second only to thin-ness on Apple's list-of-priorities.
jimwitte -
I spill only a drop of water at speaker grill on the left. Is it damaged my macbook?
If you cover the speaker grilles it does block the sound, your detail is incorrect.
so the grills only go clear through the case at the bottom as shown ? I dropped only a few drops of liquid on the upper grills beside the delete button and cleaned it right away, is it safe ?
Yeah, despite all the whining in the comments, all those speaker holes up there ARE cosmetic. The only ones that are actual, functional holes in the aluminum are way down next to the right arrow key. As long as your spill didn’t get onto the keyboard keys or the power button, you’re perfectly fine—it’s no different than if you got some liquid onto the palm rest or the display lid. Rest easy!
Dear iFixit. Firrst: I love you guys! BUT… sorry to say your assumtion may not be 100% The down firing speakers are the subwoofers(!). There are little, closed compartments like little domes right above them, which contain the tweeters. Maybe you can add another picture for this detail
Dear iFixit. First: I love you guys! But… sorry to say your description may not be 100%. The down firing speakers are the subwoofers(!). There are little, closed compartments like little domes right above them, which contain the tweeters. Maybe you can add another picture for this detail?
-
-
-
Der starke Kleber leistet Widerstand, und wir benutzen ein Opening Pick und einen Spudger, um den rechten Lautsprecher vom oberen Gehäuse wegzuhebeln.
-
Wir erspähen etwas, das ein winziger Lautsprecher sein könnte, es ist in der Ecke über dem "richtigen" Lautsprecher eingezwängt.
-
Wir mochten die süßen gummi-gepufferten ton-isolierenden Schrauben, die die Lautsprecher des MBP mit Funktionstasten befestigen, total gerne. Anscheinend hat sich die Touch Bar stattdessen für besonders klebrigen Kleber entschieden.
Hmmm, two-way audio system in a Mac laptop? Interesting.
It is a two way sound system. If you cover the top "holes" with your hands the high frequency cuts out. However, it's hard to tell if all the holes are drilled or just enough for the tweeter. In any case it sounds great and is LOUD. I suppose the function key model though will sound better.
-
-
-
Wir sind der Touch Bar so nahe, dass wir sie fast, nun ja, antatschen können.
-
Apple scheint seinen Anspruch auf diese coole Technologie besonders herausheben zu wollen, denn sie haben eine P2 Pentalobe Schraube über den Eingangspunkt zur Touch Bar geklatscht.
-
Wir entfernen ein Interconnect-Kabel aus dem unteren Gehäuse, es verbindet das Logic Board mit dem Touch Bar Display und beinhaltet wahrscheinlich etwas Display Silizium. Wir finden folgendes:
-
STMicroelectronics STOD32A AMOLED Leistungsmanager
-
Winbond W25Q40EWUXIE 4 Mb serieller NOR Flashspeicher
-
Semtech RClamp3324T 4-fach ESD Schutz
The power/Touch ID button needs to be replaced at the same time as the logic board, or vice versa as they're paired at the factory presumably. So a power button means you have to transfer ALL the data from one SSD to the next!!
-
-
-
Jetzt wird es warm. Wir holen unseren treuen Freund, den iOpener, hinzu, um uns beim Entfernen der Touch Bar behilflich zu sein.
-
So, Kinder, schaut gut zu, heute werden wir lernen, wie man aus Versehen die Touch Bar kaputt macht. Durch unsere Bemühungen das OLED Panel vom oberen Gehäuse zu trennen, wurde der Touchscreen vom Display gelöst. Man lernt nie aus.
-
Und um dem Ganzen noch die Krone aufzusetzen, verläuft das Touch Bar Flexkabel unter dem oberen Gehäuse, was den Ausbau noch ein bisschen nerviger macht als wir erwartet hatten.
Could be a great idea to put in the front of Step 19 two red exclamation marks for people to pay attention? Maybe in the corners of the pictures as well?
-
-
-
Die menschliche Berührung muss durch ein Gehirn verarbeitet werden. Die Touch Bar muss durch einen Chip verarbeitet werden. Nach einigen operativen Eingriffen finden wir auch das Gehirn der Touch Bar:
-
Broadcom BCM5976TC1KUB60G Touch Controller
-
Den OLED Streifen zu entfernen ist schon schwierig genug, aber unsere Bemühungen werden nicht vergeblich sein! Vielleicht ein bisschen vergeblich. Ok, unsere Bemühungen wurden zerschlagen (zusammen mit unseren Träumen und Hoffnungen). Die Touch Bar ist sehr zerbrechlich.
-
Die Touch Bar ist ein zerbrechliches Geheimnis, das durch einen nicht gekennzeichneten Chip, den wir finden, noch geheimnisvoller wird. Angesichts seiner Platzierung handelt es sich wohl um eine Art Displayantrieb.
-
Nachdem wir all das herausgepult haben entdecken wir eine Reihe Mikrofone. Zu wem hört eigentlich das Mikrofon ganz links? Zum Lüfter? Zur Tastatur? Wer weiss!
The third microphone is probably there to remove fan noise + keyboarding clicking noise.
Nah - I'd guess it's either Apple and/or the NSA listening in on sex chats.. (Oh, sorry, that was my inner Steve Bannon..)
jimwitte -
Does photo 2 here serve as confirmation that the leftmost part of the touch bar is inactive, meaning that a soft escape key cannot be properly located far enough left to be directly above the backquote/tilde key?
But it's actually touchable. If you touch the leftmost part of the touch bar, esc-key will be pressed (and highlighted).
-
-
-
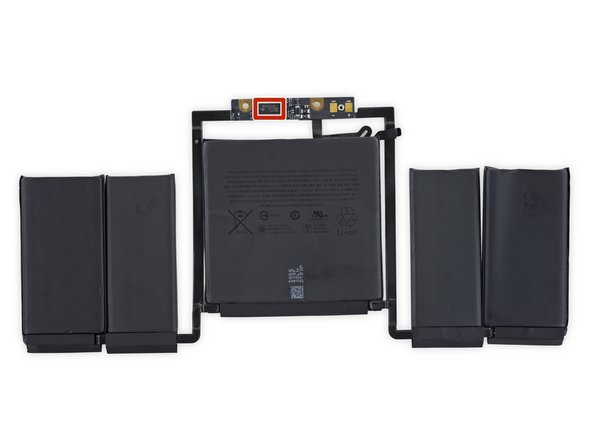
Endlich können wir den (kräftig verklebten) 5-zelligen Akku herauslösen.
-
Am besten benutzt du deinen "Pro" gar nicht so lange, dass du einen Akkuwechsel machen musst, den der hat's echt in sich.
-
Die Akkuplatine beherbergt einen TI BQ20Z451 ( eine mögliche Variante der BQ20Z45-R1 Reihe, die schon seit Ewigkeiten in MacBook Pros zu finden sind)
-
Mit einer Kapazität von 49,2 Wh scheint dieser Akku ein bisschen mickrig im Vergleich zu den 54,5 Wh des Modells mit Funktionstasten zu sein, vor allem angesichts der Tatsache, dass es über eine wesentlich größere Funktionsvielfalt verfügt.
-
Als i-Tüpfelchen legen wir diese Akkus auf die Waage: Der Akku des mit Funktionstasten ausgerüsteten MacBook Pro wiegt 235g, während dieser Akku nur 197g wiegt.
Hello this rMBP 13,3" with touch bar , the battery how many mHa ?
Portable External Battery perspective I'm interested in
How could the touch bar edition feature a smaller battery but yet about the same batter hour of usage at 10 hours?
Those cells look tiny. I hope next year's model has a capacity of at least 70 watt hours with two cells in each one.
What about the keyboard? Can it be replaced?
Do you really have to take 18(!) steps in order to remove the battery of a touch bar model? Seems a little exaggerated to me.
This isn't a guide—it's just an overview of the hardware.
-
-
-
Hier ist der 13" MacBook Pro Ende 2016 in all seiner Touch Bar Herrlichkeit!
-
- Das Trackpad kann entfernt werden, ohne dass vorher der Akku ausgebaut werden muss.
- Proprietäre Pentalobe Schrauben machen die Arbeit an diesem Gerät weiterhin unnötig schwierig.
- Die Akkueinheit ist vollständig und sehr fest im Gehäuse eingeklebt, was einen Austausch sehr kompliziert.
- Der Prozessor, die RAM und der Flash Speicher sind auf das Logic Board gelötet.
- Mit der Touch Bar gibt es einen weiteren schwer zu ersetzenden Bildschirm, der beschädigt werden kann.
- Der Touch ID Sensor dient auch als Einschalttaste und ist mit dem T1 Chip auf dem Logic Board gepaart. Die Reparatur einer defekten Einschalttaste erfordert unter Umständen die Hilfe von Apple oder ein neues Logic Board.


Fazit
Reparierbarkeits-Index


(10 ist am einfachsten zu reparieren)
Besonderer Dank geht an diese Übersetzer:innen:
100%


Diese Übersetzer:innen helfen uns, die Welt zu reparieren! Wie kann ich mithelfen?
Hier starten ›
76 Kommentare
what a mess inside. especially given the spaces around the batteries, and the off position of speakers, looks like the chassis was optimised for the non-touchbar version (much cleaner layout, removable SSD, no gaps), and touchbar addition was a later decision. Maybe initially they envisaged only the 15" would have touchbar.
a similar case of "odd unused chassis space" happened with the first gen 13" retina macbook pro, which had empty space under the trackpad. Was probably a late decision to use small form SSD over 2.5" SSD. this empty space was used up on subsequent updates.
to me the touchbar version has way too many compromises. the biggest issues are: smaller battery, while using a processor with a higher TDP. and non upgradable SSD (arguably the only component that might require future upgrade, unless you want to pay extraordinary money right now).
How do you do a power rest if the machine hangs? Before you held down the power button for a few seconds. Would that work with a touch ID button?
It still is a physical button. Just like the iPhones (except iPhone 7).
mamufek -
I would assume that you still do - the Touch ID sensor is still a physical button, so there's no reason it doesn't work like a normal button as before. However, to stop it shutting down the machine with a single click, I'd imagine macOS has some code in it saying "if the power button is pushed while the computer is on, it's probably for Touch ID things, so don't shut down".
in fact you have to press it long to act like a power button says the apple support page :P
First generation computers tend to lend themselves to some issues. However, given the price bump and the Apple brand I was expecting more, much more. The concept seems nice, the hardware implementation not so much. Laptops are to be mobile, so sacrificing battery life for weight is not a design decision that appeals to me. With Skylake I was expecting the REAL battery life to surpass 12 hours...
MacBook Pro with SSD RAID 0 inside?
Not here, sorry ;-{
Dan -
So can you move the touch ID sensor to another mac? Does it still work? Or are we going to have an Error 53 for Mac and a connect to iTunes screens.
Of course you can't. It's like the TouchID on iPhones and iPads. It's paired with the T1.
probably everything works execpt touchID, hopefully apple learned their lesson
Lack of repair-ability is understandable and unavoidable in today's world of disposable gadgets. If my $500 laptop craps out, so be it. However, $2000 worth of computer is not disposable. I would never buy another macbook.
It's not unrepairable. It's just unrepairable by unequipped amateurs, which is where iFixit sell their bits and pieces.
And those same things that make it more difficult to repair, also make it less likely to go wrong in the first place.
Again, not in iFixit's commercial interest to encourage.
alex -
I guess I see things a bit differently than Alex here. True IFIXIT is a business as such they do need to make money, but its more than that. The vision is to not create waste by repurpose or repair. The more Apple goes down this path of non-repairable it kills their own mission of being ecology minded. People don't want to throw away a $2 - 3 K system just to get a bit more memory or storage. They want some expandability! Likewise, being forced to replace major assemblies to deal with a small part failure is also wasteful!
Dan -
Random question - what do you end up doing with the things you tear down after? Do they all go back together again (and end up in full working condition)?
As you can see they've already ruined a lot of things, so this is not going back together.
Tom Chai -
From the IFIXIT team: "Not to worry—we definitely don't let our teardown devices go to waste. Oftentimes we will use them to create a full set of repair guides. We create some in-house and also send devices through our edu program to teach technical writing. You can learn more about that here. After that, we make sure they find a good home, or dispose of them responsibly."
Dan -
Wait, no split fin fans in the touchbar 13" either? I thought their website showed the touchbar 13" as having them...?
'On the 15-inch MacBook Pro, an innovative split blade design allows for more blades and delivers increased airflow.'
If you compare in Step 4 the two versions of the MacBook, you can see the version without the touch has the vent openings for the second fan too.
"The speakers are not located under the speaker grilles. The speaker grille doesn't even go clear through the case."
Yet the tweeter can clearly be seen in the red box in this image:
https://www.dropbox.com/s/j13u5ev3ypekr8...
Okay then iFixit....
Noted and the text was corrected clarifying the openings are for the twitter speaker.
Dan -
Does step 17, photo 2 serve as confirmation that the leftmost part of the touch bar is inactive, meaning that a soft escape key cannot be properly located far enough left to be directly above the backquote/tilde key?
The area is the interface to the ribbon connector that goes to the logic board. I do agree the placement is troubling. I suspect the designer wanted to be symmetrical with the other side as the Touch ID/Power Switch is the same amount of space so the Touch Bar is cropped in on that side. I'm surprised as well they didn't think this through. I would have brought the Touch display all the way to the left edge and used the underside for the connection point. There is no reason it couldn't be a bit asymmetrical.
Dan -
> There is no reason [the Touch Bar] couldn't be a bit asymmetrical.
Except that Jobs liked symmetry..
jimwitte -
what a shame! apple think all their users are stupid. they probably are 99% right. Who cares if you cant upgrade the ssd? The next step will be solder the battery too? What else they can invent to suck the idiots money? I fell terrible windows pc are so much worst... for now who cares about upgrade at least the ssd will be in the hunt for the old models. And sandisk? common, this is only to change to samsung ssd next year and announce a twice fast ssd?
"What else they can invent to suck the idiots money?" How does a book for 300 bucks sound?
Thomas J -
A stand for your Pro Display XDR for $1000!
Other crazy prices:
VESA Mount Adapter - $199.00
Apple Mac Pro Wheels Kit - $699.00
Apple Mac Pro Feet Kit - $299.00
it's crazy apple designed a separate 13 inch function key model instead of just shrinking down the touch bar model, sure it might save money on the long run, but design and testing and manufacturing two completely different 13 inch would mean ........................................................................................people from macbook air department would still keep their jobs.
This is the mate to the 13" Function key model Here is the 15" Touch Bar Teardown. What are you saying here, you want the new MacBook to have the Touch Bar?
Dan -
Am I reading the data sheet for the ram correctly? The Samsung ram was released in 2012, and is rated at ~1066MHz??? Is this somehow run in tandem to yield 2133MHz?
Briefly looking through some of the early Geekbench scores, it seems the new rMBP doesn’t have much of an edge, if any over the predecessor. Upon looking closer, it seems the memory tests are slower on the newer model. This doesn’t add up per Apple’s claim! Is this yet another crippling disappointment?
Why da fcuk do you need to open it?!
IT JUST WORKS!
Ok, the Sandisk SSD can break down, that can happen. But everything else is working forever.
You do realize that the SanDisk SSD is now soldered onto the logic board, it may be the first to die, but if it dies the entire board is useless and thus you will need a logic board replacement. Lets hope you keep backups because without a removable SSD there's no chance of getting your data recovered.
It appears you do not grasp the concept of why repair guides are created:
~1 Some people (like me) just LOVE knowing how things work - that's how we become engineers, and are able to repair things and design other things, make informed decisions (which we can confidently pass on to others with less inclination or interest to know this stuff.)
~2 Because repairing your own device teaches you independence and VALUABLE skills which are transferable and profitable, and also enjoyable to learn and practice.
It's also fine to be a consumer who DOESN'T, but it's illogical for you to criticise or chastise those who DO take them apart, kapish?
GOLD contacts, not copper; the copper is the underlying substrate that is the PCB trace.
With respect, iFixit, leave the puns to us English folks, your attempts are extremely contrived and... well... they don't work and detract from the articles you feel the urge to force them into. PLEASE, just don't try to be funny - we come here to see things stripped down, not for comedy - others do it way better.
Thanks :)
With respect, iFixit, add additional puns. We love your extremely contrived attempts at humor. They simply work, never detracting from the articles. They are as welcome as caviar on toast. Please, be funny! We come here for two things, stripping and comedy. No one else does it better.
Thanks {:-)
Hello,
Does anyone know if these new Macbook pros have 3x3 Wi-Fi antennas like the 2013 models ?
Thank you !
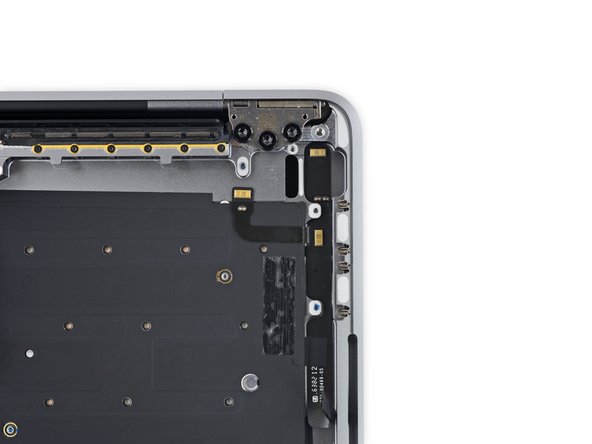
This model appears to have 3 transmit antennas (see image of the back without cover, near right fan). I think this is a 3x3 wifi model. The non-touch bar model is 2x2.
Curious what the shielded port is for. I am skeptical that it is for reading the SSD, since the SSD usually needs communication with the SMC, CPU and requires 3.42v and 3.3v S0 voltages to power it (among other circuits/signals). Unless the reader tool which plugs in independently powers the SSD ICs, I think it will be unlikely.
I think there is a high chance it is just a shielded diagnostic port, to better protect it from liquid damage. On older models (Macbook Air is a good example) if the diagnostic port gets liquid damaged, Apple can no longer use the port to read important voltages. It can also prevent the Macbook from working correctly, which is why a lot of diagnostic ports get removed by 3rd party repair centres.
In time, we will see I guess...
I've had many laptops over the years and at the end of use I always removed the data disk in order to protect my privacy. Now I have security/privacy concerns about the soldered SSD. If the logic board (or the SSD itself) goes wrong, how can you ensure that the data is removed?
Nah, it's pretty simple. Turn on FileVault encryption (you already have it on don't you?), and then when you remove your userID and recovery key you make the SSD unreadable.
Alternatively, you could remove the logic board and destroy the SSD by smashing the data chips. I'd be a bit of a waste, but it's secure!
Sir ifixit engineers if the touch bar is fragile I think it will be broken when taken by non experts or local repair technicians.what to do unless we replace it we do not need to touch it.for replacing keyboard is it necessary to remove touch bar I am asking this because it is so fragile.i know you're experts.pls help ifixit engineers as soon within less time I am waiting for you
Sir pls help I look your website everytime for disassembly
Sir ifixit where is the harddisk and dvd drive.plshelp as soon as possible
Why apple is making it's laptops unrepairable
Ives has too much input at Apple. He has developed an anorexic approach to design. He has slimmed down the look of MacOS from a 3D look to a flat bland desktop. Functional and repair sacrifices were made to make the equipment "The thinnest we ever made it" The touch bar is a nice idea but it can only be fixed by replacing the entire top of the computer. I have replaced just the keyboard for a MBP for just $40. It's held in with over 30 very small screws and was a lot of work. Still fixable though. Apple just replaces the whole top. We couldn't be foiled with special screws. Just solder and glue everything in place now. The touch bar is, in effect, part of the upper frame. USB C is great as a multiport but the loss of Magsafe is just wrong. We are back to our laptops flying off the tables again. Oh wait - More broken Macs that have to be replaced! Soldered in drives for the sake of thinness, look how this compulsion worked for Karen Carpenter.
Why is there 5 batteries and not 3? One big would have bigger capacity than 2 smaller.
Where is the wifi Chipset for the 802.11 and Bluetooth? why didnt you guys list it for the 15 inch model and you listed it for the 13 inch?
Hey there Moe Khan! In step 8 there is the Murata/Apple Wi-Fi chip. This is likely a combination of both Wi-Fi and Bluetooth. Unfortunately this is a proprietary chip, so there is no publicly available data sheet (at least as far as I know). This means we can't confirm that this is FOR SURE a Bluetooth chip. We are just "pretty sure". I hope this helps you! (I also responded to your post on the 15" MBP with Touch Bar).
Hello I am contacting you from the Experimac East Orlando store. I was wondering if the Display was easily removable or if i would have to do something with the Touch Bar to remove the screen. Looking forward to more Tear Downs, thanks again iFixit Team!
Hello. I just broken my screen. What are the chances that it can be fixed?
Nothing there about keyboard disassembly.
Mine has several keys that are now mushy and not clicky and I'd like to see a way of getting it apart without breaking the butterfly assembly.
Anyone?
Are there tamper proof screws or other booby traps that would let Apple know the computer has been opened up to void a warranty?
Recently got my screen broken and went black as just the “broken” area displays strands of colors. Went to Apple Store and said that they would reply within the day but never got any feedback from them. Can the Retina Display be repaired without the need of buying another laptop? If it can, how much can it be to repair it? I would appreciate any answers. Thank you.
Please make a tutorial of how to apply new, quality thermal paste to the Macbook pro’s processor. Quinn of Snazzy Labs showed us, that using higher quality paste results in about 10% performance gains.
In regards to the MacBook Pro internal cables/parts, can some one tell me what “Mylar BMU eDP TCON” is?
Can the battery be removed/replaced without the full teardown?
Hello, is anyone can help me to locate graphic card chit on this logic board? i have the board but not sure about specs. Thanks.
Hi, is it possible replace logic board on another if is dead? I mean in home, without service and logic board from ebay?
HOLA TENGO UN MAC BOOKPRO CON TOUCH BAR 2017 CON EL ERROR
cpu machine check architecture error dump (cpu intel(r) core(tm) i5
SE ME REINICIA A VECES NO QUIERO ARRANCAR SE PRESENTO EL ERROR CUANDO ACTUALIZE A CATALINA.
QUE PODRIA HACER AL RESPECTO.
GRACIAS
Grazie mille per questa guida. Dovevo sostituire la tastiera di questo pc, ma alla fine abbiamo optato di sostituire tutto quanto il pezzo intero. In alcuni punti mi ero proprio perso perché era la prima volta mettevo le mani su questo modello, ma grazie a questo teardown sono riuscito a levarmi dei dubbi su alcuni punti. Molto difficile ma anche parecchio soddisfacente come riparazione.
"Today's million-dollar question: Is this a scaled-up version of the 13-inch "Escape Edition," or a scaled-down version of the 15-inch Touch Bar unit? Here's what the tech specs tell us:"
So we'll need the teardown of the 15" to be sure.
alex - Antwort
Where I can find information about remplace the SSD from 256gb to 1Tb in the model A1706? Its impossible shopping the hdd!
corpusgc@gmail.com
Corpus García Ruiz.- - Antwort