Zum Hauptinhalt wechseln

Was du brauchst

Dieser Teardown ist keine Reparaturanleitung. Um dein Nikon Coolpix 3500 zu reparieren, verwende unsere Fehlerbehebungsseite.

  1. Nikon Coolpix 3500 Teardown, Nikon Coolpix 3500 Teardown: Schritt 1, Bild 1 von 1
    • Remove the battery cover.

    • Remove the battery.

  2. Nikon Coolpix 3500 Teardown: Schritt 2, Bild 1 von 1
    • Remove two 4.5 mm screws next to the battery slot.

    • Remove one 3 mm screw above the CF memory card slot.

    • Remove one 4.5 mm screw next to the CF memory card slot.

  3. Nikon Coolpix 3500 Teardown: Schritt 3, Bild 1 von 1
    • Remove two 4.5 mm screws from inside the battery slot.

  4. Nikon Coolpix 3500 Teardown: Schritt 4, Bild 1 von 1
    • Remove two 5 mm screws from the opposite end of the battery slot.

  5. Nikon Coolpix 3500 Teardown: Schritt 5, Bild 1 von 1
    • Remove the plastic cap and the 5 mm screw underneath.

  6. Nikon Coolpix 3500 Teardown: Schritt 6, Bild 1 von 1
    • Remove the five 3.5 mm screws from the bottom of the camera.

    • Gently pry off the grey faceplate.

    • Do not pull hard; there are two wires connecting the faceplate to the motherboard.

  7. Nikon Coolpix 3500 Teardown: Schritt 7, Bild 1 von 3 Nikon Coolpix 3500 Teardown: Schritt 7, Bild 2 von 3 Nikon Coolpix 3500 Teardown: Schritt 7, Bild 3 von 3
    • Use a spudger to disconnect the white-capped wire at the bottom of the camera.

    • Use a spudger to disconnect the orange-capped wire at the bottom of the camera and set the faceplate aside.

  8. Nikon Coolpix 3500 Teardown: Schritt 8, Bild 1 von 1
    • Disconnect the grey-capped wires from the motherboard.

    • Disconnect the blue wire attached to the green chip from the center of the motherboard.

  9. Nikon Coolpix 3500 Teardown: Schritt 9, Bild 1 von 2 Nikon Coolpix 3500 Teardown: Schritt 9, Bild 2 von 2
    • Remove the 3.5 mm screw from the motherboard next to the rotating lens.

    • Flip the motherboard and lens over to access the three wires on the back that connect to the LED screen.

  10. Nikon Coolpix 3500 Teardown: Schritt 10, Bild 1 von 2 Nikon Coolpix 3500 Teardown: Schritt 10, Bild 2 von 2
    • Disconnect the blue wire connecting the motherboard to the LED screen.

    • Disconnect the orange wire using a spudger while pushing out horizontally.

    • Disconnect the red capped wire from the motherboard.

    • Lift the motherboard and lens (still connected) out of the back case.

  11. Nikon Coolpix 3500 Teardown: Schritt 11, Bild 1 von 1
    • Lift up on the black covering and remove the orange wire connecting the lens to the motherboard.

  12. Nikon Coolpix 3500 Teardown: Schritt 12, Bild 1 von 1
    • Remove the 2.5 mm screw next to the red capped wire.

    • Remove the two 3.4 mm screws on the back of the directional buttons.

    • Remove the two 4.4 mm screws in the metal plate across from the orange wire.

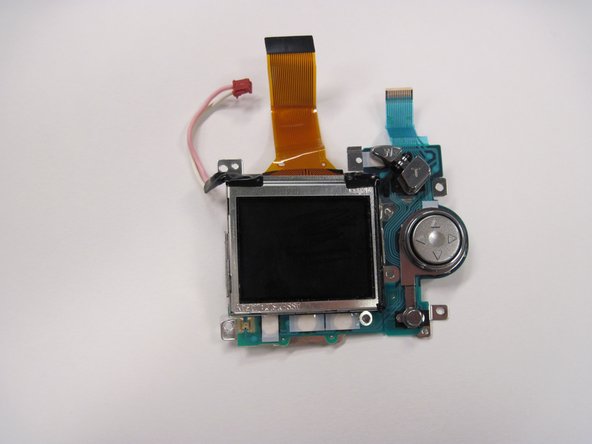
  13. Nikon Coolpix 3500 Teardown: Schritt 13, Bild 1 von 2 Nikon Coolpix 3500 Teardown: Schritt 13, Bild 2 von 2
    • Gently lift the LED screen out of the remaining casing and set it aside.

    • Be careful not to let the rubber backing of the buttons fall out of place.

Team

Cal Poly, Team 30-38, Garner Spring 2010 Mitglied von Cal Poly, Team 30-38, Garner Spring 2010

CPSU-GARNER-S10S30G38

5 Mitglieder

11 Anleitungen geschrieben

0 Kommentare

Kommentar hinzufügen

Seitenaufrufe:

Letzte 24 Stunden: 0

Letzte 7 Tage: 0

Letzte 30 Tage: 2

Insgesamt: 7,755