Einleitung
Falls du es noch nicht gehört hast, es gibt ein neues Spielzeug: Die Nintendo Switch Lite, mit weniger drin, damit du weniger zahlen musst. Oh, coole neue Farben! Aber wir wollen sie ja eigentlich auseinandernehmen, also ans Werk!
Facebook? Such's dir aus und folge uns, dann kriegst du alles sofort mit. Und wenn ein Newsletter mehr dein Ding ist, ist uns das auch Recht.
Was du brauchst
Einführungsvideo
-
-
Eine Switch Lite in freier Wildbahn! Hier die offiziellen Daten von Nintendo:
-
Angepasster NVIDIA Tegra Prozessor.
-
Eingebauter 5.5" Multi-Touch LCD Bildschirm mit einer Auflösung von 1280 × 720.
-
32 GB interner Speicher (erweiterbar auf bis zu 2 TB zusätzlich durch eine microSDHC oder microSDXC-Karte)
-
802.11 a/b/g/n/ac Wi-Fi, Bluetooth 4.1, NFC, USB Typ-C Ladebuchse und 3,5 mm Audiobuchse
-
Geschwindigkeitssensor und Gyroskop sind eingebaut
-
Der aufladbare Lithium-Ionen Akku reicht für eine Spielzeit von 3 - 7 Stunden
-
Mittlerweile mit festen Controllern
-
-
-
Bevor es losgeht, können wir dank unserer Freunde bei Creative Electron schon mal einen Röntgenblick auf die Konsole werfen.
-
Im Vergleich zu modernen Smartphones hat die Switch einen ziemlich dicken Rahmen, deshalb passen unsere Teardown Wallpaper wohl nicht so ganz. Es sei denn, wir würden auch eine Hülle produzieren ...
-
-
-
Wir haben wirklich fest an den Controllern gezerrt, weil wir uns auf zwei neue gelbe Joy-Cons gefreut haben. Hoffnungslos, sie lösen sich nicht.
-
Sieht so aus, als müssten wir das Gerät auf die gute alte Art und Weise auseinandernehmen.
-
Dafür gibt es es aber ein waschechtes Steuerkreuz.
-
Was sich Äußerlich noch geändert hat: Der Infrarotsensor ist weg und die Lautsprecher sind von vorne (alte Switch) nach unten (Switch Lite) gewandert.
-
Die Lite-Version hat auch keine Seitenstütze mehr, damit ist es die windschnittigste Switch überhaupt.
-
-
-
Nintendo versperrt uns den Weg mit Tri-point Schrauben. Wir kommen nicht durch, bis wir das richtige Werkzeug rausgesucht haben.
-
Diesmal gibts keine Ablenkung durch Nebenmissionen. Wir haben ein Ziel und alles dabei, um es zu erreichen. Wir wählen den Y00 Schraubendreher.
-
Unter der Rückseite sehen wir: noch eine Abdeckung. Weiter geht's.
-
Nebenbei: In dieser Version ist der SD-Kartenleser fest verbaut. Bei der alten Switch hatten wir ihn zu diesem Zeitpunkt schon ausgebaut.
-
Eine modulare Bauweise ist grundsätzlich besser zu Reparieren, deshalb gibts hier von unserer Seite Punktabzug.
-
Wir spähen unter die metallne Abdeckung und erhaschen einen ersten Blick auf die Innereien des Leichtgewichts.
-
-
-
-
Wir nehmen uns einen Moment Zeit, heben die Abdeckung der überarbeiteten 2019er Switch ab und ziehen mal ein paar Vergleiche:
-
Größter Unterschied: Der Akku ist richtig rum verbaut. Na, das hat sich doch schon gelohnt!
-
Zwei der drei folgenden Änderungen sind wahr: 1. Der Akku ist kleiner und sitzt neben einer schwächeren Lüftung. 2. Die Audiobuchse ist einfach rausnehmbar. 3. Der Kaugummi, mit dem der Kühlkörper befestigt ist, schmeckt jetzt nach Kirsche.
-
Wir stemmen den Akku heraus und finden ... ein Feuchttuch? Vielleicht hat jemand noch versucht, den vielen Kleber für den Akku aufzuwischen.
-
Mit den 13,6 Wh dieses Akkus kannst du laut Nintendo 3-7 Stunden spielen. Das ist mehr, als die originale Switch mit ihrem 16 Wh Akku leisten kann (aber weniger als die neue Version, die bis zu 9 Stunden hält).
You should add the dimension of the battery among other parts. I am finding it very hard to find this information.
I don’t know how you removed the battery on this thing, but I destroyed a few tools prying the bigger off. Plus the battery itself got bent beyond repair where I had to order a new one. Whether the water made the adhesive extra sticky I don’t know. (When I found the Switch, it had water damage)
The battery is definitely pretty difficult to remove. It just takes time and patience! Our guide details the process: Nintendo Switch Lite Akku tauschen
-
-
-
Effizientere Hardware braucht nicht nur weniger Strom, sie produziert auch weniger Hitze. Kein Wunder also, dass Lüfter und Kühlkörper kleiner geworden sind.
-
Eine weitere kleine Änderung: die früheren L und R Buttons haben direkt auf einen Schalter auf der Platine gedrückt, aber die neuen Buttons haben eine Membran dazwischen. Dies könnte helfen, dass weniger Schmutz eindringt und gibt den Buttons ein viel besseres Klickverhalten.
-
Die Lautsprecher sehen aus wie bei der originalen Switch, aber die Gehäuse sind komplett neu.
-
Sie zeigen jetzt nicht nur nach unten, sie haben auch mehr Platz, der vorher von den Akkus der Joy-Cons eingenommen wurde. Wir haben jetzt keinen Audio-Vergleich gemacht, aber wir würden uns sehr wundern, wenn die Lite dabei nicht viel besser abschneiden würde.
-
-
-
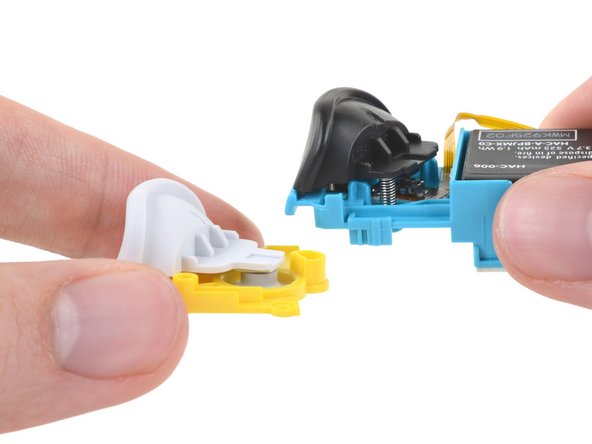
Nachdem wir die kleine Plantine des Joy Cons rausgenommen haben, sehen wir den Grund für einen kürzlichen Aufreger um die Switch - der Joystick.
-
Wir hebeln das Gehäuse der Joysticks auf und haben zunächst den Eindruck, dass sie denen der 2019er Switch sehr ähnlich, sind, aber das Design der Verschlüsse an den Kanten ist etwas anders und das Gehäuse lässt sich insgesamt leichter öffnen.
-
In der Hoffnung, irgendeine Verbesserung hinsichtlich des Driftens zu finden, bauen wir die Joysticks der Switch Lite (oben) und die der Switch von 2019 (unten) auseinander und legen sie für euch nebeneinander.
-
Auf den ersten Blick sehen wir keine großen Unterschiede, aber wir bemerken eine neue Spurführung, einen schmaleren Klick-Button und etwas größere Metallschienen.
Ich habe die neue Version der analog sticks genauer unter die Lupe genommen, sie mit meinem problembehafteten verglichen und dabei etwas festgestellt. Ich habe es in einem Tweet zusammengefasst
Just replaced my left joystick, I didn’t even take off the main heatshield to disconnect the battery (had been dead for awhile). The ribbon cables went back in easily with a drop of de-oxit for lubrication. This is a smart design because the left joystick gets much more abuse than the right. PROTIP: The ribbon cables are all fixed in place via a clasp that must be lifted up first. Failure to do so will damage the ribbon cables and your board. The riskiest part of this repair is losing screws. PH000 and Y00 drivers are needed. About a 30 minute repair for a first timer.
-
-
-
Beim Rausnehmen der Platine fällt uns auf, dass der vormals modulare Speicher mittlerweile auch festgelötet ist. (Den Speicher der originalen Switch selbst auszutauschen, hat nicht funktioniert, aber war wenigstens physisch möglich.)
-
Die Vorderseite dieses elektronischen Wasserschweins:
-
NVIDIA ODNX10-A1 (der Tegra X1-basierte SoC, wahrscheinlich eine Maßanfertigung des T210B01)
-
Samsung K4U6E3S4AM-MGCJ LPDDR4X DRAM ( insgesamt 4 GB)
-
Samsung KLMBG2JETD-B041 32 GB eMMCFlash-Speicher
-
ST Microelectronics ST21NFCD NFC-Controller und Fingerspitzen- Touchscreen-Controller
-
Realtek ALC5639 Audio Codec
-
Cypress CYW4356X 802.11ac WLAN + Bluetooth 5.0 SoC
You mention the Cypress chip to be Bluetooth 5.0, but list in the tech specs as Bluetooth 4.1. Which is it?
Nintendo’s official specs for the Switch Lite say BT 4.1. The Cypress chip is an off-the-shelf design that may have some un-utilized capabilities.
Is it possible to resolder ram chips with highrler capacity to boost a performance?
-
-
-
Mal sehen, was für Chips wir auf der anderen Seite dieses Wasserschweins finden:
-
ST Microelectronics STM32F038C6 32-bit Microcontroller mit 32 KB Flashspeicher
-
B1913 GCBRG HAC STD T1056719A1 secure MCU (vermutlich)
-
Maxim Integrated MAX77620HEWJ IC zur Leistungssteuerung
-
Rohm BM92T10MWV-Z USB-C Ladesteuerung
-
Texas Instruments BQ24193 Akkuladesteuerung
-
Maxim Integrated MAX17050 Akkustandsanzeige
-
RP602Z330C 1.5 A Aufwärtsregler
深蓝色框框里的芯片是什么芯片?
Maxim Integrated MAX17050 Battery Charge Meter.
-
-
-
Wie siehts also bei der Switch Lite aus?
-
Ein wenig Hitze und Druck reichen, um die Displayeinheit aus dem Gehäuse zu holen - so weit, so gut.
-
Mit ein wenig mehr Überzeugung löst sich der Touchscreen vom Display. Gewonnen! Die Switch bleibt ihrer Linie treu.
I’d say IPS would made sense since in whatever posture the Switch Lite fell to ground the screen won’t be directly contacted (joysticks and buttons acts like a cushion layer), it does not appear often to encounter a fractured screen so swapping to IPS gives better visual experience and more chassis space(for batteries?)
Given that the majority of replacements are screen-related, this is a really poor explanation. What about the gasket? The adhesive? You didn’t touch on that at all - and it’s SUPER important to get right.
As stated in the banner at the top of the page, these are not instructions. Our hardware teardowns are intended to give a first look at the device and assess it for repairability, and that’s all. Step-by-step repair guides will come later! You can use this document for reference, but it’s not meant to be exhaustive.
la verdad es que en el desmontaje y separacion no os habeis esmerado pero nada de nada, una foto de un despiece que ademas no tiene ni un resto de pagamento y creo que no va aser tan facil como decis y menos el volver a montar, como se monta? que adhesivo? no queda nada nada claro nada.
I agree with the posters above - it’s the most important and dangerous step (separating the screen from the digitizer) and they choose to go with “something magic happens here”! Disappointing and frustrating.
Looking at replacing a LCD, is the LCD glued to the glass or just adhesive around the edge?
It’s just a strip of black adhesive all the way around - not glue. Just warm it up with a heat gun or hair dryer and carefully peel apart the LCD and digitizer. That said, if you’re replacing a broken LCD it might be easier just to get the complete LCD+digitizer assembly (the digitizer is cheap).
-
-
-
Kostet weniger, kann weniger, ist einfach aufgebaut.
-
Für diese Switch wurde an der Modularität gespart, weder die Controller, noch der Speicher und der SD-Kartenleser sind austauschbar.
-
Aber ein nicht verklebtes Display verheißt Gutes, genauso der austauschbare Game Card-Leser und die Audiobuchse.
-
Nicht ganz so cool wie die Switch, nicht ganz so überladen wie die 3DS. Diese Lite scheint ganz gut zu passen, aber was heißt das auf unserem Reparierbarkeits-Index?
-
- Fast alle Teile sind mit Schrauben befestigt, nicht mit Kleber.
- Viele Teile, inklusive der Joysticks, des Lüfters und der Audiobuchse sind modular und können einfach ausgetauscht werden.
- Der Akku ist zwar fest verklebt, kann aber nach Abnehmen des hinteren Gehäuses schnell ersetzt werden.
- Touchscreen und Display sind zwar nicht verschweisst, aber ziemlich fest verklebt.
- Sowohl Speicher als auch SD-Kartenleser sind jetzt auf die Hauptplatine gelötet.
- Die ungewöhnlichen Tri point-Schrauben erschweren die Reparatur.


Fazit
Reparierbarkeits-Index


(10 ist am einfachsten zu reparieren)
Besonderer Dank geht an diese Übersetzer:innen:
93%


Diese Übersetzer:innen helfen uns, die Welt zu reparieren! Wie kann ich mithelfen?
Hier starten ›
34 Kommentare
The L and R triggers on the old style joycons pressed onto a fragile PCB mounted tactile switch, and were both fragile and a common point of failure. The new ones will hopefully be more robust, especially important as now they are part of the main unit and not a replaceable accessory.
Ethan…..first of all why is it important that you posted first? Second of all, you said, “Looks like the Switch Lite is based off of the original Switch.” Really, Ethan? You think? Sorry for the sarcasm but c’mon man, how is your comment helping?
You are getting waeker and weaker. No exact descripton or OEM of the fan. Boy that’s weak for because the bearing of the fan can be an issue over time too. Sleevebearings would be horror for a unit like this. I hope it is ball or hydrodynamic. This fan has to run high speeds becaus of its small diameter.
So now this begs the question, can you reuse the joycons from the OG switch, remove the buttons and place them into the lite?
Say if you wanted a different color for your buttons, seems the triggers are a nono since they use a different button system but what about a,b,x,y,+,- ect?
awful teardown guide, please give better details regarding screw placement, etc
The top of the teardown explicitly says it’s not a service guide. iFixit does have separate guides on Switch repair.
You might find the repair guides more helpful, they highlight all the screws and everything :)
Probably -
Just bought a turquoise lite and it comes with standard phillips screws
The four screws on the top and bottom of the switch lite’s case are PH000, while the 4 on the back are Y00. Look again. The screws inside are all PH000 as well.
walczyk -
Would anyone know where one could source the ‘dedicated mini-joycon board’? They seem to be the one part you cannot find anywhere.
How easy would it be for a total novice to take this apart for the purposes of re-painting the switch? I was thinking about taking it apart and doing a custom paint job on it but wanted to see if anyone else has tried it before I give it a go.
I'm a total novice and did this its very straight forward just don't get the screws mixed up and be mindful of ribbon cables also have the right tools otherwise you will strip the
Does anyone know where to get a replacement fan for the lite (in the UK). Mine sounds like its grating rocks most of the time.
Can someone point me in the direction of which ribbon connectors/sockets are for which function?
I took my boys apart to replace a snapped analogue stick and now it has sound and come on but the screen is blank, not even back-lit, and I'm not sure where I need to go next to troubleshoot it.
Took mine apart today and there are three ribbon cables that come from the screen two are under the gamecard slot those are for picture and backlight the power runs to the otherside near the battery
I’m just curious in respect to future repairability of my own switch lite - if I was to theoretically crack it open and replace the right stick (since that’s the only one that’s shown any issues whatsoever with my original set of joycons, also very pleased to see that one at least looks reasonably easy to get at) - would I need to replace the thermal compound? Or would it be fine if I just put it all back together as is?
I think it might be fine/preferable to leave/reuse the purple goop between the heatpipe and the topmost shield, as that seems to be quite a bit more spreadable than usual thermal paste used on computers.
For the blue/greyish goop between the heatsink and the SoC shield, and between the SoC shield and the SoC, you might be able to scoop up some of the excess goop that seeped out that are still kinda liquid, and slap it back on to the chip die and copper part of the shield. Though decent thermal paste aren’t all that expensive.
If you were to break a corner of the game card reader (brother decided to rip instead of gently unscrew a stripped screw), where could we get a replacement card reader? My understanding is that the switch lite and switch have different game card reader parts.
I for one disagree with this repairability score. If you’re fixing any handheld electronic and you don’t have access to a tri-wing screwdriver, you are probably just new to fixing these things. Every Nintendo handheld since the original gameboy has had them and apple adopted the use of the same bit in their very popular iPhone 7 (albeit a tad smaller). Also the adhesive on the digitizer comes off like butter with a guitar pick and some heat. Getting a new digi on without taking out the MB is an exercise in futility so that is a bit annoying, but overall I think this handheld is pretty easy to work on all things considered.
agreed regarding the Y0 driver bits, your toolkit should have them and if they don’t then you are gonna be ordering replacement parts anyway…
walczyk -
Broke my power/volume flex cable trying to put it back into the connector, anyone know when i can get a replacement, if at all?
omg that sucks, how would you break it putting it back in? I don’t know if mine is fully inserted, but de-oxit helped. BTW I found them on ebay for $7 just google something “Nintendo “Switch Lite” Power Volume Button Ribbon Flex Cable” and do not buy the non switch-lite version since they are different.
walczyk -
Why are there NO videos or howtos that show the trick in separating the digitizer from the LCD? I’ve disassembled everything but I’m stuck at that point. My LCD is good - just the digitizer is scratched and I don’t want to crack the LCD separating it from the digitizer. What’s the trick? Just a heat gun and careful prying? Note the Switch is different from the Lite - in the Switch the LCD and digitizer are not glued together, so it’s simple to replace just one. Not in the Lite tho. Any suggestions?
Okay, I took the plunge and tried separating the LCD and digitizer - it worked! The trick is to use a heat gun to heat one end of the digitizer side and then very carefully and slowly bend/peel it back from the LCD. There is a thin frame (about 2 mm wide) of black adhesive that goes all the way around. Once you’ve pulled them apart you’ll need to peel off that adhesive strip and move it to the new digitizer (if that’s what you’re replacing). Reattach the digitizer to the Switch Lite frame (reuse or use new clear adhesive if necessary), and then carefully align and stick the LCD to the backside of the digitizer. Then just reassemble everything and you’re good to ho.
¿sonde podré encontrar la tarjeta del joycon, la que aparece en la imagen uno del paso 7? vivo en Guatemala, de preferencia si la puedo conseguir en Latino américa, muchas gracias por su respuesta
japanese versions have only phillips screws
I’m interested in whether or not it is possible to add some kind of rumble motors (small, slim profile, like used in mobile phones) to the Switch Lite, there seems to be space inside the casing but does anyone know if there is an output on the board that could be used? Tied into the speakers somehow perhaps?
Also, I can’t see a NFC antenna anywhere in this tear down, yet it’s on the right stick as per the joy-cons. Is it just missing from the tear down or is it physically built into the right stick this time around?
What chip can I replace to restore video? I get audio, but no video. And No, its NOT the backlight or backlight cable/connector.
Does anyone know where exactly the NFC touch point is? I couldn’t see it in any of the pictures.
I would love it if there was an update to this video to replace the wifi antenna, as I can see the connections, but it glanced over on the video. Because this is essential to it's operation, that would be a great thing to inclue.
Is there a guide without all the cringe pokemon references? Preferably one where the first two steps are actually steps.
Harley Stout - Antwort
This isn’t a guide, this is a teardown.
Duck -