Einleitung
This is a simple guide to removing the back of the Numworks Graphing Calculator. This does not cover removing the board from the front or any instructions as to disconnecting connectors besides the battery connector.
Was du brauchst
-
-
Peel away the six rubber foots on the back of the calculator using your fingernails.
-
-
-
-
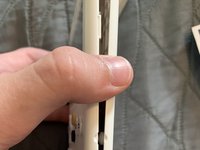
Carefully peel the two case parts away from each other, taking turns on each side disconnecting one at a time for all eight clips. The third row from the bottom up is more secure than the others. DO NOT JERK CASE APART, THERE IS A BATTERY CONNECTOR TO REMOVE instead, slowly open the case 180 degrees with the back facing you.
-
-
-
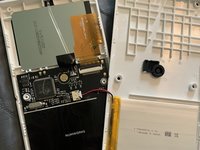
Carefully wiggle the battery connector until it slides easily loose. You have now finished removing the Numworks Graphing Calculator's case.
-


4 Kommentare zur Anleitung
Bonjour,
Ma fille a cassé son écran peut-on le changer et comment ?
Sand
Merci pour ce tuto , bonsoir j'ai également écran cassé. Peux t'on trouver un écran de remplacement quelque part?
Merci
Malheureusement, même si de nombreuses pièces de cette calculatrice sont connues du grand public, beaucoup d'autres sont spécifiques et ne peuvent être remplacées que par des pièces provenant d'une autre calculatrice. J'aimerais vraiment que Numworks propose des pièces de rechange. Il est possible de récupérer des pièces sur une autre calculatrice cassée, mais cela revient cher par rapport à d'autres options.
JamesPi -
@sandrineva29643 @disneyjean19189 Désolé pour la réponse tardive. Les seules solutions possibles que je connaisse pour réparer cela consistent soit à utiliser un écran présentant les mêmes caractéristiques techniques, puis à le câbler à l'aide de fils ou d'un circuit imprimé flexible personnalisé (quelqu'un l'a déjà fait), soit à envoyer l'appareil en réparation. Si je me souviens bien, Numworks proposait autrefois un service de réparation, mais je ne trouve aucune mention de celui-ci nulle part. Si vous vous y connaissez en électronique générale et que vous pouvez vous procurer l'écran et le circuit imprimé flexible utilisés ici : https://whatever.sdfa3.org/numworks-lcd.... ou si vous savez concevoir votre propre circuit imprimé flexible, le réparer vous-même serait une option beaucoup moins coûteuse. Sinon, j'enverrais un e-mail à Numworks pour voir s'ils peuvent trouver une solution.