Einleitung
Samsung ist zurück, Baby! Der weltgrößte Smartphone-Hersteller eröffnet das Jahr 2017 mit dem Start des beinahe weltgrößten Smartphones! Mit seinem riesigen 6.2 Zoll großen Display ist das Galaxy S8+ ein visuelles Kraftpaket. Aber wie macht es sich auf dem Seziertisch? Lasst uns einen Blick ins Innere werfen.
Oh, hast du nach unserem regulären Galaxy S8 Teardown gesucht? Du hast ihn gerade gefunden.
Willst du immer bestens über die neuesten Gadgets informiert sein? Folge uns auf Twitter, werde unser Freund bei Facebook, und schau dir unsere Fotos bei Instagram an für die aktuellsten Neuigkeiten!
Was du brauchst
Einführungsvideo
-
-
Du hast das glatte Äußere des S8+ schon auf Samsungs Werbebildern gesehen, aber wir schauen unter die Oberfläche. Einige Kernpunkte in diesem Teardown sind:
-
6,2 Zoll, dual-edge, Super AMOLED Display mit 2960 × 1440 Auflösung (529 ppi)
-
Qualcomm Snapdragon 835 (oder Samsung Exynos 8895) Prozessor mit 4 GB RAM
-
12 Megapixel Rückkamera mit Dual Pixel Autofokus und 4K Videoaufnahme; 8-Megapixel Frontkamera
-
64 GB interner Speicher, erweiterbar über MicroSD Karte (bis zu 256 GB extra)
-
Wasserdichtigkeit nach IP68-Zertifizierung
-
Android 7.0 Nougat
-
-
-
Zu den Ports auf der Unterseite gehören der Kopfhöreranschluss, ein USB-C-Anschluss, der Mikrofonanschluss und die Lautsprecherabdeckung.
-
Die Vorderseite ist glatt und beinahe strukturlos — die physische Home-Taste wurde durch einen Drucksensor unter dem Display ersetzt, das Gerät wirkt dadurch wie aus einem Guss.
-
Aufgepasst, wer seine SIM häufig tauscht: auf der Oberseite des S8+ sind zwei nahezu identische Öffnungen. Eine ist für das Werkzeug zum SIM-Auswurf gedacht, unter der anderen liegt ein Mikrofon. Lieber nicht verwechseln!
Samsung went with easier solution in regard of fingerprint reader because synaptic did not finish developing the on screen sensor; while they are under pressure to release a new flagship in a rather empty market for them after the Note 7 fiasco.
I would love to understand the damage (especially to the IP rating) that may have been caused by pushing the sim ejector through the top mic hole.
-
-
-
Zeit für ein paar schnelle Vergleiche, bevor es zur Sache geht.
-
Im Trio haben wir links das S7 Edge, in der Mitte das S8+ und ganz rechts das S8.
-
Dank seiner dünneren Einfassungen und dem ungewöhnlichen Seitenverhältnis von 18,5:9 gelingt es dem S8+ sein 6,2-Zoll-Display in etwa das gleiche Format zu pressen wie das S7 Edge mit seinen 5,5 Zoll.
-
Gegenüber den Produkten aus dem Vorjahr fällt auf ersten Blick nur ins Auge, dass Blitzlicht und Fingerabdrucksensor jetzt an neuer Stelle liegen.
-
-
-
Genug gewartet—wir sind gespannt zu sehen, was drin steckt. Zum Glück kennen wir uns inzwischen aus.
-
Eine Menge Wärme aus unserem iOpener weicht den Kleber soweit auf, dass wir das hintere Glas anheben und uns hineinkämpfen können.
-
Und wir sind fast drin...
-
-
-
... Aber trotz unseres ganzen Geredes zeigt diese Rückwand doch etwas neues. Der Fingerabdrucksensor liegt in der Rückwand und wird durch ein sehr kurzes Kabel mit dem Motherboard verbunden.
-
Scheint als hätte Samsung dieses Kabel extra so entworfen, dass es sicher mit der Rückwand abgezogen werden kann. Fast ohne jeden Durchhang zieht schon das sanfteste Anheben der Rückwand das Kabel direkt aus seinem schmalen Anschluss. Das macht es definitiv weniger schadensanfällig als die Kabel einiger anderer Fingerabdrucksensoren die wir so kennen.
-
Kabel gelöst und schon ist das Glas aus dem Weg geräumt! Das S8 und das S8+ folgen dem Schritt des S6 hin zu einer Glasrückwand. Dadurch hat sich Samsung den technischen Aufwand erspart, den die Integration von Antennen in ein metallgestütztes Smartphone so mit sich bringt. Der Preis dafür ist eine kürzere Lebensdauer und schlechte Reparierbarkeit.
-
Doppelte Bruchgefahr und eine umständliche Prozedur beim Öffnen geben in puncto Reparierbarkeit dicke Minuspunkte.
What is the fingerprint reader made from this year? The S7 fingerprint reader in the home button was prone to scratching and peeling last year. Is the fingerprint reader covered by glass this year in the S8 and S8+? Very curious to know as I like things to last and wear well.
-
-
-
-
Während wir den Mittelrahmen so Stück für Stück lösen, erinnert alles doch sehr an das S7und S7 Edge.
-
Diesmal wurde die obere Antennenanordnung mit dem NFC/der drahtlosen Ladeplatte kombiniert, wie schon beim Note7.
-
Die Spule könnte auch Funktionen von Samsung Pay übernehmen, wie bereits MST. Dabei wird die Spule vermutlich als Elektromagnet genutzt, so dass sie sich wie der Streifen einer Kreditkarte an einem Kartenleser verhält.
-
-
-
Hoffen wir, dass Samsungs verbesserte Testmethoden das gebracht haben, was dem Note7 gefehlt hat. Denn dieses Design sieht für uns fast gleich aus.
-
Und es ist immernoch eine Qual, etwas von diesem Kleber zu lösen! Selbst bei komplett entferntem Akku will der Leim nicht loslassen.
-
Das S8+ hat einen Akku von 13,48 Wh (3500 mAh bei 3,85 V) . Das ist genau die gleiche Kapazität wie beim Note7 und etwas weniger als beim S7 Edge mit seinen 13,86 Wh.
-
Im Kampf um die Akkuleistung hat Samsung gegenüber Apple weiterhin die Nase vorn und schlägt das iPhone 7+ mit seinen 11,1 Wh (2900 mAh bei 8,82 V).
-
-
-
Jetzt holen wir das vollgepackte Motherboard heraus und rupfen die Kameras raus.
-
In der Rück- bzw. Hauptkamera wurde der alte "Hero" von Sony durch den "Dream 1" -ebenfalls von Sony - ersetzt. Von den unterschiedlichen Bezeichnungen einmal abgesehen, bedeutet das die gleiche Kamerahardware wie im S7/S7 Edge. Samsung hat die Software weiterentwickelt, mehr nicht.
-
Als nächstes schauen wir auf die Frontkamera und eine weitere Kamera für den Irisscanner, wie wir sie schon zuvor im Note 7 entdeckt haben.
The image sensor is also different. Being an IMX333. On top of that the ISP has been upgraded. Far from just "sofware improvements, nothing more" I could tell the moment I took a RAW photo on both using 500 iso. Despite using RAW, bypassing the jpeg processing, the S8 image was noticeably less noisy with much less color blotching
-
-
-
Wir nehmen die Kameras beiseite, um nun einen Blick auf das Motherboard zu werfen. Unter anderem finden wir dort:
-
Ein Samsung K3UH5H50MM-NGCJ 4 GB LPDDR4 RAM, das den MSM8998 Snapdragon 835 überlagert
-
Einen Toshiba THGAF4G9N4LBAIR 64 GB UFS (NAND flash + controller)
-
Einen Qualcomm Aqstic WCD9341 Audio -Codec
-
Skyworks 78160-11
-
Avago AFEM-9066
-
Eine Silicon Mitus SM5720 PMIC Schnittstelle
-
-
-
-
Wir entnehmen die I/O-Tochterplatine. Hier sind deutliche Maßnahmen zum Eindringschutz zu erkennen, einschließlich der Einfassung der Lautsprecherabdeckung und der winzigen Dichtungen am USB-C Anschluss und an der Kopfhörerbuchse, als der Teil der IP68 Spezifizierung.
-
Die Kopfhörerbuchse selbst bleibt modular - das sind gute Neuigkeiten was die Reparierbarkeit angeht, denn es ist eine Komponente, die verschleißt .
Is the voltage regulator on the daughter board?
My S8+ indicated moisture when I plugged in the charging cable, the next day it did not but It will not take a charge. Even wirelessly. So I think it is the voltage regulator that is fried. If it is on the daughter board I can pillage one from another Google Locked phone and fix mine.
You think this will work?
-
-
-
Nach einem Blick auf die Heatpipe und die Kabel der Schalter zur Kontaktfläche entfernen wir noch ein paar Teile aus dem Gehäuse.
-
Es kommt ein guter alter Vibrationsmotor zum Vorschein.
-
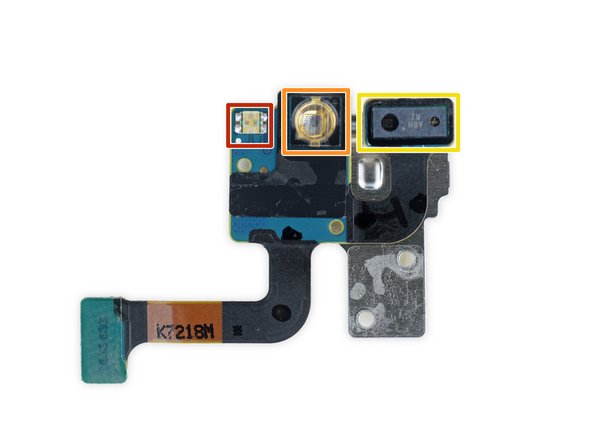
Dazu eine elegante Anordnung von Sensoren (mit Feuchtigkeitsanzeiger):
-
RGB LED (wahrscheinlich)
-
IR-Sender (vielleicht für die Irisscan-Kamera)
-
Entfernungsmesser (wahrscheinlich) um das Licht während eines Anrufs zu dimmen.
I thought the IR camera/emitter on the front should be part of the iris scanning system and not pulse reading
Exactly. Yellow is the proximity sensor, orange an IR LED for the iris scanner and red the notification LED, as stated.
Not as stated, the description says it's for illuminating fingers for pulse reading,,,
djlobb01 -
-
-
-
Auf der Jagd nach dem mysteriösen Home "Nicht-Button" graben wir uns ins Innere des Displays - trotz früherer Schwierigkeiten.
-
Zum Glück lässt sich diese Verschmelzung von Display /Digitizer nach einem ordentlichen Kampf unbeschädigt aus dem Rahmen lösen.
-
In der Hoffnung unter der Display-Verkabelung einige versteckte Details zu entdecken, lösen wir sie und finden - gar nichts. Keine Modellinfos und kein Drucksensor in Sicht. Mehr Glück dann hoffentlich beim nächsten Mal.
There is a force sensor..hope everybody can see it which connects to the display/timing/touch controller board
This interests me most.... So there is no pressure sensor at all?? How does the S8 register a home button "press" without any kind of pressure pad/sensor?
A pressure sensor isn't needed, it just needs to see how big an imprint your finger is making as the harder you press, the bigger the contact area is on the screen
that seems like a conductive layer beneath with a sponge covering. this could be a force sensor.
-
-
-
Das war's für das S8+. Wenn dein Hunger nach Teardowns noch immer nicht gestillt ist, dann wirf mal einen Blick auf unsere Zerlegung vom standard Galaxy S8.
-
Inzwischen ist es an der Zeit, diesem Smartphone eine Bewertung zu verpassen.
Hiya!
I was wondering if you guys could maybe do a comparison?
1) like the SD835 vs the A10 size.
2) volume of battery on S8 vs iphone7
3) size, efficency and density of the two motherboards (i think iphones is much smaller)
4) size and effectiveness of the two vibration motors (since S8 seems 1/3 the size)
4) also could you compare the two speakers (S8 and iphone7) against the and dual front speaker moto phone?
I ask because once again I am under the impression that the moto speakers are 1/3 the size of the main speakers in the two leaders and the same size as the ear speaker on the two.
5) and also maybe the effectiveness of the hydrophobic coating on the moto phones vs the two leaders?
6) and finally compare their internals density and effeicency to the Xiaomi Redmi 3s (because as far as I know, that is the smallest 5inch phone with a 4000mA battery)
I think that would be a really cool and enlightning.
love your work guys.
cheers.
-
- Viele Komponenten sind modular und können unabhängig voneinander ausgetauscht werden.
- Der Akku kann ausgetauscht werden, aber hartnäckiger Kleber und die aufgeklebte Rückwand machen es unnötig schwer.
- Vorder- und Rückseite aus Glas führen zu doppelter Bruchgefahr und starker Kleber auf beiden Seiten macht es bei jeder Reparatur schwierig, ins Innere zu gelangen.
- Durch den gekrümmten Bildschirm ist es extrem schwierig, nur die Frontscheibe zu ersetzen, ohne dass das Display zerstört wird.


Fazit
Reparierbarkeits-Index


(10 ist am einfachsten zu reparieren)
Besonderer Dank geht an diese Übersetzer:innen:
61%


Diese Übersetzer:innen helfen uns, die Welt zu reparieren! Wie kann ich mithelfen?
Hier starten ›
32 Kommentare
Hi: the breakdown exercise did you get a positive id on who is providing the USB-C controller chip? Thx!
I don't like glue on the battery and its not just that its the same capacity as we already see on the Samsung Galaxy S7 its kinda sad.
Man i now i will probably wait for one plus 5 or next google device because these two have big support on XDA community and they have regulari updates.
OnePlus are great with updates. My friend had Nougat on his OnePlus 3 before any of the leading phone makers (excluding Google Pixel obviously).
djlobb01 -
The S8/S8+ use a Sony IMX333 or Samsung S5K2L2 up from the IMX266 S5K2L1 found in last year's S7/S7E.
Thanks as always, guys. I seem to miss the speaker, though. Is it under the light gray grille?
Ah, ok. I see. It is the component in the lower midframe (https://d3nevzfk7ii3be.cloudfront.net/ig...).
Do you know how the home button works since there's no pressure sensor?
Does it have a separate "taptic engine" or uses the same vibration motor?
Thanks.
It likely works by measuring the surface area of the finger placed on the screen. When you press harder to activate the virtual button your finger will create a larger surface area on the screen which can be measured as more force being applied.
Leo Best -
Because samsung opted for Toshiba UFS storage if they also manufacture UFS storage
Why would you expect to find a pressure sensor behind the displyay? The screen does not deform, the digitiser just has to look for the contact patch of your finger getting bigger as you press harder on that area.
Open the Samsung Dex Dock as well!
Are the s8 and s8+ motherboards the same?
Photos [|3]
Hi, could you see a photo in high resolution, how is the earphone hooked? The frontal bone, I get curious about how it is maintained and how it is, and if it could sink without meaning to. Thank you
Do you mean the earpiece speaker? It can be seen in this photo, the last photo in step 6, at the top of the phone. It is adhered to the case and connected via spring contacts to the back of the motherboard. The speaker grille can be seen in this photo, the second image on step 13 at the top of the phone.
Can someone tell me what type the 14 Phillips screws used to hold down the NFC antenna, charging coil, and loud speaker? In addition, what are the 5 Phillips screws used to hold down the charging port PCB?
accidently I entered the ejection pin in the bottom mic.hole in S8 please advise if I already damaged the mic and/or the water resistant sealed?
I want to share my experience with you all.
We at HiGenius.nl fix smartphones all the time like Samsung S8 Plus too. unfortunately i did not see in this video that the sim tray is different than ever before. This because the tray is attached at the back of the board. So dont be surprised while you see this for the first time. Just be very cautious while removing the board. it wil follow so don’t worry.
I recently disassembled my Samsung galaxy s8 Plus the other day to replace the usb-c port as it would no longer lock in the charging cable.
However upon putting it back together and re-inserting the SIM card, it can no longer connect to my network provider. I get no mobile data or cell reception at all. However Wifi connections still work.
I was wondering if you may have an idea at what piece, board ect may play a role in connecting to the network.
The SIM works fine in another samsung phone that I previously used, so it is definitely hardware.
I’ve done network setting resets, WiFi calling is not on, and ive factory reset.
Sort of wishing I just bought a wireless charger at this point…
Thanks,
ZL
Something like that happened to me with an ASUS phone, the cause of the problem was that I did not properly connected the antenna (it was a little loose).
Hops this helps!
My galaxy s8 replaced screen isn't black what other part do i need to buy
The pictures don’t match what is received for the Galaxy S8+. It’s also not clear where to attach the perimeter adhesive. On the lip of the back cover or just inside the well area. In addition, after exposing the adhesive (after removing the clear side), no matter how weel you pre-align the position, you can’t count on the adhesive to stick to whichever method questioned above, without some of it not releasing cleanly from the colored backing. Yes. firm pressure was applied before moving a little further down. At times the adhesive stuck so strongly to the colored backing, it stretched the adhesive out of shape.
I have repaired hundreds of laptops and all in ones, so I understand there are subtleties in a repair, and I found it quite confusing replacing the battery and fingerprint sensor and other necessary parts related to doing that repair with the either inaccurate, outdated, or lack of detail provided (but much needed) in this guide.
can i buy motherboard for samsung galaxy 8plus scv35
hhera,n - Antwort