-
-
The first disassembly step is quite straight forward as it's the way to pair and to swap the batteries.
-
-
-
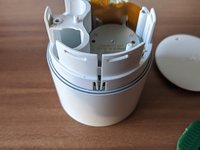
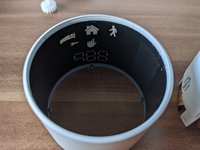
Removing the cover which has the "tado" logo embossed is the first step to getting into the thermostat.
-
One right next to the little opening for the temperature sensor .
-
Two other on the opposite side.
-
Once you removed the cover you can easily pry off the serrated ring. This serration is connected to a little cogwheel which transfers the turning motion to an electrical signal for setting the temperature.
-
-
-
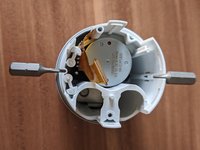
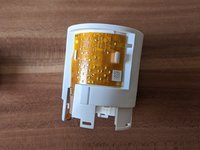
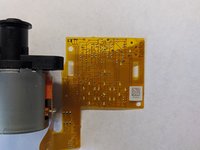
The single PCB is secured with 2 cross head screws and a ribbon cable which leads to the "display".
-
By lifting the tightening cover of the ribbon cable you can remove it.
-
By removing the 2 standard screws you can finally completely remove the PCB from the assembly.
-
Additionally there are two plastic pins which transfer button pushes from to the PCB. More for that to come when looking at the PCBs.
-
-
-
-
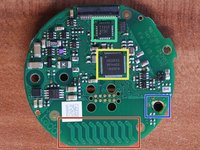
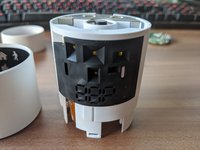
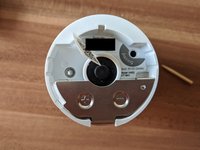
On this side of the PCB you can see several important objects.
-
The red section is the sub-GHz antenna which is the main communication antenna to the base station.
-
The blue section is where the cogwheel for setting the temperature is positioned.
-
The T1317 chip (green) I could not assign to anything. If sb. has an idea what it is, please let me know.
-
The N52832 IC (yellow) is a low power Bluetooth transceiver which is only used by the Tado radiator thermostat in app mode.
-
-
-
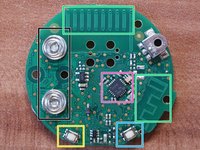
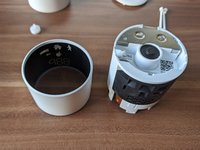
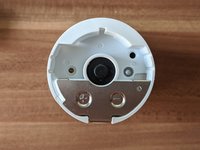
On this side of the PCB you can see several more important objects:
-
In black you see both AA battery connections.
-
The first button (yellow) is the button which is pressed when you screw lock the adapter plate back into the main unit when pairing or changing the batteries. It indicates to the device that it is mounted to a radiator.
-
The second button (teal) is the pairing button.
-
The RF antenna (red)
-
The antenna already mentioned is connected to the CC110L IC (magenta), which is a sub-GHz transceiver.
-
In the last step on the other side of the PCB we saw a Bluetooth IC. On this side of the PCB we can also find the antenna for it (green).
-
-
-
The shell consists of two parts. The outer one is painted black inside to block the light from the self-made LED display. The inner one houses all the rest.
-
To separate the two, you have to open or part the two opposite clips by driving something. between them - these might be toothpicks, but also can be bits like in this case.
-
When you spread the clips apart, you can slide the other shell off - revealing the self-made LED display and its cover.
-
-
-
Here you can see how the managed to implement a bent "display". The black part is made out of rubber, blocking all the light of the LEDs in the ribbon cable behind.
-
-
-
Removal of the motor is quite simple.
-
Behind the sticker there are two more screws, securing the 25BYJ412-56 motor.
-
Remove them and the motor including the ribbon cable and ribbon-display falls out.
-
-
-
And that is it, the completly disassembled tado Smart Radiator Thermostat v3+.
-


20 Kommentare zur Anleitung
Hi, I have several of these and I’m looking at ways to make them more usable as they should measure the temperature of the room, not the radiator. I have a couple of questions:
- what kind of temperature sensor does it use? Can it be desoldered and moved away from the valve for a better reading
- can the motor be disconnected? If so, does the valve still work as an external temperature sensor when placed in the same room as another valve?
Hi Jacopo, I have exactly the same question. I want to use the Tado to heat up my pool and want a probe inside of the water. Did you manage to find the temperature sensor? Cheers, Dennis
I have the same question, similar to Dennis I would like to use Tado to heat my hot tub and would like to feed my own temperature reading into the device (albeit offset by 20 degrees). Would be great to understand how the temperature sensing works.
this is not an electronics feedback loop. It’s like a normal thermostatic head, with the wax feedback, the electronics just inputs the set point, like you would do by hand twisting the knob. Of course, you could use the setpoint for feedback, but these are plastic gears, you can’t use them too much.
Hi
I suggest sign-in at https://ifttt.com so you can use another IoT device to control temperature an this one would send the order through IFTTT
Also install Wireless Temperature Sensor in Master-Slave settings with the Tado Smart Radiator Thermostat
Jairo -