Einleitung
Bei der Veröffentlichung der Keynotes am 9. März hat uns Apple mit vier neuen MacBooks überrascht. Wie immer mussten wir natürlich unbedingt gleich das überarbeitete MacBook Pro in die Finger kriegen.
Äußerlich ähnelt das MacBook Pro 13" mit Retina Display von Anfang 2015 seinem älteren Bruder sehr. Es hat das gleiche Retina Display und dieselbe Unibody-Konstruktion aus Aluminium. Aber mit einem neumodischen Force Touch Trackpad sowie dem allerneuesten Broadwell-U Prozessor von Intel verspricht dieses MacBook doch, etwas ganz Neues zu sein. Erforsche mit uns gemeinsam das Innenleben dieser neuen Art!
Du kannst du nicht genug von unseren News kriegen? Dann folge uns auf Instagram, Twitter und Facebook!
Sieh dir auch unsere ausführliche Video-Analyse des Force Touch Trackpads an!
Was du brauchst
Einführungsvideo
-
-
Sieh an, das neue Retina! Wir haben ja schon mal mit dem professionellen 13 Zoll Laptop von Apple zu tun gehabt, aber diesmal ist doch etwas anders: Ooooh, dieses Trackpad!
-
Schaun wir mal, welche technischen Wunder diese magische Box für uns bereithält:
-
13,3 Zoll, 2560 x 1600 pixel (227 ppi) Retina Display
-
2,7 oder 2,9 GHz dual-core Intel Core i5 Prozessor (optional auch mit 3,1 GHz dual-core Intel Core i7 Prozessor erhältlich)
-
8 GB oder 16 GB 1866 MHz LPDDR3 eingebauter Speicher
-
128 GB, 256 GB, 512 GB, oder 1 TB Flash Speicher
-
Intel Iris Graphics 6100
-
Thunderbolt 2, USB 3.0, HDMI I/O in voller Größe
-
-
-
Ein kurzer Blick auf die Unterseite zeigt keinerlei Überraschungen - dieses Gerät teilt sich die Bezeichnung A1502 mit dem MacBook Pro von Ende 2013.
-
Schaun wir mal auf die Ports:
-
Auf der rechten Seite hat dieses MacBook einen SDXC Karten-Slot, einen HDMI Port und einen USB 3 Port.
-
Links haben wir einen MagSafe 2 Port, zwei Thunderbolt 2 Ports, einen weiteren USB 3.0 Port, eine Kopfhörerbuchse sowie duale Mikrofone.
-
-
-
Lasset die Spiele beginnen. Trommelwirbel bitte!
-
Scheint als hätte dieses MacBook das Gen des einzelnen Lüfters von seinem Vorgänger geerbt ... und nicht nur das.
-
Da müssen wir wohl noch etwas tiefer graben, um an die tollen Neuerungen zu kommen.
-
-
-
Winkt uns Apple etwa herein? Der Warnaufkleber auf dem Akku, den wir beim Teardown des MacBook Pro 13" mit Retina Display von Ende 2013 (Mittleres Bild) gefunden haben, ist verschwunden. Na dann auf geht's!
-
Das Geheimnis um das Force Touch Trackpad löst sich nach und nach, wir beginnen zunächst damit, das Kabel zu entfernen.
-
Apple hat uns verlockende Anweisungen für das Trackpad hinterlassen: "Je stärker du drückst, desto mehr kannst du machen." Okay Apple, wenn du darauf bestehst!
This trackpad cable is proving to be the last straw for me. Not a month off warranty, the keyboard and trackpad on my MBP stopped responding and replacing this poorly-located cable was the only fix. Three months later, I'm having the same problem, albeit intermittently, and I'm probably going to have to replace it yet again. It's not acceptable that this fancy product is sold as a pro-level machine. Frankly, Apple's new engineering ethos is an embarrassment and an insult to the industry, and yet when I look into the competition, I see much the same: fancy products designed to last just beyond the standard warranty. And don't get me started on port adapters. Such a shame.
To any of you possibly reading this and in any way invested in this cable issue, I did indeed replace the cable back in August (2016) and the machine worked properly until this last week of December (2016) when the problem returned. I'll either have to replace it yet again or move on to a new machine.
Thanks for providing me another incidence of this cable being the culprit in what seems to be a frequently reported bug on this particular model of the MacBook pro.
Hi mapercortesia - can you please let https://appelissues.net/ know about the issue and please cite this compendium that is collecting as much information about the issue: http://a1502-2015-macbook-pro-13-trackpa...
I'm having the same intermittent trackpad and keyboard issue for the last few weeks. I've narrowed it down to the cable based on feedback from people like yourself and would love to know where you procured your replacement cable from (and the part number if you happen to know it).
Hello! I ordered the IPD Trackpad Flex Cable (Item CMP-5726-UTW0) from Command Mac Parts.
Last update for anyone affected by this issue: this is fundamentally a design flaw. Temperature fluctuations cause the extremely small points of contact between each end of the cable and its respective connector to disengage. Unless the cable itself is truly kaput, reseating it often resolves the problem, but only temporarily. Allowing the machine to adjust to room temperature (after carrying it around outside in colder weather, for example) may also get the keyboard and trackpad working again. Tapping on the case beneath the spacebar, at the base of the trackpad or underneath the trackpad can also get the components working properly. But, again, this is not a permanent solution. I'm not sure if there is a permanent solution. And since carrying an external keyboard and mouse around with me is preposterous (imagine someone sitting in a cafè with a keyboard on their keyboard), I'm not going to deal with this anymore. It will be a long time before I consider purchasing another Apple product.
Hey mapercortesia. I actually paid Apple to replace the cable. I tried to replace it myself with one off eBay and it worked except for haptic feedback / clicking.
I can’t work on a crippled device so I took it to Apple immediately. I didn’t bother to check if others had the haptic feedback issue with replacement cable, but that is indeed the case. And there’s 2 part numbers for the cable (one is a revised one that Apple tries to remedy the issue with - but still fails).
Under Australia Consumer Law Guarantee a product must be of acceptable quality free from defect and fit for purpose (e.g. you can use keyboard & mouse). This trackpad cable is, as you say, a design flaw and not durable and fails that test. However this law only applies for products with a reasonable lifetime expectancy. Apple in Australia uses only two factors on deciding reasonable lifetime: (1) when the fault happened and (2) the age of the product.
Apple says: “your laptop is 4 years old, which is 12 months older than expected lifetime”.
Here is an actively maintained compendium of this issue: http://a1502-2015-macbook-pro-13-trackpa...
I urge anyone having this issue please contact https://appleissues.net/ and let them know that this is a widespread well known issue that Apple has not acknowledged and link to above.
-
-
-
Die Operation "Akku entfernen" hat begonnen! Da wir schon früher Retinas gesehen haben, kennen wir die ungefähre Vorgehensweise, aber du wirst nichts hören, denn wir holen jetzt die Lautsprecher heraus.
-
Wo früher vier Schrauben den Rahmen des Akkus befestigt haben (angesichts der Menge Klebstoff, die benutzt wurde, waren sie vielleicht etwas überflüssig), befinden sich jetzt vier Gummiverschlüsse.
-
-
-
Wenn du eine Schlacht willst, Apple, kannst du eine Schlacht kriegen. Wie das alte klingonische Sprichwort besagt: Heute ist ein guter Tag zum Sterben, wenn es sein muss, auch beim Versuch, einen Akku zu entfernen.
-
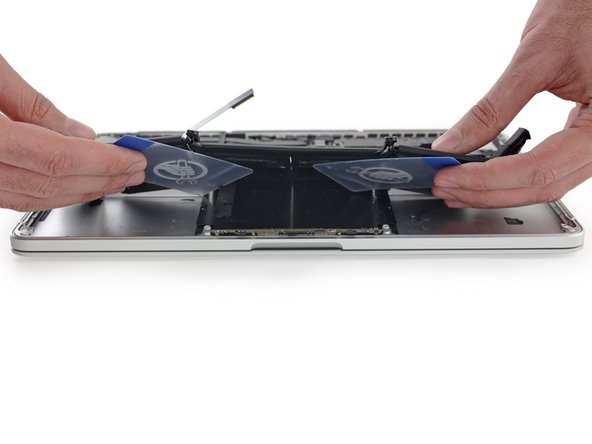
Mit unseren zuverlässigen Werkzeugen, dem iOpener und der Plastikkarte, bewaffnet, beginnen wir, den Akku zu erwärmen und herauszuhebeln, und passen dabei auf, nichts zu beschädigen, was "potentiell Feuer fangen oder brennen" könnte.
-
-
-
Diese Komponenten verstecken sich sehr gut vor uns. Wir benutzen ein Öffnungswerkzeug aus Weichplastik, um die Kontrollplatine des Trackpads aus dem Weg zu schubsen, aber entfernen tun wir sie noch nicht...
-
Apple hat sich dafür entschieden, die größten Kabel auf die Trackpad-Platine zu löten, und das heißt, dass wir sie im Moment einfach nur zur Seite klappen. ZIF sagt dir aber schon was, oder Apple?
-
Die neue Trackpad-Platine enthält ein paar interessante ICs:
-
ST Microelectronics 32F103 ARM Cortex-M basierte Microcontroller
-
Broadcom BCM5976 Touch Screen Controller
-
-
-
-
Grrr. Wir beginnen mit dem mühsamen Prozess, diesen minderjährigen Akku mithilfe einer Plastikkarte von seinen Drogen runterzukriegen. Unserer Meinung nach sollte Klebstoff auch als Droge gelten und wie diese strengen Kontrollen unterliegen und nur verantwortungsvoll genutzt werden.
-
Die mittleren Akkuzellen sind schwerer zu entfernen als in vorherigen Jahren. Vielleicht sind wir einfach nur schwächer.
-
Das Entfernen des Akkus bringt ... klebriges Zeug zum Vorschein. Entweder glaubt Apple, dass du deinen Akku nicht austauschen musst, oder irgendjemand hat ihn aus Versehen in Teer getunkt.
What was the tar video *of*? <shoot[V]-foot[N.DO]-self[PRO.GEN] copyright rant> Some obscure scene in an obscure movie that would have actually served to advertise the movie to people who read iFixit? Wow - an opportunity for a movie company to perhaps *make money* from “copyright infringement” - *what a concept*!
-
-
-
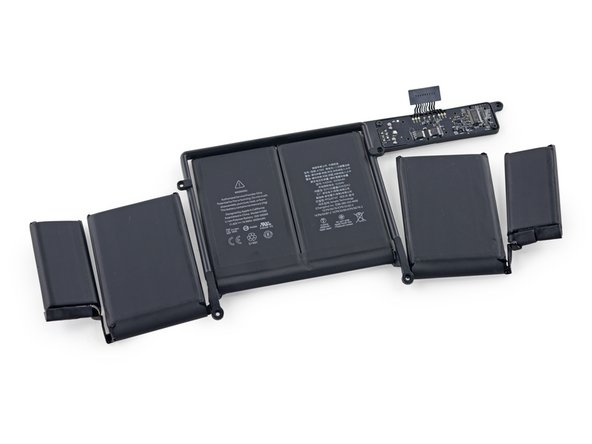
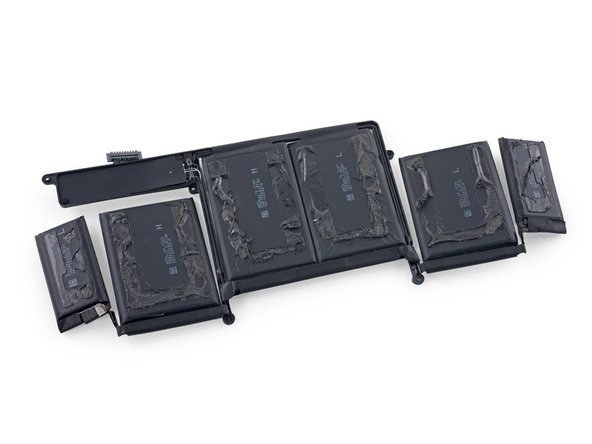
Wir haben eine ganze Reihe von Verfahren angewendet, um diese Anordnung aus 74,9 Wh Lithium Polymer Akkuzellen zu entfernen.
-
Beim Modell von Ende 2013 hatten wir 71,8 Wh, so dass wir jetzt ganze 4% mehr Leistung haben und damit 11% mehr Laufzeit. Den Rest schreiben wir der Effizienz der Broadwell Architektur zu.
-
Der XPS 13 von Dell schafft aber sowohl einen HD Bildschirm als auch eine (angebliche) Laufzeit von 11 Stunden mit einem 52 Wh Akku.
-
Unser Stammgast bei den Retina Displays, der Texas Instruments BQ20Z451 Gas Gange IC, misst auch hier die Akkulebensdauer.
-
Diese IC sollte der älteren BQ20Z45, bzw. seinem Ersatz, der BQ20Z45-R1 ähneln.
-
-
-
Und hier ist es, Leute, das nagelneue Force Touch Trackpad. Um es zu testen, holen wir unseren kleinsten Angestellten, Gus den
EwokCavapoo. -
Man kann ein Trackpad nicht nach seinem Äußeren beurteilen, daher entfernen wir die 10 Schrauben, mit denen es befestigt ist.
-
Wir versuchen das jetzt nicht zu verurteilen, denn wenigstens ist es nicht geklebt. Aber die Aussicht auf 10 weitere Schrauben im Trackpad unter der Abdeckung lässt uns doch kurz aufstöhnen. Wieviel Kraft hat denn dieses Trackpad, dass es so sehr festgehalten werden muss?
-
-
-
Die Macht ist mit uns. Naja, die des Force Touch Trackpads.
-
Schon 2007 wurde davon gesprochen, jetzt endlich halten wir die Taptic Engine in unseren Händen, die für das haptische Feedback des Force Touch Trackpad verantwortlich ist.
-
Also ganz kurz und knapp: Das Rumble Pak, das du vielleicht von deiner Nintendo noch kennst.
Any chance this is compatible with an older 13" rMBP or 15" rMBP?
-
-
-
Bei seinem Event am Montag hat Apple einige unglaubliche Computeranimationen von seinem hochmodernen Force Touch Trackpad gezeigt.
-
Wir hatten erwartet, dass das MacBook Pro dasselbe Trackpad erhält, aber dieses hier sieht etwas anders aus. Das untere Panel ist komplett und es gibt vier federnde Halterungen.
-
-
-
Dann lass uns mal einen Blick unter die Haube der Taptic Engine werfen.
-
Wir hatten gehofft, das Gummi einfach aufschneiden zu können, aber wir mussten es Stück für Stück wegschneiden.
-
Endlich liegen die Spulen frei! Naja, wenigstens offen.
-
Force Touch scheint die clevere Anwendung einer Technik zu sein, die weit zurückdatiert, nämlich um genau zu sein ins Jahr 1826.
-
Der Elektromagnet im Force Touch Trackpad besteht aus einem ferromagnetischen Kern, der mit Drahtspulen umgeben ist, und er dient dazu, die Vibrationen zu erzeugen, die du als Rückmeldung spürst.
-
-
-
Um das Geheimnis des Trackpads weiter zu lüften, beginnen wir mit den Spulen. Wir hatten gehofft, Beweise für lineare Oszillatoren zu finden, aber es scheint, als ob es sich nur um eine Reihe von Elektromagneten handelt.
-
Die Magnete drücken und ziehen schnell gegen eine Metallschiene, die unter dem Trackpad montiert ist, um für jeden Klick ein Summen zu erzeugen (und ein zweites Summen für einen starken Klick)
-
Das erklärt das Geräusch, aber was ist mit dem Gefühl?
-
Wir müssen diesen Kerl wohl ganz auseinandernehmen, um zu sehen, ob das der Fall ist.
Patent applications related to that trackpad were published in the end of 2013, under an unknown applicant name: Yknots Industries LLC, in Delaware... See for example http://www.google.com/patents/WO20131883..., http://www.google.com/patents/WO20131656..., among others. Once those worldwide patent applications enter in national phases (such as US), they become assigned to Apple Inc.
Does Apple create fake company entities to conceal its published patent applications?
Does Apple create fake company entities to conceal its published patent applications?
Wouldn’t that be at least some counterproductive to Apple, in terms of it’s valuation regarding patents that they have but don’t/haven’t/don’t-ever-intend-to-use? Of course, that assumes that anyone *cares* about that, unless “Time Apple” *really* screws up, it goes back 20 years and manages to drop to a few cents and become a takeover target.
But if Apple decided to license those (hypothetical) “never intend to use” patents.. Or to let them be used in ways that Apple would never actually *do* (because it was too complicated for “the simple folk” in terms of industrial/UX design").
-
-
-
Um das Trackpad von der Halterung zu lösen, müssen wir vier Lagen Kleber durchschneiden.
-
Sobald sie aufgetrennt sind, können wir einen ersten Blick auf die Drucksensoren werfen.
-
Unter dem Mikroskop können wir uns die Sensorhalterung genauer ansehen.
-
In Verbindung mit dem traditionellen kapazitiven Touchpad darüber kann genau festgestellt werden, wo du Druck ausübst.
-
-
-
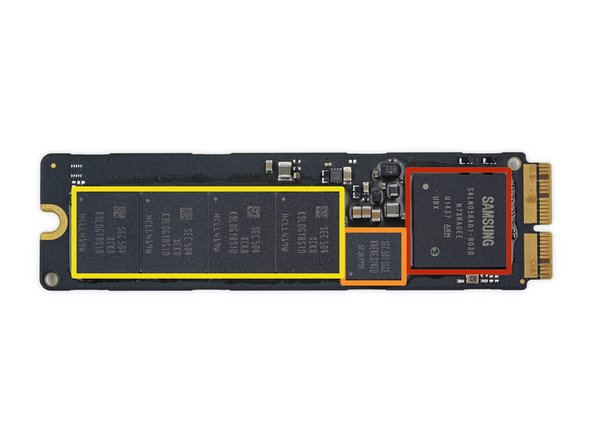
Das hier kommt uns bekannt vor ... der nagelneue und doppelt so schnelle Flash-Speicher verfügt über genau die gleichen ICs, die wir neulich bei unserem Teardown des MacBook Air 13" gefunden haben.
-
Samsung S4LN058A01 PCIe 3.0 x4 AHCI Flash Controller
-
Samsung K4E4E324ED 512 MB LPDDR3 DRAM
-
8 x Samsung K9LDGY8S1D-XCK0 16 GB Flash Speicher (insgesamt 128 GB)
-
Genau wie beim MacBook Air setzt auch diese SSD neue Maßstäbe für Geschwindigkeit.
So will I be able to order their proprietary SSD from Apple and then be able to upgrade? Will they (Apple) do the upgrade for a charge (albeit a very steep charge)? Say 128 to 512? Surely third parties will as well once warranty goes out on the model..
I would wait at the moment. There is one website that sell the SSD but at a ludicrous price. You can check eBay for the drive, but make sure it's for your apple macbook pro.
Mit Amin -
Hi everyone I just wanna know, can I upgrade my SSD card on the MacBook Pro retina early 2015 ? Thank you for your answer
-
-
-
Sobald dieses MacBook seinen kühlen Kopf verliert ist auch schon das Logic Board draußen.
-
Keine Sorge, wir haben alles unter Kontrolle. Außer einem sich ausbreitenden Klacks Wärmeleitpaste sieht das hier aus wie unser alter Freund von früheren Teardowns: die gleiche Form, die gleiche Vorgehensweise beim Entfernen.
The thermal pipe contact surface does cover the combined CPU+GPU die completely, so no problem there (though it looks like there's an awful lot of thermal paste on iFixits device...).
The part I think you're looking at (clean with no thermal paste and too far from the thermal pipe contact surface to be covered by it) is the PCH die, which apparently doesn't put off enough heat to matter.
Speculating, if they HAD extended the thermal pipe contact surface to the PCH, it would almost certainly have transferred some of the heat coming off the CPU+GPU die over to the PCH, which in addition to being counterproductive, might be something the PCH can't handle :)
Steve -
-
-
-
Wir haben unseren IC Decoder Ring vergessen, aber das macht nichts, viele dieser Chips kommen uns sehr bekannt vor:
-
Intel SR26K Dual-Core i5-5257U Prozessor mit Intel Iris Graphics 6100
-
SK Hynix H9CCNNNBLTALAR LPDDR-SDRAM
-
Cirrus 4208-CRZ Two-Channel Low Power HD Audio Codec
-
Intel DSL5520 Thunderbolt 2 Controller
-
Texas Instruments TI 58872D
-
2 x Fairchild Halbleiter DE46SY
-
-
-
Und noch mehr alte Freunde! Dies hier sind die ICs auf der Rückseite:
-
SK Hynix H5TC4G63AFR 4 Gb (512 MB) DDR3 SDRAM
-
Texas Instruments/Stellaris LM4FS1EH SMC Controller
-
Broadcom BCM15700A2, es scheint sich um ein kabelloses networking Chipset zu handeln
-
Texas Instruments HD3SS213 DisplayPort Differentialschalter
-
Windbond 25064FVIQ
-
Lineartechnik LT3957 und Intersil 958 26AHRZ
-
Texas Instruments TPS51980 und SMSC EMC1704-2
-
-
-
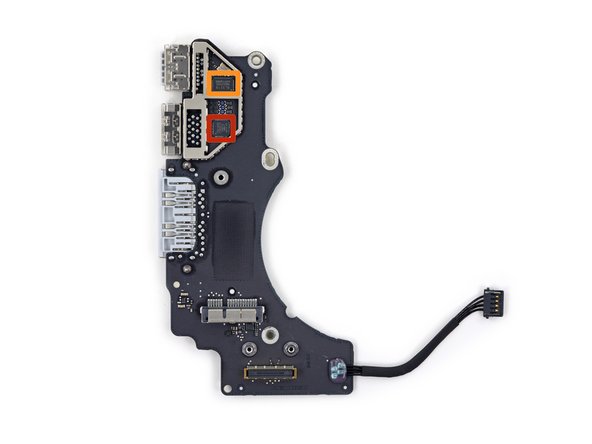
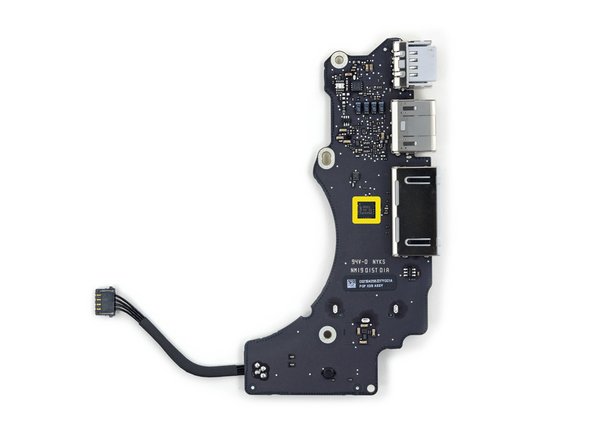
Das I/O Board sieht unverändert aus, aber was ist mit den Chips darauf? Es scheint, als hätten ein paar von ihnen die Seiten gewechselt:
-
Parade Technology PS8401A HDMI Jitter Cleaning Repeater
-
Genesys Logic GL3219 SDXC Kartenleser Controller
-
NXP Halbleiter PCA9501 8-bit I/O Expander mit integriertem 2-kbit EEPROM
Has apple really not changed to the now 4 year old SD4.0 standard for SDXCcards? this is a 5 year old part yes? Max throughput 104MB/s?
-
-
-
Das MacBook Pro 13" mit Retina Display von Anfang 2015 erhält 1 von 10 Punkte auf der Reparierbarkeits-Skala (10 ist am einfachsten zu reparieren)
-
Die proprietären Pentalobe Schrauben erschweren weiterhin unnötigerweise das Öffnen des Gerätes.
-
Die Akkueinheit ist komplett und sehr fest in das Gehäuse eingeklebt, was einen Austausch kompliziert macht. Zusätzlich bedeckt der Akku die Schrauben, die das Trackpad befestigen, sodass es unmöglich ist, das Trackpad zu ersetzen, ohne vorher den Akku zu entfernen.
-
Das Retina Display ist eine fusionierte Einheit ohne getrenntes Schutzglas. Falls irgendetwas im Inneren des Displays kaputt geht, muss die gesamte Einheit (€€€) ersetzt werden.
-
Das RAM ist auf das Logic Board gelötet. Zahle jetzt für ein Upgrade, oder bleibe für immer bei 8 GB. Ein Aufrüsten ist nicht möglich.
-
Die proprietäre PCIe SSD ist immer noch kein Standard-Laufwerk. Drück die Daumen, dass es in Zukunft vielleicht kompatible Laufwerke geben wird, im Moment mußt du mit dem auskommen, was du hast.
This repairability score seems particularly harsh to me. Pentalobe screws - so? You get a tool and you can open it easily. Battery replacement - yes, difficult, but possible, especially with the guides provided here. SSD - easily available so that comment is overly harsh. I'd give it a 3 or 4. To me, "repairability" is the ability to be repaired, not so much a commentary on how difficult it is. Several components can be replaced, so that's good.
-


Besonderer Dank geht an diese Übersetzer:innen:
91%


Diese Übersetzer:innen helfen uns, die Welt zu reparieren! Wie kann ich mithelfen?
Hier starten ›
52 Kommentare
How are the SSDs propriotery? They are just a M.2 SSD available in most places! The Samsung ones are just harder to get.
They appear to be M.2 but they aren't. If you look closely to the connector you can spot some differences.
It's the same as in the old Macbook Retina. A Proprietary connector, it's a modified SATA3 connector. Every macbook aberration has even its own form factor. So upgradability will be not possible that easy.
ydar -
I would edit the part "Pay for the upgrade now, or be stuck with 8 GB forever. There is no chance of upgrade."
It should rather say "There is no chance of upgrade FOR THE ORDINARY PEOPLE OUT THERE."
I don't know how skilled at soldering technicians you have in the US, but from where I come from (Czech Republic), I work with a guy who can do wonders, and that includes upgrading, usually the 2012 15" Retina Macbooks Pro from 8GB Ram to 16GB ram.
And if there's something this guy can't do, then he has his Polish friends who can resurrect computers that 99.9% technicians out there would consider unrepairable, dead, useless weight.
I wish I had their skills. I guess there's a long way ahead of me
Actually he is correct. The 2012 15" retina has the RAM soldered to the board. The 2012 15" without the retina display does have removable RAM chips. So yes upgrading the 2012 Retina does take some pretty good soldering skills. Here is an image of the 2012 15" Retina motherboard
Hi, i am in germany and I want to open the laptop and clean it for coffee spill. are there technicians like you said in germany? it would be much help
krishna -
Hi, are there any technicians like that in germany? i want help in cleaning my mac which got coffee spilled over
krishna -
I think the PCIe 3.0 SSD is not a good reason to give this a 1 score. First off, it's smaller. And then it's super fast, has less protocol overhead and can virtually be upgraded with any future PCIe compatible SSD provided Apple builds the support required inside OS X.
Noooooooop. This is not a standard M.2 SSD. It's got a proprietary connector.
I'd like a comparison with the old trackpad to see how it compares. Check overall volume,part volume, part location, height of system and parts, all weights... Maybe edge sealing around the pad...
The point being that I want to know how much does this actually gain or loose. That new Lenovo is about 15% lighter when compared to the new macbook so I'm curious where the weight is coming from.
This means if I have a mid-2014 13" Retina and I buy a new 2015 13" Retina I can't swap the SSD? I was hoping I could, I have a 1TB model now, I'd like to move my SSD into a new 13" Retina.
you may actually be able to... no word on it yet however
Great teardown as usual. "Proprietary" was the beginning of the end for IBM - anybody remember the PS2? Apple is getting cocky and not caring about its customer base the way Microsoft did in the 90s - which led to its irrelevancy of today. Not letting your customers upgrade their SSD down the road is simply cruel, like a doctor telling a patient s/he will only get one battery for the pacemaker. It will come back to bite Apple, as history has proven many times. Anybody remember Apple being close to bankruptcy in the late nineties?
yep and lets not even mention the terrible quality of the iPhone 6 and 6+, they are either out of touch or simply dont care
Roger -
Any chance you can retrofit the force track pad to a late 2013 retina macbook pro?
do you want to be the first to try it? xD
hi guys.. wishes from abu dhabi
i have macbook pro retina 13" late 2012.. is it possible to upgrade its ssd ?
I did it on a MacBookPro Early 2011, be sure of compatibility.
I knew when Steve Jobs died that Apple would not be able to carry on satisfying customers. It only took a couple of generations of the Macbook to alienate the customer. The many changes are not for us, they're for Apple. Old trick - planned obsolescence. If you cannot upgrade the device you have to buy a new one sooner. Great for Apple - bad for customer. But wait, what if customer no longer buys them? I refuse to buy any computer that I cannot upgrade. And I know I'm not the only one. History is repeating itself. No Jobs = bad decisions at Apple. Sell your stock boys, this time he ain't commin' back!
Sorry to break it to you but Steve Jobs was the one who first decided Apple should take the closed system approach way back in the 1980's with the introduction of the Macintosh, he wasn't quite the hero of the company he appears.
Ben -
What do you exactly need 1 Tb of internal storage for? I have a 128 Gb model and a removable 1 Tb external solid state drive that was £50. Im studying for a masters in mechanical engineering here in England and the macbook is perfect. Its solid as a brick, reliable and stable. Compared to the surface book its cheap.
I have a monster gaming rig the size of a fridge for home use.
Its a tool, you don't perform surgery with a sledgehammer. I would recommend the pro to anyone. Apart from gamers.
Where did you get a 1TB external SSD for £50?
I'm planning tobuy retina macbook pro 2015 13inch
I hAVE SOME DOUBTS
1.Whether ram is soldered or ram upgradable
2. Many people facing problems strains on retina display
3. We can manuallu updgrade ssd in this model
4. whehter it is best for CATIA,ANSYS,SOLID WORKS working environment
If you are doing advanced video editing then even then the 13" is good. I use Adobe Audition and Adobe After Effects with it and it doesn't lag. But the 15" has a dedicated graphics card, that might be better for you if you do 3D modelling as it is more powerful. It is also quad core as opposed to dual core.
AdamA -
OMG was I the only one who loved hearing her say the names of all the components? haha! Great tear down guys!
I really wish you guys had taken off the keyboard backing to show that it is now held in place by rivets, not screws. Wasted 3 hours getting it apart, realizing I couldn't replace the keyboard then putting it back together still broken. Not angry at iFixit. !#^&@@ off at Apple for this blatant disregard to repair-ability.
Hello, I would like to know if it is possible to remove the motherboard without removing the heatsink. Can anyone help me?
'Maybe' but it's not a best practice. The fan on the 13" has a panel that extends far beneath the heatsink. And the tiny ribbon cable that connects the fan to the logic board is very difficult to unplug with the heatsink attached. If you can manage to unplug the ribbon cable without remove the heatsink, then yes.
Jacob -
Hey RikoTiko! Lucky for you we created a product for replacing Retina batteries with adhesive remover, making this job way easier! We have the adhesive remover kit here, and a battery replacement kit here, for use with this guide. Since this requires such a specialized solution, the repairability score still stands, despite being plausible. =)
Well, now I understand (yea, right!) why you guys make the big bucks right out of puberty. So, here’s my question: To begin with, it is now April 2018 and I’m asking about a 2015, 13” 2.9, I5 Retina MB Pro with the 6100 graphics that’s going bad (which should really inspire another blog altogether about why the !&&* Adderrall wasn’t available in the 80s when I clearly needed it), and therefore i’ve been offered this otherwise perfect condition laptop for a song. So, how much will this repair cost, and is there someone in the Washington, D.C. area capable of performing same while I wait, hopefully without being bent over toooo far? Only a day or two to decide … HEEELP!!
s'
could i upgrade my MacBook pro 13” early 2015 from 8 ram to 16 ??
Not you, but somebody! Check them out: https://iboffrcc.com/
Jacob -
Is there a Processor Upgrade i can Get?? And how do i replace it?? Is it Soldered on??
The i5 is not enough for me!
To you and @yourtechy: you can’t upgrade, it’s soldered straight to the board. That’s the norm with laptops unfortunately!
Sure there is! Is it feasible for you to do or economic for you to pay for someone else to do? Nope! Check out Dosdude1 on youtube...You are likely limited to dual core 4th gen cpu's due to the TDP constraints of the 13" laptop though.
Jacob -
Do we have to replace keyboard and trackpad also only to replace the battery?Because my battery has failed.
Have a look here: MacBook Pro 13" Retina Display Anfang 2015 Akku austauschen. Good luck!
I have 2015 model a1502 macbooc pro, retina and hard drive crashed. Can I fix myself? Local applestore is almost asking half price of macbook. What SSD can fit this model.
@gogababa I think this is the guide you’re looking for. It includes a link to some compatible parts. They are pricey, but far less than half the retail cost of the machine.
Hi, on Step 17 theres a black tape like thing around the CPU that came off during one of my repairs.
There seems to be a lot of confusing stuff on the internet (and during my calls to repair shops) about that.
Is it a thermal pad or kaptom tape? Where can I get the replacement?
Very much appreciated.
Great question...no one knows! Check out the discussion here: Tape over processor and GPU?
Jacob -
Hello,
I would like to know if thé LCD Screen is the same on 2014 and 2015?
thank you!
See this link for all your MacBook interchangeability needs!
https://logi.wiki/index.php/MacBook_LCD_...
Jacob -
Ouch! Marhowl. Ourada plunge-tore a stake into your rectum
I feel like this score (as well as others) deserve a revisit. I am a moderately seasoned technician and I have gutted an entire 13 and 15 inch retina MacBook Pro. What are the main differences from the unibody's?
1. Proprietary SSD (alleviated via a cheap adapter)
2. Soldered RAM (the biggest bummer; but still possible to upgrade and I HAVE: see REWA and iBoff RCC)
3. Riveted Keyboard (Another bummer, but not that impossible to replace; and after replacing? You can use screws!)
4. Adhesive for the battery (I removed both 13/15 batteries WITHOUT heat or adhesive dissolver; I did need to remove the 15 Logic Board, so that is certainly a time consuming repair)
5. The screen assemblies are basically all one unit, any issue means you are replacing the whole thing for most people (but even on the unibodies...who was replacing individual components on these screens? That's crazy risky)
Other than that? Everything is just screws and connectors...borderline identical to unbody's. 1/10? Give me a break...
its configurable up to a 3.1GHz dual core i7. The i5 can turbo to 3.3GHz, but thats it :P
[deleted] - Antwort
if you look at benchmarks, youll find the i7 isnt that much stronger than the 2.7 i5, so for most people it isnt really worth getting. (think about the added heat as well)
bcredeur97 -
Hey Guys, ready to do the 15" macbook pro from 2015?
mcrugg - Antwort