Einleitung
Wir haben diesen iPod am 10. September 2008 demontiert.
Was du brauchst
-
-
Der neue iPod Touch wird in einer kleineren, transparenten Kunststoffbox geliefert.
-
Jemand fragte, ob wir ihn einschalten oder die neue Software ausprobieren sollten, bevor wir ihn auseinander nehmen. Aber wir sind einfach zu neugierig.
-
-
-
Auch in der Schachtel drin:
-
Kopfhörer
-
USB 2.0 Kabel
-
Dock Adapter (für das Apple Universal Dock)
-
Putztuch
-
-
-
Wie erwartet, wurde die Form aktualisiert, um zu den Kurven des iPhone 3G zu entsprechen.
-
-
Dieser Schritt ist noch nicht übersetzt. Hilf mit, ihn zu übersetzen!
-
The bare LCD display.
-
Apple gives the size as 3.5 inches (diagonal) with a 480x320 pixel resolution at 163 pixels per inch.
-
-
Dieser Schritt ist noch nicht übersetzt. Hilf mit, ihn zu übersetzen!
-
There are no screws securing the LCD. Instead, it's held in place with a little double-sided tape.
-
-
-
Dieser Schritt ist noch nicht übersetzt. Hilf mit, ihn zu übersetzen!
-
Removing the metal backing.
-
The battery is held to the backing with two strips of light adhesive, but peels off easily.
-
-
Dieser Schritt ist noch nicht übersetzt. Hilf mit, ihn zu übersetzen!
-
Disconnecting the display data cable.
-
Note the residue from the glue holding the battery to the metal backing.
-
This is getting exciting!
-
-
Dieser Schritt ist noch nicht übersetzt. Hilf mit, ihn zu übersetzen!
-
Removing the battery.
-
The WiFi antenna and circuitry are at the bottom of the image, near the thumb.
-
-
Dieser Schritt ist noch nicht übersetzt. Hilf mit, ihn zu übersetzen!
-
The large orange cable connects the WiFi antenna (upper left) to the logic board.
-
At the top of the picture above the battery is a metal cover. Underneath the cover is a Broadcom BCM4325 Wi-Fi and Bluetooth chip. Yes, that's right, Bluetooth! Apple has said nothing of this publicly.
-
This particular bluetooth chipset supports BT2.1+EDR. No word yet on whether the one Apple included supports A2DP, which would enable stereo headphones.
-
Part numbers: BCM4325GKWBG CD0825 B76332 P40 SF
-
-
Dieser Schritt ist noch nicht übersetzt. Hilf mit, ihn zu übersetzen!
-
The other side of the wireless circuitry, battery, and logic board.
-
-
Dieser Schritt ist noch nicht übersetzt. Hilf mit, ihn zu übersetzen!
-
You can see the dock connector in the center and the headphone jack on the right.
-
-
Dieser Schritt ist noch nicht übersetzt. Hilf mit, ihn zu übersetzen!
-
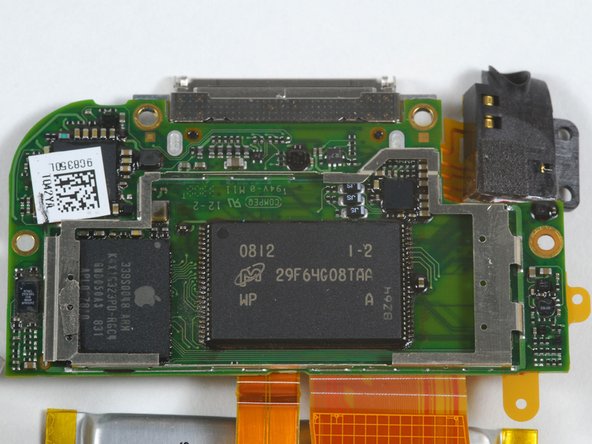
The logic board.
-
We think the brown rectangle in the center is the speaker. It looks like the two wires in the orange ribbon cable on the right of it run to the new volume control dial.
-
-
Dieser Schritt ist noch nicht übersetzt. Hilf mit, ihn zu übersetzen!
-
The battery. 3.7 V Lithium-ion polymer, as expected. Apple part number 616-0404. No word yet on the mAh rating.
-
-
Dieser Schritt ist noch nicht übersetzt. Hilf mit, ihn zu übersetzen!
-
The logic board again, this time with (what we think is) the speaker removed.
-
The NAND flash memory is a Micron MLC chip: MT29F64G08TAAWP
-
The processor is an Apple-branded Samsung-manufactured ARM with SDRAM on the package, similar to the iPhone processor.
-


Besonderer Dank geht an diese Übersetzer:innen:
33%


Diese Übersetzer:innen helfen uns, die Welt zu reparieren! Wie kann ich mithelfen?
Hier starten ›
3 Kommentare
Broke the screen.
probaly should of used a hair dryer
i need all the parts of ipod touch 2nd generation
hard to do really