Zum Hauptinhalt wechseln

iPhone 4 Battery disconnection

Archivierte Anleitung
Diese Anleitung wurde ausschließlich für historische Zwecke erhalten. Verwende die aktualisierte Version dieser Anleitung, um deine Reparatur durchzuführen.

Was du brauchst

  1. iPhone 4  Battery disconnection, Rear Panel: Schritt 1, Bild 1 von 2 iPhone 4  Battery disconnection, Rear Panel: Schritt 1, Bild 2 von 2
    • Before you begin, discharge your iPhone battery below 25%. A charged lithium-ion battery can catch fire and/or explode if accidentally punctured.

    • Power off your iPhone before beginning disassembly.

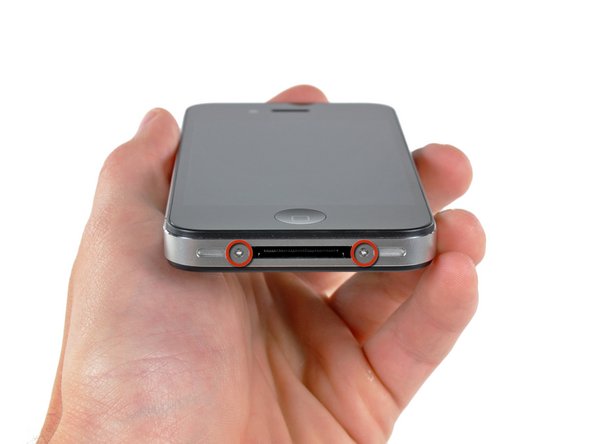
    • Your iPhone 4 rear cover may have either two #000 Phillips screws or Apple's 5-Point "Pentalobe" screws (second image). Check which screws you have, and ensure you also have the correct screwdriver in order to remove them.

    • Remove the two 3.6 mm Pentalobe or Phillips #000 screws next to the dock connector.

    • Be sure the driver is well seated when removing Pentalobe screws, they are very easy to strip.

  2. iPhone 4  Battery disconnection: Schritt 2, Bild 1 von 2 iPhone 4  Battery disconnection: Schritt 2, Bild 2 von 2
    • Push the rear panel toward the top edge of the iPhone.

    • The panel will move about 2 mm.

  3. iPhone 4  Battery disconnection: Schritt 3, Bild 1 von 1
    • Pinch the rear panel with your fingers and lift it away from the iPhone. Alternatively, use a Small Suction Cup .

    • Be careful not to damage the plastic clips attached to the rear panel.

    • If you are installing a new rear panel, be sure to remove the plastic protective sticker from the inside of the camera lens and the sticker from the large black area near the lens.

  4. iPhone 4  Battery disconnection, Battery disconnection: Schritt 4, Bild 1 von 1
    • Remove the single 2.5 mm Phillips screw securing the battery connector to the logic board.

    • Simply place the screwdriver a few minutes on a magnet to magnetize. It will then much easier to remove the screws and even to put them back.

  5. iPhone 4  Battery disconnection: Schritt 5, Bild 1 von 1
    • Use a plastic opening tool to gently pry the battery connector up from its socket on the logic board.

    • Be very careful to only pry up on the battery connector and not the socket on the logic board. If you pry up on the logic board socket, you may break it entirely.

    • Remove the metal clip covering the antenna connector.

    • The oils on your fingers have the potential to cause wireless interference issues. Be careful to not use your fingers.

Abschluss

To reassemble your device, follow these instructions in reverse order.

56 weitere Nutzer:innen haben diese Anleitung absolviert.
revher

Mitglied seit: 08/17/13

4.076 Reputation

2 Anleitungen geschrieben

Ein Kommentar

thank you for battery disconnect

ovikumarbarman - Antwort

Kommentar hinzufügen

Seitenaufrufe:

Letzte 24 Stunden: 0

Letzte 7 Tage: 1

Letzte 30 Tage: 4

Insgesamt: 19,065