Zum Hauptinhalt wechseln

DualSense Edge Battery Replacement

Was du brauchst

  1. DualSense Edge Battery Replacement, Battery: Schritt 1, Bild 1 von 2 DualSense Edge Battery Replacement, Battery: Schritt 1, Bild 2 von 2
    • Disconnect and power down your controller before you begin.

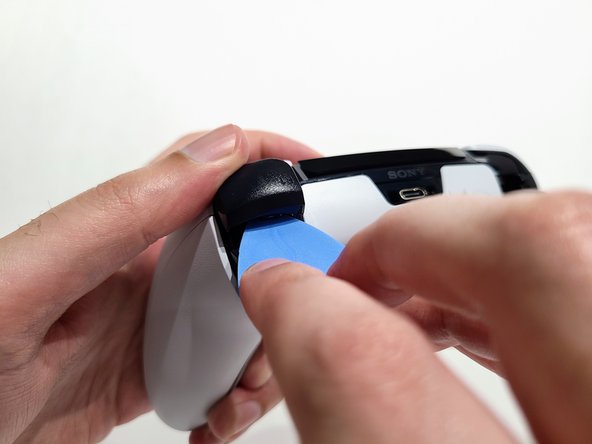
    • Use the opening pick to push the release latch on the back of the controller.

  2. DualSense Edge Battery Replacement: Schritt 2, Bild 1 von 3 DualSense Edge Battery Replacement: Schritt 2, Bild 2 von 3 DualSense Edge Battery Replacement: Schritt 2, Bild 3 von 3
    • Remove the front plate.

  3. DualSense Edge Battery Replacement: Schritt 3, Bild 1 von 2 DualSense Edge Battery Replacement: Schritt 3, Bild 2 von 2
    • Raise both left and right levers next to each stick module.

  4. DualSense Edge Battery Replacement: Schritt 4, Bild 1 von 3 DualSense Edge Battery Replacement: Schritt 4, Bild 2 von 3 DualSense Edge Battery Replacement: Schritt 4, Bild 3 von 3
    • Slide both stick modules out of their slots.

  5. DualSense Edge Battery Replacement: Schritt 5, Bild 1 von 3 DualSense Edge Battery Replacement: Schritt 5, Bild 2 von 3 DualSense Edge Battery Replacement: Schritt 5, Bild 3 von 3
    • Use the pick to pop both the R1 and L1 shoulder buttons out.

    • Use your thumb to prevent the button from flying across the room.

  6. DualSense Edge Battery Replacement: Schritt 6, Bild 1 von 2 DualSense Edge Battery Replacement: Schritt 6, Bild 2 von 2
    • Slide the opening pick along the left and right inner trim to release the clips that secure the case.

  7. DualSense Edge Battery Replacement: Schritt 7, Bild 1 von 3 DualSense Edge Battery Replacement: Schritt 7, Bild 2 von 3 DualSense Edge Battery Replacement: Schritt 7, Bild 3 von 3
    • Turn the controller around and continue sliding the opening pick along the trim to release the remaining clips.

  8. DualSense Edge Battery Replacement: Schritt 8, Bild 1 von 2 DualSense Edge Battery Replacement: Schritt 8, Bild 2 von 2
    • Remove the middle casing now that all clips are released.

  9. DualSense Edge Battery Replacement: Schritt 9, Bild 1 von 3 DualSense Edge Battery Replacement: Schritt 9, Bild 2 von 3 DualSense Edge Battery Replacement: Schritt 9, Bild 3 von 3
    • Use a Phillips #00 screwdriver to remove the two 6.5 mm screws from the L1 and R1 button enclosures (one screw on each side).

  10. DualSense Edge Battery Replacement: Schritt 10, Bild 1 von 2 DualSense Edge Battery Replacement: Schritt 10, Bild 2 von 2
    • Use your screwdriver to remove the seven 6.5 mm screws from the back of the controller.

  11. DualSense Edge Battery Replacement: Schritt 11, Bild 1 von 2 DualSense Edge Battery Replacement: Schritt 11, Bild 2 von 2
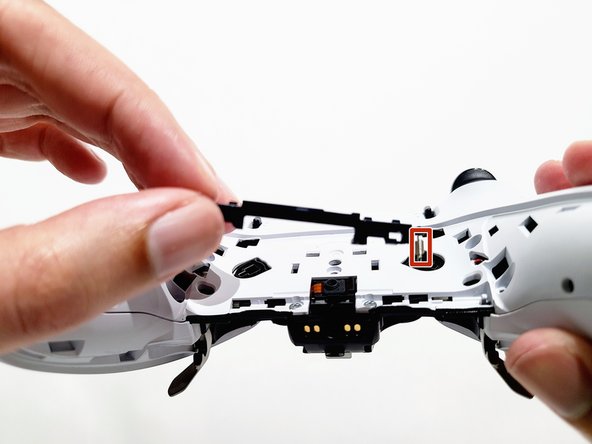
    • Pull the lever to the left and lift up to detach it from the controller.

    • Be careful with the tiny spring attached to the lever, as it is easy to lose once detached.

  12. DualSense Edge Battery Replacement: Schritt 12, Bild 1 von 2 DualSense Edge Battery Replacement: Schritt 12, Bild 2 von 2
    • Insert an opening pick between the front and rear casing and gently pry them apart.

  13. DualSense Edge Battery Replacement: Schritt 13, Bild 1 von 3 DualSense Edge Battery Replacement: Schritt 13, Bild 2 von 3 DualSense Edge Battery Replacement: Schritt 13, Bild 3 von 3
    • Use your hands to pull the rear case off of the controller carefully.

    • Make sure to go from bottom to top when removing the case so as not to pull on the trigger buttons.

  14. DualSense Edge Battery Replacement: Schritt 14, Bild 1 von 2 DualSense Edge Battery Replacement: Schritt 14, Bild 2 von 2
    • Use your opening pick to lift the battery from its enclosure and expose the wire connection.

    • The battery is loose in the enclosure; hold the controller with the battery facing upward so it does not fall out.

  15. DualSense Edge Battery Replacement: Schritt 15, Bild 1 von 3 DualSense Edge Battery Replacement: Schritt 15, Bild 2 von 3 DualSense Edge Battery Replacement: Schritt 15, Bild 3 von 3
    • Place your opening pick under the wire housing, and pull it upward toward you to disconnect the battery.

Abschluss

To reassemble your device, follow these instructions in reverse order.

Ein:e weitere:r Nutzer:in hat diese Anleitung absolviert.

Team

CSU Los Angeles, Team 1-1, Briggs Spring 2023 Mitglied von CSU Los Angeles, Team 1-1, Briggs Spring 2023

CSULA-BRIGGS-S23S1G1

2 Mitglieder

2 Anleitungen geschrieben

2 Kommentare

where can i buy battery replacement

Rave Paz - Antwort

取替の説明が有っても、バッテリー自体が手に入らないから日本では上げても余り意味が無い。

ちょいオヤジ - Antwort

Kommentar hinzufügen

Seitenaufrufe:

Letzte 24 Stunden: 24

Letzte 7 Tage: 161

Letzte 30 Tage: 670

Insgesamt: 6,148