Zum Hauptinhalt wechseln

Sostituzione batteria iPhone 8 Plus

Hinweis: Du bearbeitest eine grundständige Anleitung. Alle Änderungen, die du vornimmst, betreffen auch die Anleitung, die diese beinhaltet.

Englisch
Italienisch
Schritt 3
iPhone 8 Plus Battery Replacement: Schritt 0, Bild 1 von 3 iPhone 8 Plus Battery Replacement: Schritt 0, Bild 2 von 3 iPhone 8 Plus Battery Replacement: Schritt 0, Bild 3 von 3
  • Try to keep the adhesive strips flat and unwrinkled during this procedure; twisted or wrinkled strips will stick together and break instead of pulling out cleanly.

  • Additionally, do not press down on the battery as you pull the strips. Pressing on the battery creates pressure points that can snag and break the adhesive.

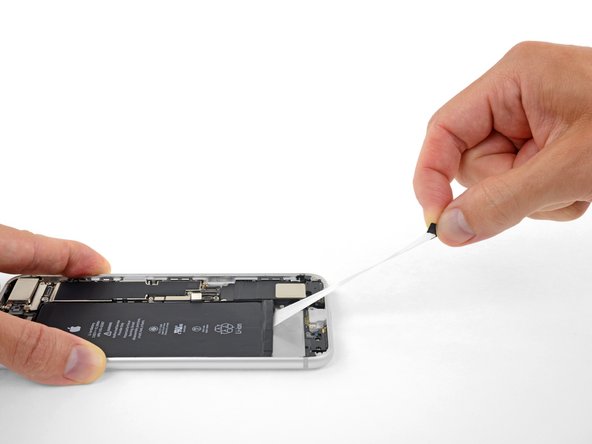
  • Slowly pull one battery adhesive tab away from the battery, towards the bottom of the iPhone.

  • Pull steadily, maintaining constant tension on the strip until it slips out from between the battery and the rear case. For best results, pull the strip at as low an angle as possible, without snagging it on any of the iPhone's other components.

  • The strip will stretch to many times its original length. Continue pulling and re-grab the strip near the battery if necessary.

  • If the battery adhesive tabs break during the removal process, use your fingers or blunt tweezers to retrieve the remaining length of adhesive, and continue pulling.

  • If any of the adhesive strips break underneath the battery and cannot be retrieved, try to remove the remaining strips, and then proceed as instructed below.

Cerca di tenere la striscia adesiva piatta e non arricciata nel corso di questa procedura; le strisce piegate o ritorte si incolleranno su se stesse e si romperanno invece di venire fuori senza problemi.

Altra precauzione: non premere sulla batteria mentre tiri le strisce. Se lo farai, creerai dei punti di pressione che potrebbero bloccare la striscia adesiva causandone la rottura.

Tira lentamente una delle linguette delll'adesivo della batteria allontanandolo dalla batteria stessa, verso la pa rte bassa del telefono.

Tira con fermezza, mantenendo una tensione costante sulla striscia finché non scivola fuori dalla sua posizione tra la batteria e il case posteriore. Per risultati ottimali, tira la striscia di piatto, a un angolo il più basso possibile, evitando di farle impigliare in qualcuno degli altri componenti dell'iPhone.

La striscia si allungherà sino a varie volte la sua lunghezza originale. Continua a tirare e, se necessario, afferra la striscia più vicino alla batteria.

Se la linguetta dell'adesivo si rompe nel corso del processo di rimozione, usa le dita o pinzette a punte arrotondate e quindi riprendi a tirare.

Se una delle strisce adesive si è rotta sotto la batteria e non può essere recuperata, cerca di rimuovere le strisce rimaste e poi continua come da istruzioni qui sotto.

Deine Beiträge sind lizenziert unter der Open-Source Creative Commons Lizenz.