Zum Hauptinhalt wechseln

Smontaggio iPhone SE

Hinweis: Du bearbeitest eine grundständige Anleitung. Alle Änderungen, die du vornimmst, betreffen auch die Anleitung, die diese beinhaltet.

Englisch
Italienisch
Schritt 3
iPhone SE Teardown: Schritt 0, Bild 1 von 3 iPhone SE Teardown: Schritt 0, Bild 2 von 3 iPhone SE Teardown: Schritt 0, Bild 3 von 3
  • Now for the step we don't like. Pentalobes: a five-pointed reminder that Apple doesn't really want you opening up your device.

  • Still, these pentalobes are totally cute and come in a matching rose gold.

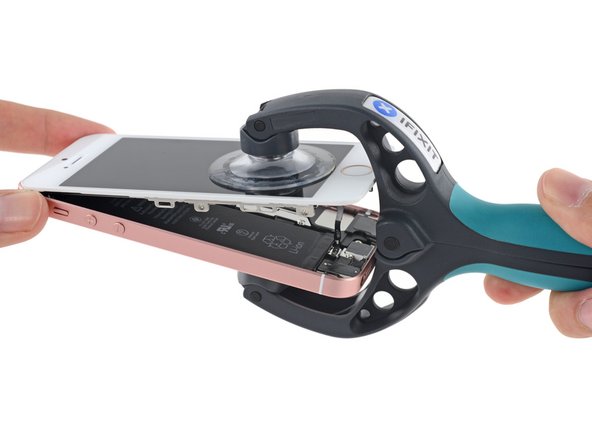
  • Setting the pretty pink screws aside, we iSclack the top off—and there's no pesky, color-matching display adhesive in sight. Compared to Apple's S-series flagships, this opening procedure is a snap.

  • We had speculated that the display gasketing in the 6s and 6s Plus was added for water resistance or structural reinforcement supporting 3D Touch. Its absence from this model and some preliminary tests suggests it's the latter.

Ed ecco la fase che non ci piace. Pentalobe: un promemoria a cinque punte sul fatto che Apple davvero non vuole che tu apra il tuo dispositivo.

Tuttavia, queste Pentalobe sono molto carine essendo in tinta, in oro rosa.

Dopo aver messo da parte le eleganti viti rosa, tiriamo via la parte superiore con l'iSclack e sotto il display non ritroviamo alcun fastidioso adesivo, magari in tinta col telefono. Rispetto alle versioni S, le ammiraglie di Apple, questa procedura di apertura è veramente agevole.

Avevamo ipotizzato che le guarnizioni del display del 6s e 6s Plus fossero state aggiunte per l'impermeabilizzazione oppure per un rinforzo strutturale nel supporto del Touch 3D. L'assenza di guarnizioni in questo modello e alcuni test preliminari fanno propendere per la seconda ipotesi.

Deine Beiträge sind lizenziert unter der Open-Source Creative Commons Lizenz.