Zum Hauptinhalt wechseln

iPhone 4S Display ersetzen

Hinweis: Du bearbeitest eine grundständige Anleitung. Alle Änderungen, die du vornimmst, betreffen alle 4 Anleitungen, die diese beinhalten.

Englisch
Deutsch
Schritt 11
iPhone 4S Screen Replacement, Display Assembly Installation (Cont'd): Schritt 0, Bild 1 von 3 iPhone 4S Screen Replacement, Display Assembly Installation (Cont'd): Schritt 0, Bild 2 von 3 iPhone 4S Screen Replacement, Display Assembly Installation (Cont'd): Schritt 0, Bild 3 von 3
Display Assembly Installation (Cont'd)
  • Whether installing a replacement display assembly or re-using the existing display assembly, note the following:

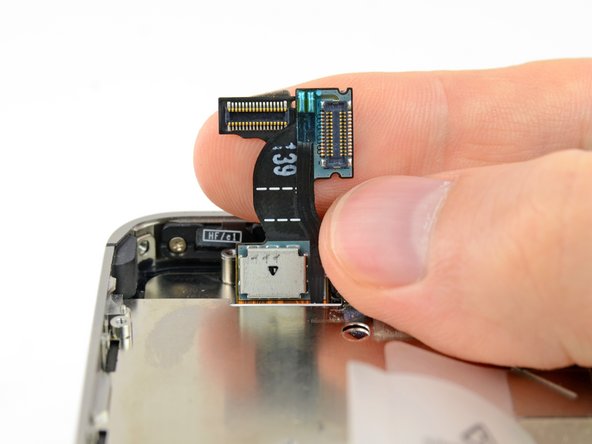
  • Carefully straighten the digitizer and LCD data cables, and feed them through the slot cut in the outer case.

  • The middle photo shows the digitizer cable being correctly fed through to its full length.

  • This photo shows the display assembly being installed incorrectly, with too much slack in the digitizer cable, which then forms a bend/loop that gets caught in the slot. The third photo also shows this loop.

  • If the digitizer cable has been installed incorrectly, it will not reach its socket on the logic board. Do not attempt to pull it through by force, or it will be cut by the sharp edge of its slot in the enclosure. Remove the display assembly, straighten the cable, and re-feed the cable through completely and correctly.

Unabhängig davon, ob du ein Ersatzdisplay installierst, oder das vorhandene Display weiterverwendest, solltest du folgendes beachten:

Glätte vorsichtig das Digitizer- und das LCD-Datenkabel und führe sie durch den schlitzförmigen Ausschnitt im äußeren Gehäuse.

Das mittlere Foto zeigt, wie das Touchscreen Kabel in ganzer Länge richtig installiert wird.

Dieses Foto zeigt die falsch installierte Display Einheit , mit zu viel Schlupf im Kabel, so dass es eine Schlinge formt, die im Schlitz hängen bleibt. Das dritte Foto zeigt diese Schlinge.

Wenn das Kabel nicht korrekt installiert ist, reicht es nicht bis zu seinem Anschluss. Versuche nicht, es mit Gewalt dahin zu ziehen, weil es sonst von den scharfen Kanten der Aussparung beschädigt wird und reißen kann. Entferne in diesem Fall die Display Einheit, ziehe das Kabel glatt und führe es ordnungsgemäß erneut durch den Schlitz.

Deine Beiträge sind lizenziert unter der Open-Source Creative Commons Lizenz.