Zum Hauptinhalt wechseln

Remplacement de l'écran du HP Envy 15-J120SG

Englisch
Französisch
Schritt 5
HP Envy 15-J120SG Display Panel Replacement, Remove the display bezel: Schritt 0, Bild 1 von 2 HP Envy 15-J120SG Display Panel Replacement, Remove the display bezel: Schritt 0, Bild 2 von 2
Remove the display bezel
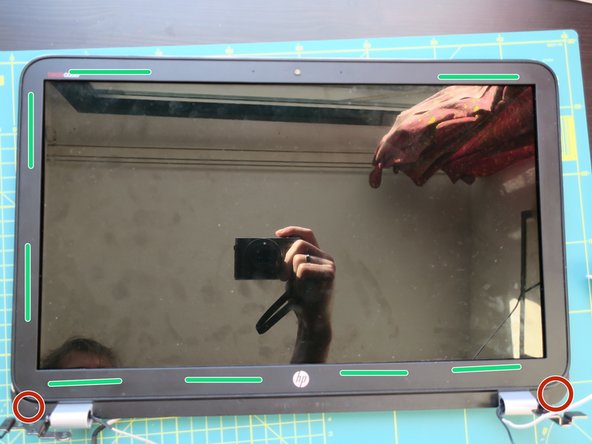
  • Under the plastic of the bezel are two hidden screws: One is in the lower left corner, the other in the lower right corner. Bend the plastic up a bit and remove these screws.

  • The Bezel itself comes loose pretty easy as soon as you have disconnected it from the lower part on one point. Work your way around the display.

  • The bezel is glued to the display using double-sided tape. Be careful while lifting the plastic. When re-assembling the lid, place new double-sided tape on these places.

Sous le plastique du joint de l'écran, nous trouvons deux vis cachées. L'une dans le coin inférieur gauche et l'autre dans le coin inférieur droit. Pliez le plastique sans le casser et enlevez ces deux vis.

Le joint de l'écran se détache assez facilement dès lors qu'il a été désemboîté de la partie basse de l'écran. Progressez le long de l'écran.

Le joint est collé à l'écran à l'aide de ruban adhésif double-face. Soyez vigilant lorsque vous décollez le plastique. Lors du réassemblage de l'écran, appliquez du ruban adhésif double face aux endroits indiqués.

Deine Beiträge sind lizenziert unter der Open-Source Creative Commons Lizenz.