Einleitung
This guide is for replacing the CMOS battery of the ASUS TUF Gaming FX505DY, a CR2032 cell battery.
CMOS batteries, also called motherboard batteries, clock batteries, or BIOS batteries, provide power for the motherboard CMOS while the computer is off. This allows motherboard BIOS or UEFI settings to be saved and allows the time to be kept even with the computer off for extended periods of time.
The CMOS battery is not infinite, and usually depletes after a total of three years of "off-time," where the system is off and draining the battery. A faulty CMOS battery can result in the ASUS TUF Gaming FX505DY losing the date and time and the CMOS settings. The computer can still boot, although any custom motherboard settings will be lost. If the motherboard still does not retain settings or the date and time after replacing the battery, then there may be a hardware fault on the motherboard itself. If the machine consistently saves the time but is incorrect, it is probably a settings issue. Use this section of the troubleshooting guide to resolve it.
A very old, overstressed, or damaged battery may leak or burst, although this is very uncommon in modern machines. Signs of damage or leakage include swelling and a foreign powdery substance, ranging in color from off-white to blue or green. Wear gloves and use a Q-tip soaked in isopropyl alcohol to remove battery acid, and allow the alcohol to dry and evaporate before restarting the machine.
Make sure to fully shut down the device and unplug any chargers and peripherals before beginning.
Was du brauchst
-
-
Turn off the laptop.
-
Disconnect the charging cable.
-
Flip the laptop so the back is facing up.
-
-
-
Use a Phillips #1 screwdriver to remove the five 6 mm screws that secure the back panel.
-
Use the same screwdriver to remove the six 13 mm screws securing the back panel.
-
-
-
-
Insert the plastic opening tool at a corner and pry up along the edges, leaving the back side with the hinges for last.
-
-
-
Gently lift up the back panel to release any remaining clips on the side with the hinges and remove the panel.
-
-
-
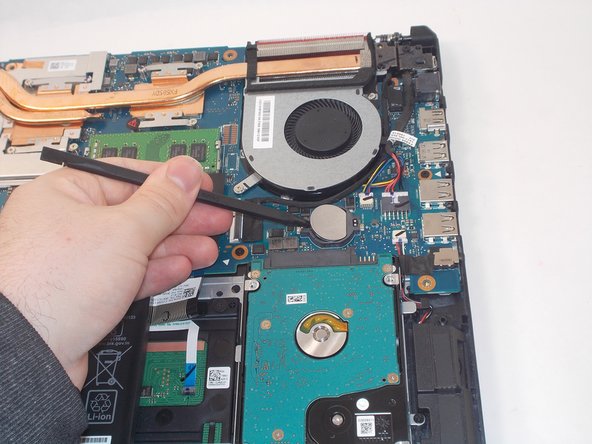
Gently insert the narrow end of a spudger beneath the CMOS battery and push in, raising the battery.
-



To reassemble your device, follow these instructions in reverse order.
To reassemble your device, follow these instructions in reverse order.


Team

UMass Dartmouth, Team 2-4, Mellen Spring 2022 Mitglied von UMass Dartmouth, Team 2-4, Mellen Spring 2022
UMASSD-MELLEN-S22S2G4
4 Mitglieder
8 Anleitungen geschrieben
