Diese Version enthält möglicherweise inkorrekte Änderungen. Wechsle zur letzten geprüften Version.
Was du brauchst
-
Dieser Schritt ist noch nicht übersetzt. Hilf mit, ihn zu übersetzen!
-
Position the laptop upside down with the hinges on the side furthest away from you.
-
Remove the eight 8mm screws with a phillips #1 screwdriver,
-
Remove the four 4.5mm screws with a phillips #1 screwdriver,
-
-
Dieser Schritt ist noch nicht übersetzt. Hilf mit, ihn zu übersetzen!
-
Use the plastic opening tool to pry open then remove the plastic base from the rest of the laptop. Start from the right side and work towards the left.
-
Set the plastic base beside the laptop by opening it as if you were opening a book.
-
-
Dieser Schritt ist noch nicht übersetzt. Hilf mit, ihn zu übersetzen!
-
Flip up the small white ZIF connector by using a fingernail or metal spudger.
-
Pull the blue tab to remove the ribbon cable.
-
-
-
Dieser Schritt ist noch nicht übersetzt. Hilf mit, ihn zu übersetzen!
-
Locate and remove the two 6mm screws holding the battery in place with a Phillips #1 screwdriver.
-
-
Dieser Schritt ist noch nicht übersetzt. Hilf mit, ihn zu übersetzen!
-
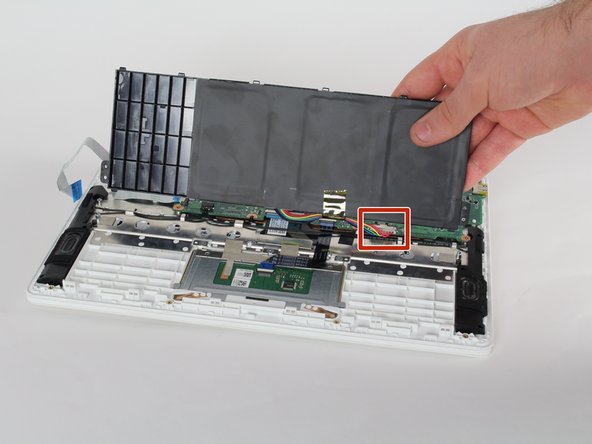
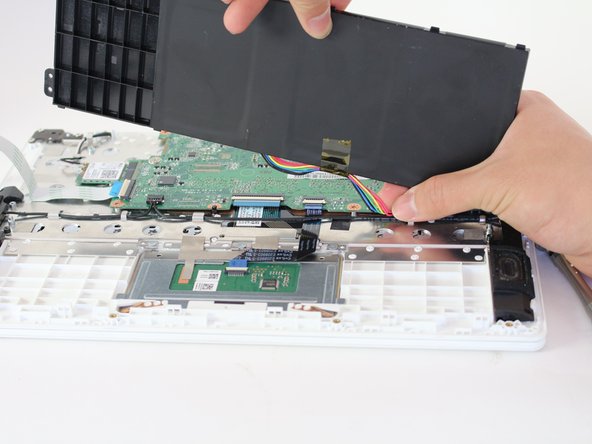
Pull the battery forward to clear the base from its clips.
-
Lift the battery up so that there is room to grab and unplug the bundled cable connector.
-
-
Dieser Schritt ist noch nicht übersetzt. Hilf mit, ihn zu übersetzen!
-
Use a metal spudger to flip up the white ZIF connector that holds the ribbon cable in place.
-
Unplug the black ribbon cable from the track pad assembly.
-
-
Dieser Schritt ist noch nicht übersetzt. Hilf mit, ihn zu übersetzen!
-
Use a Phillips #000 screwdriver to remove the three 2.4mm screws located across the top of the track pad assembly.
-
-
Dieser Schritt ist noch nicht übersetzt. Hilf mit, ihn zu übersetzen!
-
Use your finger to gently pull up on the assembly and slide a metal spudger under each of the two strips of tape and peel them off of the main metal plate.
-
-
Dieser Schritt ist noch nicht übersetzt. Hilf mit, ihn zu übersetzen!
-
Slide the track pad assembly up towards the motherboard until it can be lifted up and out.
-


Team

Cal Poly, Team 22-7, Maness Winter 2017 Mitglied von Cal Poly, Team 22-7, Maness Winter 2017
CPSU-MANESS-W17S22G7
4 Mitglieder
12 Anleitungen geschrieben