Diese Version enthält möglicherweise inkorrekte Änderungen. Wechsle zur letzten geprüften Version.
Was du brauchst
-
Dieser Schritt ist noch nicht übersetzt. Hilf mit, ihn zu übersetzen!
-
Carefully tilt the sander back and lay it down on its side, exposing the three sanding pads on the bottom.
-
-
Dieser Schritt ist noch nicht übersetzt. Hilf mit, ihn zu übersetzen!
-
Peel the hook-and-loop sandpaper disc off of the driver assembly.
-
-
Dieser Schritt ist noch nicht übersetzt. Hilf mit, ihn zu übersetzen!
-
Use a 3 mm hex key or driver bit to remove the six 11.9 mm-long screws securing the driver pad.
-
Remove the driver pad from the sanding disc.
-
-
Dieser Schritt ist noch nicht übersetzt. Hilf mit, ihn zu übersetzen!
-
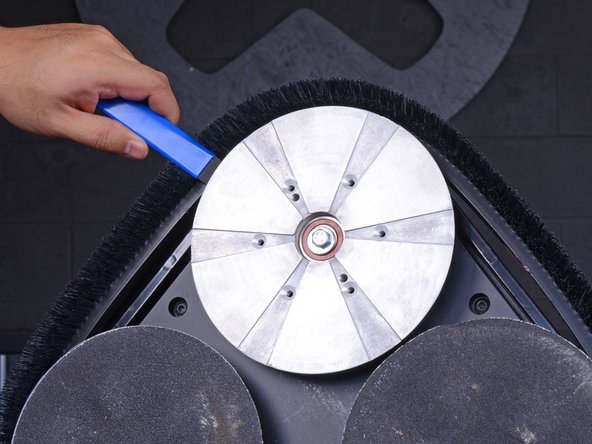
Use a flathead screwdriver to pry off and remove the rubber plug in the center of the sanding disc.
-
-
Dieser Schritt ist noch nicht übersetzt. Hilf mit, ihn zu übersetzen!
-
Slide a thin 22 mm wrench underneath the sanding disc and clasp it onto the flat part of the motor driveshaft to keep the driveshaft from turning.
-
-
-
Dieser Schritt ist noch nicht übersetzt. Hilf mit, ihn zu übersetzen!
-
Use an 11 mm socket and socket wrench to remove the 16.5 mm-long bolt securing the sanding disc to the motor driveshaft.
-
Apply counter torque to the driveshaft wrench as you loosen the bolt to keep the sanding disc from spinning.
-
-
Dieser Schritt ist noch nicht übersetzt. Hilf mit, ihn zu übersetzen!
-
Take two pry bars and insert them underneath the sanding disc as close to the driveshaft as possible.
-
Apply pressure to the pry bars in opposite directions to carefully pry the sanding disc off of the driveshaft.
-
Remove the sanding disc from the floor sander.
-
-
Dieser Schritt ist noch nicht übersetzt. Hilf mit, ihn zu übersetzen!
-
Repeat the previous seven steps to remove the other two sanding discs before continuing.
-
With all three sanding discs removed, use a 4 mm hex key to remove four 25.4 mm-long screws securing the bottom cover and bottom weight.
-
-
Dieser Schritt ist noch nicht übersetzt. Hilf mit, ihn zu übersetzen!
-
Lift the bottom weight away from the sander.
-
-
Dieser Schritt ist noch nicht übersetzt. Hilf mit, ihn zu übersetzen!
-
Pull the top edge of the bottom cover away from the sander until you have enough space to slide the cover out.
-
Slide the cover across the bottom of the sander, away from the wheels, and remove it.
-
-
Dieser Schritt ist noch nicht übersetzt. Hilf mit, ihn zu übersetzen!
-
Remove the washer from the motor shaft.
-
-
Dieser Schritt ist noch nicht übersetzt. Hilf mit, ihn zu übersetzen!
-
Pull the drive pad bearing straight off of the motor shaft.
-
You may not be able to remove the bearing with your hands. If this is the case, use a bearing puller to remove the bearing.
-
-
Dieser Schritt ist noch nicht übersetzt. Hilf mit, ihn zu übersetzen!
-
Using snap ring pliers, pry the snap ring open and slide it off of the motor shaft.
-
Remove the snap ring.
-
-
Dieser Schritt ist noch nicht übersetzt. Hilf mit, ihn zu übersetzen!
-
Slide the dust fan straight off of the motor shaft.
-
Rückgängig: Ich habe diese Anleitung nicht absolviert.
2 weitere Nutzer:innen haben diese Anleitung absolviert.


