Einleitung
Diese Anleitung wird dich durch die grundlegende Zerlegung des Apple Wireless Keyboard A1314 führen: Austausch der Logic Board Baugruppe und von feststeckenden Batterien.
Was du brauchst
-
-
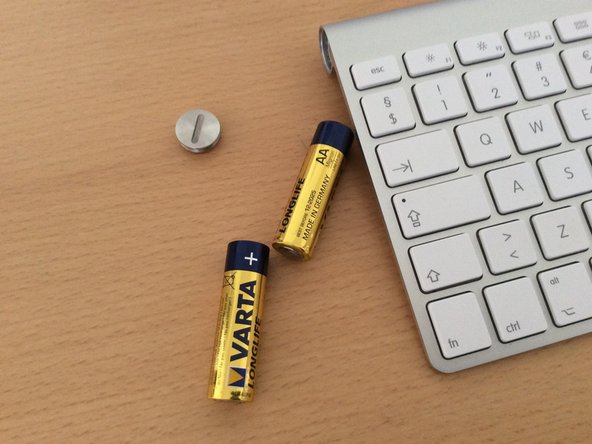
Drehe es entgegen des Uhrzeigersinnes auf.
-
Wenn es noch neuwertig ist, solltest du in der Lage sein, es einfach mit dem Daumennagel zu tun. Wenn nicht, versuche es mit einer Münze oder einem großen Schlitzschraubendreher.
-
Die Batterien sollten einfach herausgleiten. Falls deine Batterien stecken bleiben, kannst du sie zunächst dort lassen. Du wirst später in der Lage sein, dich um sie zu kümmern.
-
-
-
Drehe jetzt die Tastatur herum, um an die Plastikabdeckung an der Unterseite zu gelangen.
-
Drücke mit zwei Fingern die eine Seite der Plastikabdeckung zusammen und hebe sie dabei hoch.
-
Sei vorsichtig, dabei nicht zu viel Kraft aufzuwenden, sonst könntest du die Abdeckung oder die Hauptplatine, auch Logicboard genannt, beschädigen.
-
-
-
-
Entferne nun diese eine kleine Kreuzschlitzschraube, mit der die Platinenbaugruppe befestigt ist.
-
-
-
Hebe die kleine Klemmleiste am Anschluss für das Flachbandkabel hoch und ziehe das empfindliche Flachbandkabel behutsam heraus.
-
Sei mit diesem Flachbandkabel besonders vorsichtig, es ist sehr dünn und kann mit zuviel Kraft leicht beschädigt werden.
-
-
-
Denke immer an das empfindliche Flachbandkabel, wenn du nun die ganze Baugruppe - mit der rot markierten Einschalttaste voran - herausholst.
-
Wenn sie etwas weiter draußen ist, wirst du einen kleinen Widerstand spüren. Um ihn zu überwinden, musst du das weiße Plastikteil auf der Unterseite ein wenig eindrücken.
-
Wenn sich die Batterien verklemmt haben, kannst du sie jetzt herausnehmen. Mit einem geeigneten Werkzeug, z.B. einem Schraubendreher lassen sie sich herausdrücken- denke immer an das Flachbandkabel.
-
Das war's schon!
-


Um dein Gerät wieder zusammenzubauen, folge dieser Anleitung in umgekehrter Reihenfolge.
Um dein Gerät wieder zusammenzubauen, folge dieser Anleitung in umgekehrter Reihenfolge.
Rückgängig: Ich habe diese Anleitung nicht absolviert.
58 weitere Personen haben diese Anleitung absolviert.
Besonderer Dank geht an diese Übersetzer:innen:
100%


Diese Übersetzer:innen helfen uns, die Welt zu reparieren! Wie kann ich mithelfen?
Hier starten ›

25 Kommentare
My keyboard has the same model number as the unit described here, but the plastic cover is at the end near the power button. Although I could remove the cover and small screw inside, I was unable to remove the ribbon cable.
I tried banging the stuck battery out of the keyboard until I was sure it would be ruined. With only 1cm of progress, I decided to take the battery out by setting a screw and pulling it out like a fish on a hook. Here's what I did:
1. Poke a hole in the bottom of the stuck battery with an ice pick
2. Create a 'fish hook and line' by wrapping a coat hanger around the end of a big gnarly wood screw.
3. Carefully screw into the battery until it is most of the way in.
4. fit the coat hanger through a narrow gap (drill a hole in a board) and pull with all your might to drag the battery out of the keyboard.
5. Clean out the hole to get rid of the rotten battery debris
6. Pop in some new batteries, and Hey-Presto! it works.
I have a great picture of this if there is a way to upload one.
To remove the ribbon cable you have to first release the cable. The gray piece is actually a clip (of sorts) I you look closely you can see a seam in the grey piece. It slides up (in the direction of the cable) and will allow the cable to be removed easily.
I know this is old but maybe someone else has the same question.
Mo Ali -
My plastic cover is in the middle and I can't get at it any suggestions? Thanks
Use a pry tool like the ones used to remove screens. I thin flat screwdriver might work. It’s better to use a plastic pry tool (if you have one) they look like guitar picks and generally won’t scratch the surfaces.. Place it in the seem between the metal and plastic. I just squeezed it together really hard and then I saw a seam. I put a fingernail in the seam to open it up all the way.
Mo Ali -