Zum Hauptinhalt wechseln

Azpen A740 Speaker Replacement

Was du brauchst

  1. Azpen A740 Speaker Replacement, Back Panel: Schritt 1, Bild 1 von 1
    • Use the plastic opening tool or black spudger tool to lift the back panel off the tablet.

  2. Azpen A740 Speaker Replacement, Speaker: Schritt 2, Bild 1 von 2 Azpen A740 Speaker Replacement, Speaker: Schritt 2, Bild 2 von 2
    • The speaker will be attached by 2 screws with 3.75mm and 3.81mm at the bottom of the plastic holding the speaker in. These 2 screws will need to be removed in order to replace the speaker with a pentalobe screwdriver.

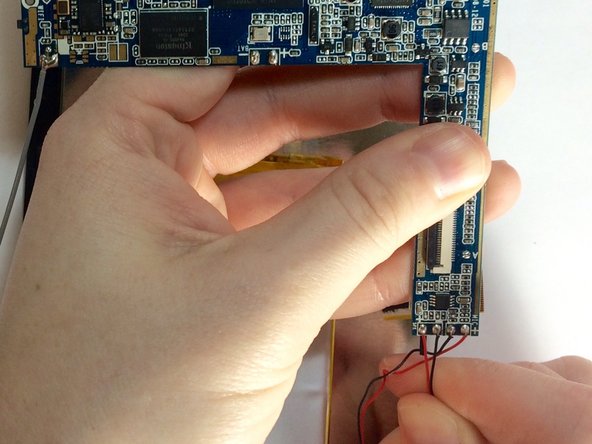
  3. Azpen A740 Speaker Replacement: Schritt 3, Bild 1 von 2 Azpen A740 Speaker Replacement: Schritt 3, Bild 2 von 2
    • Once the screws are removed, you should fully desolder the speaker wires that are attached to the motherboard. Instructions on how to desolder these wires are here on ifixit: Wie man Lötverbindungen herstellt und entlötet

    • After switching out the old speaker, just follow the directions in reverse to finish.

Abschluss

To reassemble your device, follow these instructions in reverse order.

Mallory

Mitglied seit: 01/21/15

346 Reputation

3 Anleitungen geschrieben

Team

USF Tampa, Team 4-5, Brown Winter 2015 Mitglied von USF Tampa, Team 4-5, Brown Winter 2015

USFT-BROWN-W15S4G5

3 Mitglieder

12 Anleitungen geschrieben

0 Kommentare

Kommentar hinzufügen

Seitenaufrufe:

Letzte 24 Stunden: 0

Letzte 7 Tage: 3

Letzte 30 Tage: 3

Insgesamt: 104