Zum Hauptinhalt wechseln

Black and Decker CM0700BZ Water Tank Replacement

Was du brauchst

  1. Black and Decker CM0700BZ Water Tank Replacement, Lid: Schritt 1, Bild 1 von 2 Black and Decker CM0700BZ Water Tank Replacement, Lid: Schritt 1, Bild 2 von 2
    • Open the lid of the coffee maker.

    • Remove the brew cup.

  2. Black and Decker CM0700BZ Water Tank Replacement: Schritt 2, Bild 1 von 3 Black and Decker CM0700BZ Water Tank Replacement: Schritt 2, Bild 2 von 3 Black and Decker CM0700BZ Water Tank Replacement: Schritt 2, Bild 3 von 3
    • Place your finger, screwdriver, or spudger behind the corner of the tab.

    • Pull up on the tab until it disconnects from the coffee maker.

  3. Black and Decker CM0700BZ Water Tank Replacement: Schritt 3, Bild 1 von 3 Black and Decker CM0700BZ Water Tank Replacement: Schritt 3, Bild 2 von 3 Black and Decker CM0700BZ Water Tank Replacement: Schritt 3, Bild 3 von 3
    • Hold the tab while pushing back on the lid.

    • The lid should open fully with the top of the lid facing down.

  4. Black and Decker CM0700BZ Water Tank Replacement: Schritt 4, Bild 1 von 2 Black and Decker CM0700BZ Water Tank Replacement: Schritt 4, Bild 2 von 2
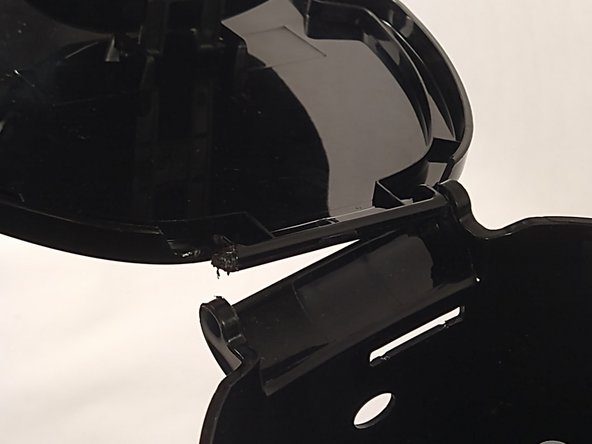
    • Insert the flathead screwdriver or spudger into one of the inserts holding the lid.

    • Pry facing away from the lid to force the peg out.

    • You should hear a pop when it disconnects.

    • Hold the lid and pull it away from the other insert.

  5. Black and Decker CM0700BZ Water Tank Replacement: Schritt 5, Bild 1 von 1
    • To also remove the shower head, use the Shower Head guide.

  6. Black and Decker CM0700BZ Water Tank Replacement, Water Tank: Schritt 6, Bild 1 von 2 Black and Decker CM0700BZ Water Tank Replacement, Water Tank: Schritt 6, Bild 2 von 2
    • Remove the carafe holder from the bottom of the coffee machine.

  7. Black and Decker CM0700BZ Water Tank Replacement: Schritt 7, Bild 1 von 3 Black and Decker CM0700BZ Water Tank Replacement: Schritt 7, Bild 2 von 3 Black and Decker CM0700BZ Water Tank Replacement: Schritt 7, Bild 3 von 3
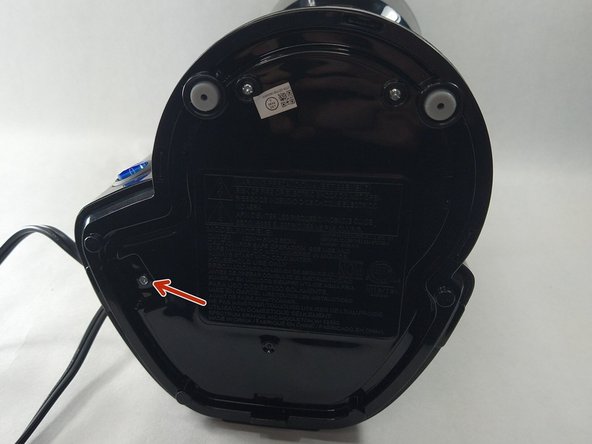
    • Place coffee maker on its side, with the bottom facing you.

    • Remove two 10mm Phillips #1 screws and one 10mm Tri-Point Y1 screws with their designated tips.

  8. Black and Decker CM0700BZ Water Tank Replacement: Schritt 8, Bild 1 von 3 Black and Decker CM0700BZ Water Tank Replacement: Schritt 8, Bild 2 von 3 Black and Decker CM0700BZ Water Tank Replacement: Schritt 8, Bild 3 von 3
    • Slowly pry the bottom lid from the front.

    • You should hear a pop.

    • Pull up and remove the bottom lid.

  9. Black and Decker CM0700BZ Water Tank Replacement: Schritt 9, Bild 1 von 1
  10. Black and Decker CM0700BZ Water Tank Replacement: Schritt 10, Bild 1 von 3 Black and Decker CM0700BZ Water Tank Replacement: Schritt 10, Bild 2 von 3 Black and Decker CM0700BZ Water Tank Replacement: Schritt 10, Bild 3 von 3
    • Remove the four 10 mm Phillips #1 screws.

    • Slowly pull the water tank up to expose the water pipes

  11. Black and Decker CM0700BZ Water Tank Replacement: Schritt 11, Bild 1 von 2 Black and Decker CM0700BZ Water Tank Replacement: Schritt 11, Bild 2 von 2
    In diesem Schritt verwendetes Werkzeug:
    Tweezers
    $4.99
    Kaufen
    • Squeeze on the prongs with tweezers and hold.

    • Pull the water tank while squeezing the tighteners to loosen the water pipes off of the water tank.

Abschluss

To reassemble your device, follow these instructions in reverse order.

Team

UMass Dartmouth, Team 1-2, Shaddix Spring 2023 Mitglied von UMass Dartmouth, Team 1-2, Shaddix Spring 2023

UMASSD-SHADDIX-S23S1G2

4 Mitglieder

5 Anleitungen geschrieben

0 Kommentare

Kommentar hinzufügen

Seitenaufrufe:

Letzte 24 Stunden: 1

Letzte 7 Tage: 4

Letzte 30 Tage: 25

Insgesamt: 237