Zum Hauptinhalt wechseln

Canon Powershot ELPH 100 HS Speaker Replacement

Was du brauchst

  1. Canon Powershot ELPH 100 HS Speaker Replacement, Battery: Schritt 1, Bild 1 von 3 Canon Powershot ELPH 100 HS Speaker Replacement, Battery: Schritt 1, Bild 2 von 3 Canon Powershot ELPH 100 HS Speaker Replacement, Battery: Schritt 1, Bild 3 von 3
    • Locate the battery cover on the bottom of your camera.

    • Slide the tab to the right to open the battery cover.

  2. Canon Powershot ELPH 100 HS Speaker Replacement: Schritt 2, Bild 1 von 2 Canon Powershot ELPH 100 HS Speaker Replacement: Schritt 2, Bild 2 von 2
    • Flip the battery cover open.

    • Using your fingers, slide the battery out of the camera.

    • This was not the original battery that came the camera, so yours may look different.

  3. Canon Powershot ELPH 100 HS Speaker Replacement, Memory Card: Schritt 3, Bild 1 von 3 Canon Powershot ELPH 100 HS Speaker Replacement, Memory Card: Schritt 3, Bild 2 von 3 Canon Powershot ELPH 100 HS Speaker Replacement, Memory Card: Schritt 3, Bild 3 von 3
    • Push down on the memory card until it clicks and releases.

    • Pull up on the memory card to remove it.

  4. Canon Powershot ELPH 100 HS Speaker Replacement, Outer Case: Schritt 4, Bild 1 von 1
    • Using the Phillips #00 screwdriver, remove the two 3.1mm screws from the bottom of the camera.

    • Keep track of all the screws that are being taken out from the outer case.

    • The display screen of the camera should be facing towards you.

  5. Canon Powershot ELPH 100 HS Speaker Replacement: Schritt 5, Bild 1 von 1
    • Ensure that the screen is facing you, and then rotate it till you see the screws on the side of the camera.

    • Use the Phillips #00 screwdriver to remove the two 3.1 mm screws.

  6. Canon Powershot ELPH 100 HS Speaker Replacement: Schritt 6, Bild 1 von 2 Canon Powershot ELPH 100 HS Speaker Replacement: Schritt 6, Bild 2 von 2
    • With the screen still facing you, rotate the camera 180 degrees.

    • The side with the charging port should now be facing up.

  7. Canon Powershot ELPH 100 HS Speaker Replacement: Schritt 7, Bild 1 von 2 Canon Powershot ELPH 100 HS Speaker Replacement: Schritt 7, Bild 2 von 2
    • Use the Philips #00 screwdriver to pry open the charging port cover.

    • Once you pry open the charging port cover, rotate the cover so that you have access to the screw underneath. Which is seen in the next image.

    • Remove both 3.1 mm screws using the Phillips #00 screwdriver.

    • The image still shows the screw from step 3 in place.

  8. Canon Powershot ELPH 100 HS Speaker Replacement: Schritt 8, Bild 1 von 2 Canon Powershot ELPH 100 HS Speaker Replacement: Schritt 8, Bild 2 von 2
    • Turn the camera so the bottom is once again facing up.

    • With the battery door still open, use a spudger to remove the cover from the front of the camera.

    • Carefully go around all of the edges until the cover is released.

  9. Canon Powershot ELPH 100 HS Speaker Replacement: Schritt 9, Bild 1 von 1
    • Once the entire front cover has been released carefully pull it off.

    • Be careful not to break the tabs that hold it in place.

  10. Canon Powershot ELPH 100 HS Speaker Replacement: Schritt 10, Bild 1 von 3 Canon Powershot ELPH 100 HS Speaker Replacement: Schritt 10, Bild 2 von 3 Canon Powershot ELPH 100 HS Speaker Replacement: Schritt 10, Bild 3 von 3
    • Just like Step 4-6 , carefully use the Spudger to remove the back cover.

    • Go along all the borders of the back cover so that it releases from the camera safely.

    • Be careful not to break the tabs.

  11. Canon Powershot ELPH 100 HS Speaker Replacement, Speaker: Schritt 11, Bild 1 von 1
    • Turn on soldering Iron.

  12. Canon Powershot ELPH 100 HS Speaker Replacement: Schritt 12, Bild 1 von 3 Canon Powershot ELPH 100 HS Speaker Replacement: Schritt 12, Bild 2 von 3 Canon Powershot ELPH 100 HS Speaker Replacement: Schritt 12, Bild 3 von 3
    • Gently remove the tabs surrounding the power button on the housing of the camera.

    • Be careful not to break the wires that connect the housing to the body of the camera.

  13. Canon Powershot ELPH 100 HS Speaker Replacement: Schritt 13, Bild 1 von 1
    • Make sure the battery is removed.

    • Cut the wires half way between the microphone and body of camera.

    • Leave 25mm of wire on the speaker when cutting the wire

  14. Canon Powershot ELPH 100 HS Speaker Replacement: Schritt 14, Bild 1 von 1
    • Strip the ends of the newly cut wires.

    • Expose only 2 mm of bare wire.

  15. Canon Powershot ELPH 100 HS Speaker Replacement: Schritt 15, Bild 1 von 3 Canon Powershot ELPH 100 HS Speaker Replacement: Schritt 15, Bild 2 von 3 Canon Powershot ELPH 100 HS Speaker Replacement: Schritt 15, Bild 3 von 3
    • Remove the 3.1mm screw holding speaker to the housing.

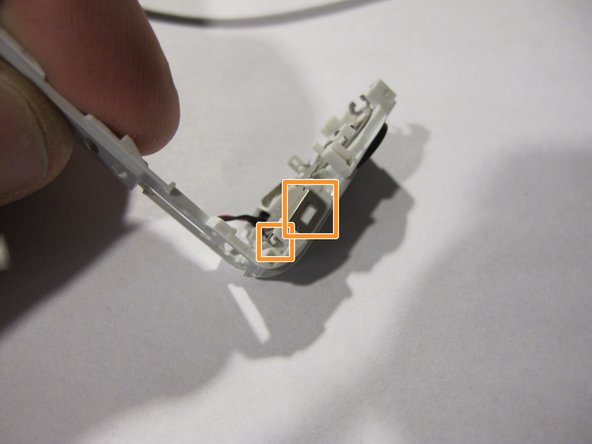
    • Remove the two clips and the metal cover will be released

    • When you remove the metal cover the spring will shoot out.

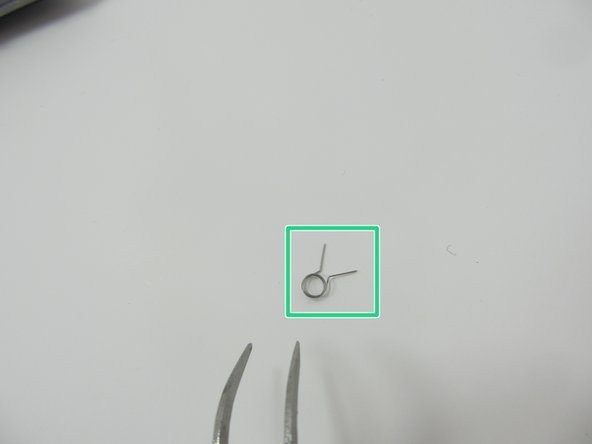
    • Take note of the spring and its orientation, it will need to be re-installed later

    • Image of the spring

  16. Canon Powershot ELPH 100 HS Speaker Replacement: Schritt 16, Bild 1 von 2 Canon Powershot ELPH 100 HS Speaker Replacement: Schritt 16, Bild 2 von 2
    • Using tweezers, grab the wires to pull the speaker from the plastic housing.

    • Use force as the speaker is glued to the housing.

  17. Canon Powershot ELPH 100 HS Speaker Replacement: Schritt 17, Bild 1 von 1
    • Test the heat of the soldering iron by touching it to the tip of a paperclip.

    • If the tip of the paperclip melts, the iron should be ready.

    • If you have never used a soldering iron before, please consult the tutorial in the description of this guide, or watch the following video: How To Solder Or Soldering Techniques.

  18. Canon Powershot ELPH 100 HS Speaker Replacement: Schritt 18, Bild 1 von 1
    • Solder the red wire to the right terminal, and the black wire to the left terminal.

    • Do not apply force to the speaker wires during this step. If the wires break, you will need to re-solder them.

  19. Canon Powershot ELPH 100 HS Speaker Replacement: Schritt 19, Bild 1 von 1
    • Place the speaker back in it's housing.

  20. Canon Powershot ELPH 100 HS Speaker Replacement: Schritt 20, Bild 1 von 1
    • Place the metal cover over the speaker.

    • Do not attach the screw.

  21. Canon Powershot ELPH 100 HS Speaker Replacement: Schritt 21, Bild 1 von 2 Canon Powershot ELPH 100 HS Speaker Replacement: Schritt 21, Bild 2 von 2
    • Lift up the corner of the metal cover and slide the spring in so it rests around the screw hole.

    • After the spring is around the screw hole post, replace the screw so that the cover stays in place.

  22. Canon Powershot ELPH 100 HS Speaker Replacement: Schritt 22, Bild 1 von 1
    • To reattach the speaker housing to the rest of the camera, make sure the pins and clips are aligned.

Abschluss

To reassemble your device, follow the case disassembly guide in reverse.

2 weitere Nutzer:innen haben diese Anleitung absolviert.

Angehängte Dokumente

Jacob

Mitglied seit: 03/17/15

570 Reputation

3 Anleitungen geschrieben

Team

Michigan Tech, Team 1-10, Lauer Spring 2015 Mitglied von Michigan Tech, Team 1-10, Lauer Spring 2015

MTU-LAUER-S15S1G10

2 Mitglieder

5 Anleitungen geschrieben

0 Kommentare

Kommentar hinzufügen

Seitenaufrufe:

Letzte 24 Stunden: 0

Letzte 7 Tage: 0

Letzte 30 Tage: 1

Insgesamt: 784