Zum Hauptinhalt wechseln
Gemeinsam reparieren - Jetzt registrieren

Ematic FunTab 3 Battery Replacement

Was du brauchst

  1. Ematic FunTab 3 Battery Replacement, Back Panel: Schritt 1, Bild 1 von 3 Ematic FunTab 3 Battery Replacement, Back Panel: Schritt 1, Bild 2 von 3 Ematic FunTab 3 Battery Replacement, Back Panel: Schritt 1, Bild 3 von 3
    • Turn off the device before starting

    • To prevent damage, open the device on the side without the buttons.

    • Insert the hooked end of the plastic opening tool in the gap between the screen and the back panel on the edge of the device.

    • Slide the plastic opening tool down the long side of the device.

    • Insert tool again and slide it down the long slide of the case a second time.

    Frag FixBot

    Kommentar hinzufügen

  2. Ematic FunTab 3 Battery Replacement: Schritt 2, Bild 1 von 1
    • Pull the back panel away from the screen.

    Frag FixBot

    Kommentar hinzufügen

  3. Ematic FunTab 3 Battery Replacement, Battery: Schritt 3, Bild 1 von 1
    • Remove the black tape to reveal the wire ribbon connector.

    Frag FixBot

    Kommentar hinzufügen

  4. Ematic FunTab 3 Battery Replacement: Schritt 4, Bild 1 von 3 Ematic FunTab 3 Battery Replacement: Schritt 4, Bild 2 von 3 Ematic FunTab 3 Battery Replacement: Schritt 4, Bild 3 von 3
    In diesem Schritt verwendetes Werkzeug:
    Tweezers
    $4.99
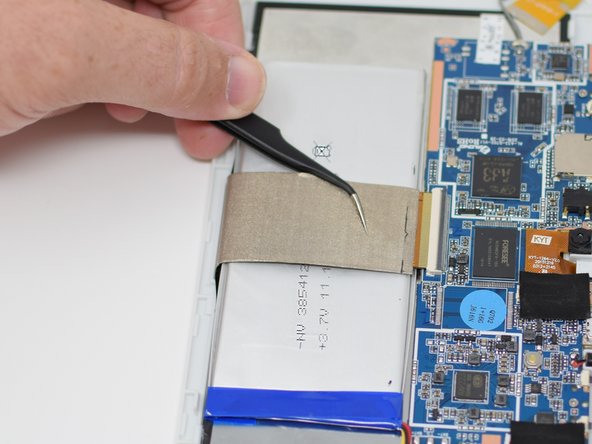
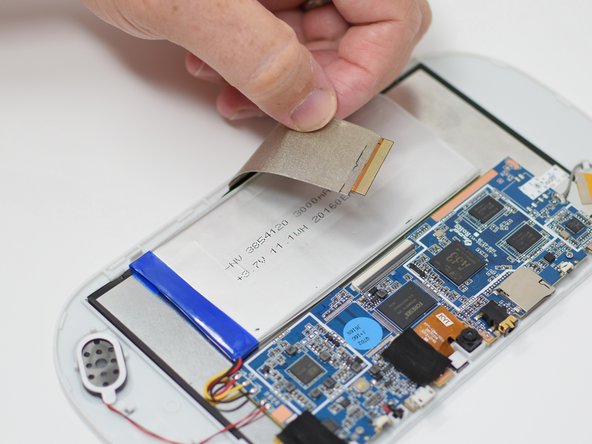
    • Flip up the black retaining tab using the plastic opening tool.

    • Pull out the large wire ribbon that crosses over the battery.

    • You may need tweezers to pull out the wire ribbon.

    Frag FixBot

    Kommentar hinzufügen

  5. Ematic FunTab 3 Battery Replacement: Schritt 5, Bild 1 von 3 Ematic FunTab 3 Battery Replacement: Schritt 5, Bild 2 von 3 Ematic FunTab 3 Battery Replacement: Schritt 5, Bild 3 von 3
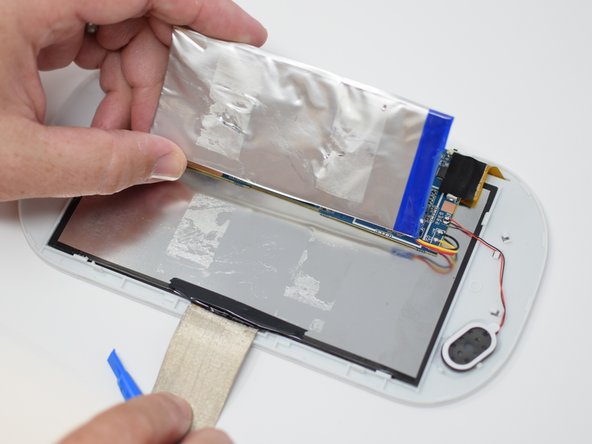
    • Insert the plastic opening tool under the battery.

    • Using the plastic opening tool, pry up the battery.

    • There is tape on the back of the battery. Some more force may be required to separate the battery from the back of the display.

    Frag FixBot

    Kommentar hinzufügen

  6. Ematic FunTab 3 Battery Replacement: Schritt 6, Bild 1 von 2 Ematic FunTab 3 Battery Replacement: Schritt 6, Bild 2 von 2
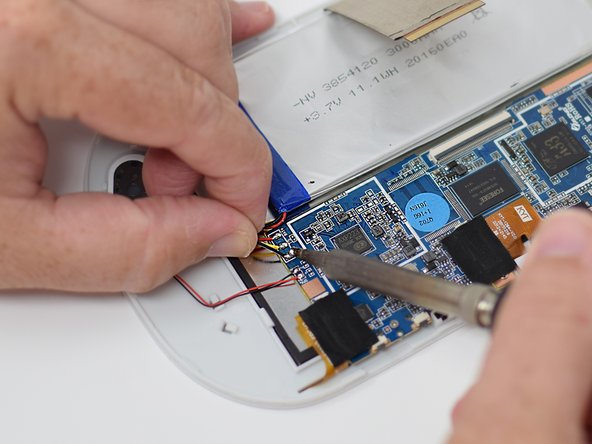
    • Remove the wires from the motherboard using a soldering iron tool. Here is a link on How To Solder and Desolder Connections.

    • After the connections are desoldered, remove the battery.

    • Close the black ribbon retaining tabs once ribbons are inserted during reassembly.

    Frag FixBot

    Kommentar hinzufügen

Abschluss

To reassemble your device, follow these instructions in reverse order.

Rückgängig: Ich habe diese Anleitung nicht absolviert.

Team

UW Tacoma, Team S1-G5, Cardinal Summer 2018 Mitglied von UW Tacoma, Team S1-G5, Cardinal Summer 2018

UWT-CARDINAL-SU18S1G5

4 Mitglieder

12 Anleitungen geschrieben

0 Kommentare zur Anleitung

Kommentar hinzufügen

Seitenaufrufe:

Letzte 24 Stunden: 0

Letzte 7 Tage: 6

Letzte 30 Tage: 26

Insgesamt: 986