Zum Hauptinhalt wechseln

HP 14-fq1025nr SSD Replacement

Was du brauchst

  1. HP 14-fq1025nr SSD Replacement, Back Cover: Schritt 1, Bild 1 von 1
    • Flip the laptop upside down so the bottom cover is facing up.

  2. HP 14-fq1025nr SSD Replacement: Schritt 2, Bild 1 von 1
    In diesem Schritt verwendetes Werkzeug:
    Tweezers
    $4.99
    Kaufen
    • Use a pair of tweezers to grab and pull the feet off of the cover.

  3. HP 14-fq1025nr SSD Replacement: Schritt 3, Bild 1 von 1
    • Remove the two 4 mm screws using a Phillips #0 screwdriver.

    • Remove the six remaining 6 mm screws located around the edges and underneath the feet using a Phillips #0 screwdriver.

  4. HP 14-fq1025nr SSD Replacement: Schritt 4, Bild 1 von 1
    • Flip the laptop right-side up and slide an iFixit opening tool and/or Jimmy inside of the bottom cover seam to pry it open.

  5. HP 14-fq1025nr SSD Replacement: Schritt 5, Bild 1 von 1
    • Remove the bottom cover.

  6. HP 14-fq1025nr SSD Replacement, Battery: Schritt 6, Bild 1 von 2 HP 14-fq1025nr SSD Replacement, Battery: Schritt 6, Bild 2 von 2
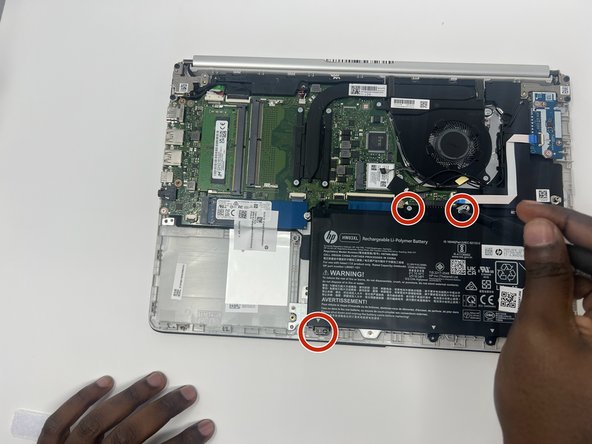
    • Remove the four gray 3 mm screws holding down the battery using a Phillips #0 screwdriver.

  7. HP 14-fq1025nr SSD Replacement: Schritt 7, Bild 1 von 1
    • Remove the battery.

  8. HP 14-fq1025nr SSD Replacement, SSD: Schritt 8, Bild 1 von 1
    • Remove the single 6 mm screw holding down the SSD using a Phillips #0 screwdriver.

  9. HP 14-fq1025nr SSD Replacement: Schritt 9, Bild 1 von 1
    • Slide the SSD out of the slot.

Abschluss

To reassemble your device, follow these instructions in reverse order.

Kristen Gismondi

Mitglied seit: 11/12/14

83.158 Reputation

204 Anleitungen geschrieben

Team

iFixit Mitglied von iFixit

Staff

137 Mitglieder

17.524 Anleitungen geschrieben

0 Kommentare

Kommentar hinzufügen

Seitenaufrufe:

Letzte 24 Stunden: 2

Letzte 7 Tage: 8

Letzte 30 Tage: 30

Insgesamt: 405