Einleitung
The Memory Module or RAM in this computer is responsible for the temporary storage of memory that is wiped when the computer is turned off. RAM is accessed when you call on your computer to open apps or surf the web.
Reasons that your RAM would stop working are if the board is faulty, if it is not installed correctly or if there is excessive dust that is causing the connection to not be clean.
Before starting this step the battery and service cover will need to be removed from the bottom of the computer.
WARNING: if the BIOS is not up to date before removing the RAM, the system could inherit many different problems. See https://support.hp.com/us-en/document/c0... for more information on how to complete this process.
-
-
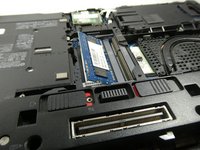
Position the computer upside down with the opening latch facing away from you and the battery facing towards you.
-
-
-
Slide the battery latch positioned to the right over to the right side. Hold it there.
-
-
-
-
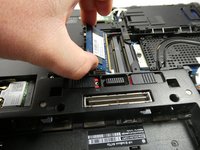
With the laptop latch still facing away from you, slide the left release latch to the left.
-
-
-
Slide the door away from you, toward the opening latch.
-
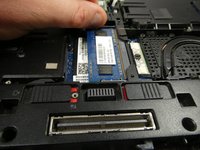
Lift the door upwards away from the computer.
-
-
-
Spread the retaining tabs on either side of the memory module to release the module.
-
-
-
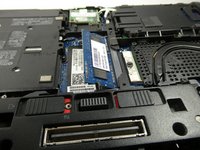
Note that the device does have two memory slots. The top slot houses the the expansion memory and the bottom slot houses the primary memory.
-
Repeat the previous steps if there is an expansion memory card
-


To reassemble your device, follow these instructions in reverse order.
Rückgängig: Ich habe diese Anleitung nicht absolviert.
Eine weitere Person hat diese Anleitung absolviert.

Team

UMass Dartmouth, Team 5-3, Sinclaire Fall 2022 Mitglied von UMass Dartmouth, Team 5-3, Sinclaire Fall 2022
UMASSD-SINCLAIRE-F22S5G3
5 Mitglieder
7 Anleitungen geschrieben