Einleitung
If your HP Pavilion G60-120US’s keyboard is not functioning normally such as some keys are stuck or your keyboard responsiveness ranges from fully unresponsive to partially unresponsive it might be time to replace your keyboard.
A functional keyboard will allow you to type anything, and all keys will relay the appropriate information when pressed. However, sometimes keyboards can break due to a multitude of things such as general wear and tear or misuse. If you start to notice certain, if not all, keys not providing the accurate response, you should replace your keyboard.
Before beginning the steps on this guide make sure your laptop is powered down and not connected to any ports.
Was du brauchst
-
-
Slide and hold the battery release switch to the left to release the battery from the device.
-
-
-
While holding the battery release switch, grab the battery and pull it upward gently.
-
-
-
Using the Phillips #0 screwdriver, remove the seven 4.0mm screws on the battery compartment of the laptop.
-
-
-
Using the Phillips #0 screwdriver, remove two 4.0mm screws from the hard disk cover.
-
Remove the hard disk cover.
-
-
-
-
Remove the hard drive by pulling gently and disconnecting the hard drive from the laptop.
-
Gently pull on the black and red wiring on the bottom left to separate the wire from the component.
-
-
-
Using the Phillips #0 screwdriver, remove the two 4.0 mm screws from the memory card cover.
-
Remove the memory disk cover.
-
-
-
Using the Phillips #0 screwdriver, remove the 4.0 mm screw from the Wi-Fi chip cover.
-
Remove the Wi-Fi chip cover.
-
-
-
Using the Phillips #0 screwdriver, remove the two 3.0 mm screws securing the Wi-Fi chip in place.
-
Grab the Wi-Fi chip and pull up gently to the left to disconnect it from the laptop.
-
-
-
Using the Phillips #0 screwdriver, remove the seven 4.0 mm screws on the bottom of the laptop.
-
-
-
Turn the laptop back to its upright state.
-
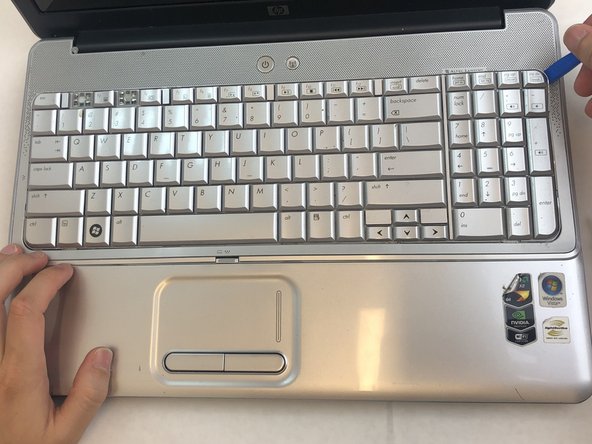
Insert an opening tool into the upper right corner of the keyboard and gently lift it to separate it from the laptop.
-
-
-
Grab the wiring and gently pull it out to disconnect it from the laptop.
-
Remove the keyboard.
-


To reassemble your device, follow these instructions in reverse order.
To reassemble your device, follow these instructions in reverse order.

