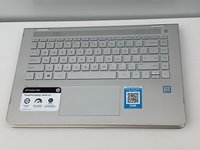
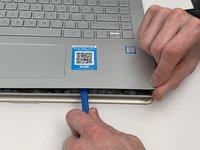
Einleitung
This guide will help you remove and replace the DC Power Jack on the HP Pavilion x360 14m-ba114dx. The DC Power Jack is tasked with directing the charge taken from the AC Adapter Cable (charging cable) to the battery. The symptom of a failed DC Power Jack is that the laptop is not charging, which may cause the laptop to not power on at all. For more information on how to deal with a laptop that will not power on or will not charge, consult this troubleshooting page.
Finally, a prerequisite to this guide is removal of the battery. If you notice once the laptop is open that the battery is swollen, remove it with caution. If swollen, do not charge the battery, keep the battery at a stable room temperature, and dispose of it properly at a recycling center. This page will help you deal with a swollen battery. Another important thing is to make sure that you unplug your device from any external power sources and completely power it off before beginning this replacement.
Was du brauchst
-
-
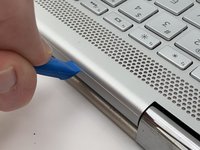
Using a #0 Phillips-head screwdriver, remove the three 5 mm screws along the bottom of the back cover.
-
Using a #0 Phillips-head screwdriver, remove the 6 mm screw at the top of the back cover.
-
-
-
Using the flat end of the Spudger, pry up the two rubber feet on the top of the laptop's back cover.
-
Using a #0 Phillips-head screwdriver, remove the 8 mm screw under each of the rubber feet.
-
-
-
Open the laptop, with the display fully extended to 360 degrees so that the screen is on the table.
-
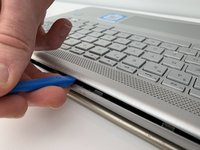
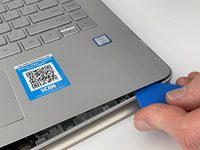
Using the thinner end of an iFixit Plastic Opening Tool, pry open the keyboard panel from the base of the laptop near the screen hinges.
Op nieuwere modellen moet je de onderkant openwrikken en zal je de batterije daar aantreffen
-
-
-
Using the iFixit Plastic Opening Tool and the iFixit Opening Picks, work your way around the rest of the keyboard and pry it out of the base.
Op nieuwere modellen moet je de onderkant openwrikken en zal je de batterije daar aantreffen
-
-
-
Grasp the keyboard with both hands and gently lift it out of the base.
Op nieuwere modellen moet je de onderkant openwrikken en zal je de batterij daar aantreffen
-
-
-
Using a plastic Spudger, remove the ZIF connectors that attach the motherboard to the touchpad and the keyboard. Use the flat end of the Spudger to pop up the cap on top of the connector. The connector will then slide out of place.
-
Repeat this step for all three connectors.
Op nieuwere modellen moet je de onderkant openwrikken en zal je de batterij daar aantreffen, er zijn geen ribbons los te maken
-
-
-
Using the flat end of the plastic Spudger, remove the ZIF connector attaching the volume button and headphone jack to the motherboard.
Op nieuwere modellen moet je de onderkant openwrikken en zal je de batterij daar aantreffen, er zijn geen ribbons los te maken
-
-
-
-
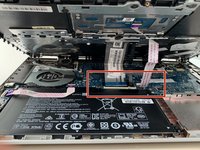
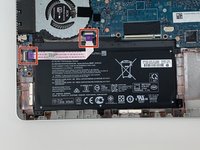
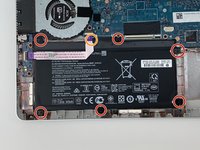
Using a #1 Phillips-head screwdriver, remove the seven 4 mm screws around the battery.
-
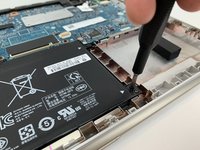
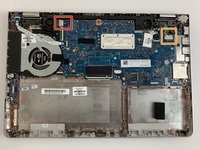
Gently move the ZIF connector out of the way to reach the screw marked in orange. Then use the #1 Phillips-head screwdriver to unscrew it.
Op nieuwere modellen moet je de onderkant openwrikken en zal je de batterij daar aantreffen, er zijn geen ribbons los te maken
-
-
-
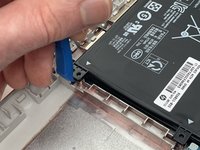
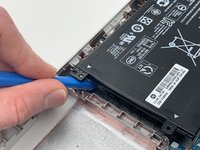
Using the thin end of the iFixit Plastic Opening Tool, pry the battery out of its place inside the laptop's base.
-
Next, use your fingers to pull the battery out of its position.
-
-
-
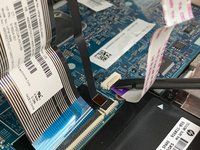
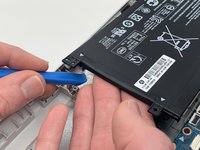
Using the plastic Spudger, remove the ZIF connector connecting the power button board to the motherboard. Remove the connector by popping the cap up on top of the connector and sliding it out of its slot.
For all ZIF connectors, be sure to break these down according to my feedback in the screen guide.
-
-
-
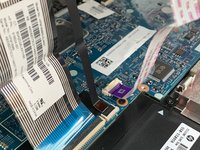
Using the iFixit Plastic Opening Tool or the plastic Spudger, disconnect the touch screen cable from the motherboard. Flip up the ZIF connector and move the wire away from the connection point.
-
Pull the wire out from its track next to the speaker.
Note that the its here should be possessive (its) not contraction (it’s). Also, since the component is black and the tool is black, this photo is kind of hard to see what you’re doing. Do you have another angle?
-
-
In diesem Schritt verwendetes Werkzeug:Tweezers$4.99
-
Use the Blunt Tweezers to disconnect the Wireless Card Antenna Cables. Start with the cable labeled M2, which is connected to Port #2. To disconnect he cable, grab it on both sides with the tweezers and pull up.
-
-
-
Use the Blunt Tweezers to disconnect the Antenna Cable labeled A1, which is connected to Port #1. To disconnect he cable, grab it on both sides with the tweezers and pull up.
-
Using the Blunt Tweezers, unwind the cables from the track to the right of the speaker. The cables are held in place by two black hooks.
Note that you do not need a comma between labeled and A1 here. Also, you should transfer the red markup to these steps, too, so the user doesn’t have to go back to get that information. Can you be a little clearer about how to pull out the cables?
-
-
-
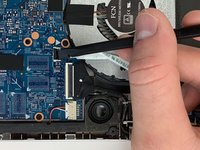
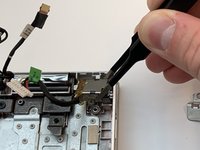
Using the plastic Spudger, remove the ZIF connector that connects the motherboard to the Display Cable. To remove a ZIF connector, use the flat end of the Spudger to flip up the cap on the top. Then the connector should slide out.
-
-
In diesem Schritt verwendetes Werkzeug:Halberd Spudger$2.99
-
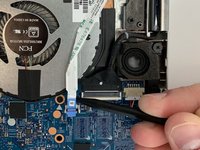
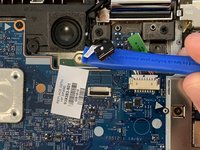
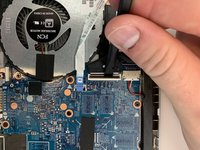
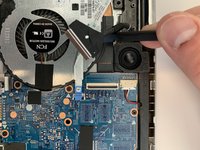
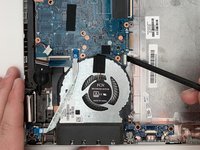
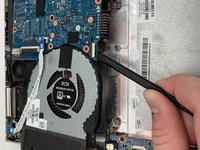
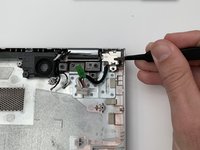
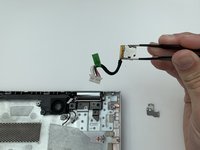
Using the curved end of the Halberd Spudger, disconnect the Speaker Cable from the port that connects it to the motherboard by prying it out of the port.
-
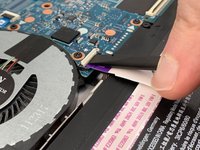
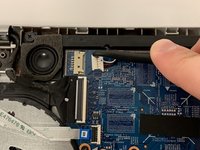
Using the same process to disconnect the DC Power Jack Cable from the port that connects it to the motherboard.
Here, the flipbook seems inconsistent because the tool seems to be connected to the wires, not the white part, in the second part of the shots. Try to combine the two sentences for concision.
-
-
-
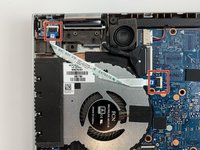
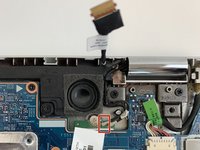
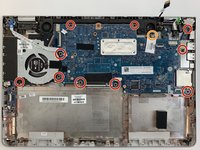
Using a #1 Phillips-head Screwdriver, remove the ten 5 mm screws that secure the motherboard and fan to the base.
-
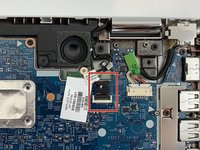
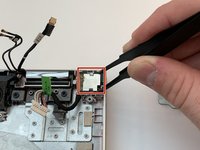
Using a #1 Phillips-head Screwdriver, remove the singular 2 mm screw that connects the motherboard to the wireless card.
The last two shots are disorientating for me. Are they on different parts of the device? I think you could potentially take these shots further out, to give some orientation with the rest of the device.
-
-
-
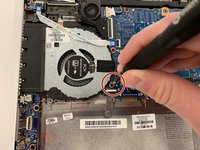
Using the plastic Spudger, gently lift up on the motherboard from the side that has the fan connected to it and remove the motherboard from the base.
For me, the last shot is a little confusing. Can you show you lifting it out, rather than the kind of ta-da step at the end here?
-
-
In diesem Schritt verwendetes Werkzeug:Tweezers$4.99
-
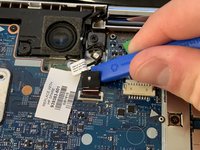
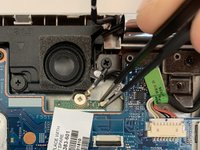
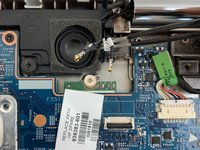
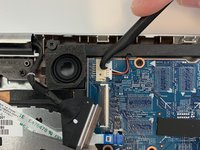
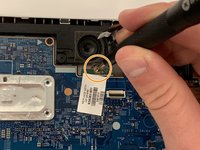
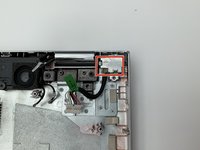
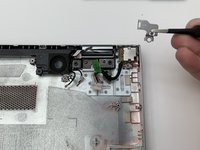
Using the Blunt Tweezers, gently lift the metal piece that covers the DC Power Jack unit and the metal piece will pop out.
Note the comma splice in the caution. I would also identify why the person shouldn’t be forceful (e.g., breaking or bending the metal cover). I think you could also make the step more concise.
-


To reassemble your device, follow these instructions in reverse order.
To reassemble your device, follow these instructions in reverse order.
Rückgängig: Ich habe diese Anleitung nicht absolviert.
3 weitere Personen haben diese Anleitung absolviert.

Team

Embry-Riddle Aeronautical University, Team S6-G4, Watkins Spring 2020 Mitglied von Embry-Riddle Aeronautical University, Team S6-G4, Watkins Spring 2020
ERAU-WATKINS-S20S6G4
4 Mitglieder
9 Anleitungen geschrieben
2 Kommentare zur Anleitung
This is an amazing guide to repairing Hp Power Jack.
Check online HP DC Jack in India.
Great explanation. Thank you,