Diese Version enthält möglicherweise inkorrekte Änderungen. Wechsle zur letzten geprüften Version.
Was du brauchst
-
Dieser Schritt ist noch nicht übersetzt. Hilf mit, ihn zu übersetzen!
-
Remove the five rubber feet from the bottom of the laptop with a plastic opening tool.
-
-
Dieser Schritt ist noch nicht übersetzt. Hilf mit, ihn zu übersetzen!
-
Remove the thirteen 5mm Phillips #0 screws from the bottom case.
-
-
-
Dieser Schritt ist noch nicht übersetzt. Hilf mit, ihn zu übersetzen!
-
Flip the laptop over and open it up.
-
Wedge a plastic opening tool between the keyboard and bottom case, pry upwards to separate the two pieces.
-
Lift up the keyboard.
-
-
Dieser Schritt ist noch nicht übersetzt. Hilf mit, ihn zu übersetzen!
-
Use a spudger to flip up the retaining flaps on the keyboard ribbon cable ZIF sockets.
-
Pull up the ribbon cables from their sockets.
-
-
Dieser Schritt ist noch nicht übersetzt. Hilf mit, ihn zu übersetzen!
-
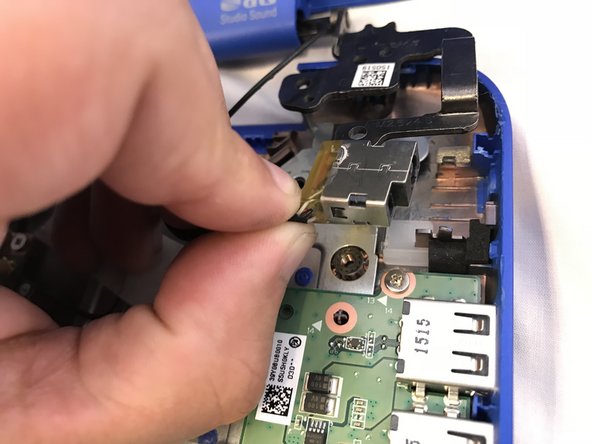
Disconnect the charging port from the motherboard.
-
-
Dieser Schritt ist noch nicht übersetzt. Hilf mit, ihn zu übersetzen!
-
Remove the two 5mm Phillips screws from the charging port.
-
Remove the bracket.
-
Pull out the charging port.
-


Team

USF Tampa, Team S1-G3, Cagle Spring 2018 Mitglied von USF Tampa, Team S1-G3, Cagle Spring 2018
USFT-CAGLE-S18S1G3
4 Mitglieder
12 Anleitungen geschrieben