Zum Hauptinhalt wechseln

HTC One M8 Battery Replacement

Was du brauchst

  1. HTC One M8 Battery Replacement, SIM Card: Schritt 1, Bild 1 von 2 HTC One M8 Battery Replacement, SIM Card: Schritt 1, Bild 2 von 2
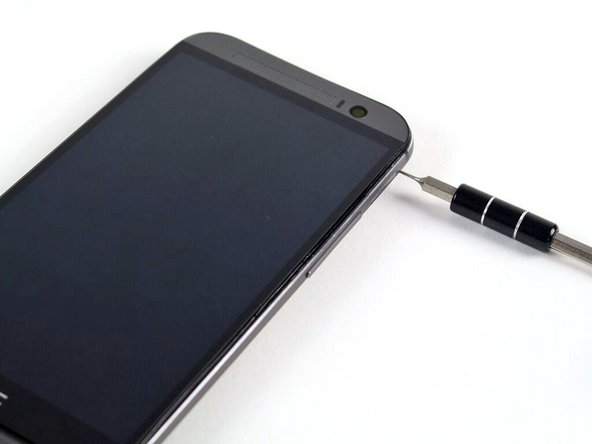
    • Insert a SIM card eject tool or a paperclip into the small hole in the SIM card tray, located on the upper left hand side of the phone.

    • Press to eject the tray.

    • This may require a significant amount of force.

  2. HTC One M8 Battery Replacement: Schritt 2, Bild 1 von 1
    • Remove the SIM card tray assembly from the HTC One M8.

    • When reinserting the SIM card, ensure that it is in the proper orientation relative to the tray.

  3. HTC One M8 Battery Replacement, MicroSD Card: Schritt 3, Bild 1 von 2 HTC One M8 Battery Replacement, MicroSD Card: Schritt 3, Bild 2 von 2
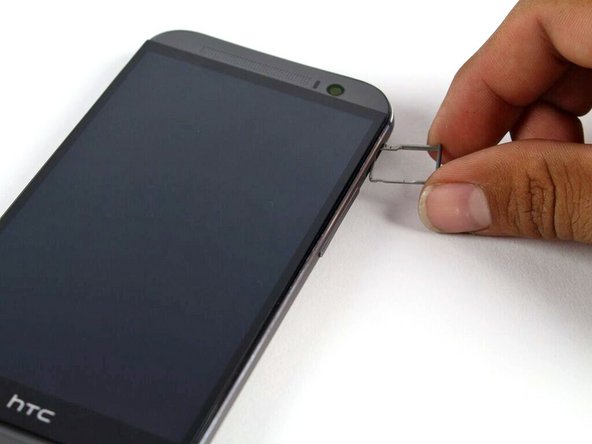
    • Insert a SIM card eject tool or a paperclip into the small hole in the microSD card tray, located on the upper right hand side of the phone.

    • Press to eject the tray.

    • This may require a significant amount of force.

  4. HTC One M8 Battery Replacement: Schritt 4, Bild 1 von 1
    • Remove the microSD card tray assembly from the HTC One M8.

    • When reinserting the microSD card, ensure that it is in the proper orientation relative to the tray.

  5. HTC One M8 Battery Replacement, Rear Case: Schritt 5, Bild 1 von 2 HTC One M8 Battery Replacement, Rear Case: Schritt 5, Bild 2 von 2
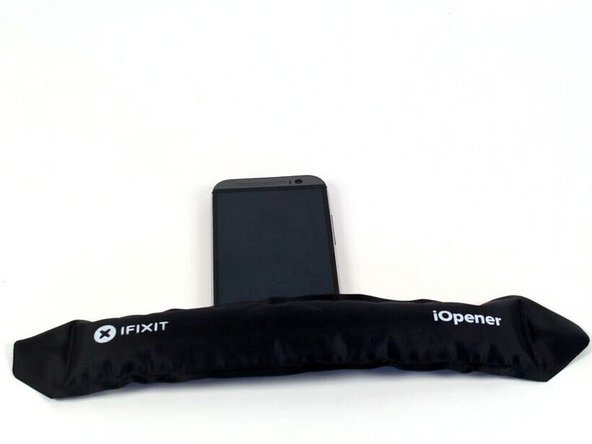
    • Use an iOpener or heat gun to loosen the adhesive on the upper and lower speaker grilles.

    • Refer to the iOpener guide for info on how to use the iOpener.

  6. HTC One M8 Battery Replacement: Schritt 6, Bild 1 von 3 HTC One M8 Battery Replacement: Schritt 6, Bild 2 von 3 HTC One M8 Battery Replacement: Schritt 6, Bild 3 von 3
    • Use a plastic opening tool to gently peel up the lower speaker grille.

    • The adhesive is messy, and can be removed using Goo-gone.

  7. HTC One M8 Battery Replacement: Schritt 7, Bild 1 von 2 HTC One M8 Battery Replacement: Schritt 7, Bild 2 von 2
    • Use a plastic opening tool to gently peel up the upper speaker grille.

  8. HTC One M8 Battery Replacement: Schritt 8, Bild 1 von 1
    • Remove the two silver 3 mm Phillips #00 screws from the top.

    • Remove the four black 4 mm T5 Torx screws from the bottom.

  9. HTC One M8 Battery Replacement: Schritt 9, Bild 1 von 3 HTC One M8 Battery Replacement: Schritt 9, Bild 2 von 3 HTC One M8 Battery Replacement: Schritt 9, Bild 3 von 3
    • Work your way around the perimeter of the phone with a spudger and plastic opening picks to free the clips that secure the rear case to the display assembly.

    • A metal spudger is pictured, but it is best to use a nylon spudger to prevent marring the device.

    • Be careful not to lose the power button: it sits loosely in the top of the lower chassis.

    • Significant force may be required to pry the casing apart.

  10. HTC One M8 Battery Replacement, Motherboard: Schritt 10, Bild 1 von 2 HTC One M8 Battery Replacement, Motherboard: Schritt 10, Bild 2 von 2
    • Remove the two silver 2 mm Phillips #00 screws securing the battery connector to the motherboard.

    • Use a plastic opening tool to gently pry up the battery connector.

  11. HTC One M8 Battery Replacement: Schritt 11, Bild 1 von 3 HTC One M8 Battery Replacement: Schritt 11, Bild 2 von 3 HTC One M8 Battery Replacement: Schritt 11, Bild 3 von 3
    • Use a spudger to disconnect the two (four) antenna cables.

    • Use the tip of a spudger to disconnect the seven ZIF connectors.

    • Use a pair of tweezers to gently pull the seven ribbon cables free of the connectors.

  12. HTC One M8 Battery Replacement: Schritt 12, Bild 1 von 1
    • Remove three silver 3mm screws using T5 screwdriver.

  13. HTC One M8 Battery Replacement: Schritt 13, Bild 1 von 3 HTC One M8 Battery Replacement: Schritt 13, Bild 2 von 3 HTC One M8 Battery Replacement: Schritt 13, Bild 3 von 3
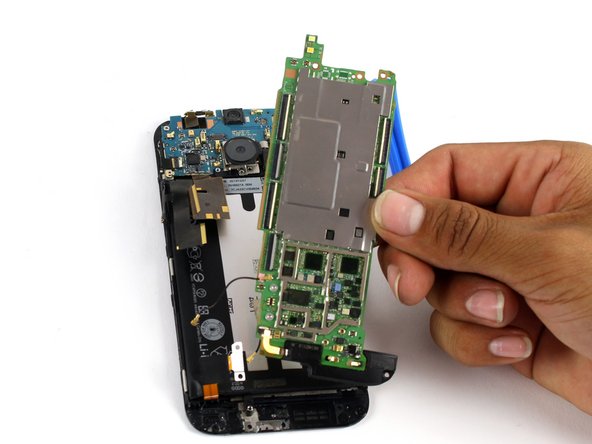
    • Use an iOpener or a heat gun to loosen up the adhesive securing the motherboard to the display assembly.

    • Use a plastic opening tool to gently pry the motherboard free of the display assembly.

    • At this point, the bottom speaker is still attached to the motherboard. If you are only replacing the motherboard, refer to the bottom speaker guide to swap your existing speaker to the new motherboard.

  14. HTC One M8 Battery Replacement, Battery: Schritt 14, Bild 1 von 3 HTC One M8 Battery Replacement, Battery: Schritt 14, Bild 2 von 3 HTC One M8 Battery Replacement, Battery: Schritt 14, Bild 3 von 3
    • Gently bend the various ribbon cables out of the way of the battery.

    • Use an iOpener or heat gun to loosen up the adhesive securing the battery to the display assembly.

    • Use a plastic opening tool to gently pry up the battery from the display assembly.

Abschluss

To reassemble your device, follow these instructions in reverse order.

125 weitere Nutzer:innen haben diese Anleitung absolviert.

Team

Cal Poly, Team 5-9, Maness Spring 2015 Mitglied von Cal Poly, Team 5-9, Maness Spring 2015

CPSU-MANESS-S15S5G9

4 Mitglieder

18 Anleitungen geschrieben

33 Kommentare

thanks for the instructions. i dropped my m8 and the power button wasnt responding at all and volume down wasnt either . i dissassembled the phone ( maybe i shouldnt have used my swiss army blade, left dents in plastic) using this guide..and pushed all the connectors into firmly and it worked again . thanks a bunch

drocheit - Antwort

Do we need to replace the adhesive when replacing the battery?

iarinaga - Antwort

I did not replace the adhesive: there's enough left to keep everything secure

Karl Horton -

zoccola zoccola

giovanni antise - Antwort

Hi, if there is a lot of tape is it necessary to replace it with new tape and copper shielding, and where can you get it please ?

Toby Murcott - Antwort

Kommentar hinzufügen

Seitenaufrufe:

Letzte 24 Stunden: 7

Letzte 7 Tage: 33

Letzte 30 Tage: 135

Insgesamt: 153,924