Einleitung
Eine intensive Nutzung kann zu einem schwachen oder defekten Akku des HTC Vive Controllers führen, was Strom- oder Funktionsprobleme verursachen kann. Der Akku ist unerlässlich, damit die Fernbedienung eingeschaltet werden und funktionieren kann. Der Akku darf beim Ausbau auf keinen Fall beschädigt werden. In dieser Anleitung wird der Austausch des Akkus gezeigt.
Was du brauchst
-
-
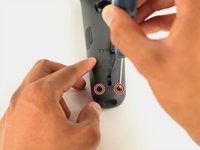
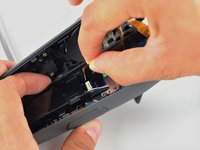
Drehe den Vive Controller so, dass der untere Ring nach oben zeigt.
-
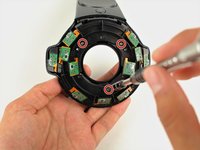
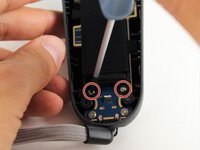
Entferne die drei schwarzen 21 mm T5 Torx Schrauben am unteren Ring.
-
-
-
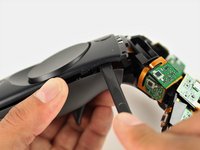
Benutze einen Nylonspudger, um die Abdeckungen des unteren und des oberen Rings an allen Kanten voneinander zu lösen.
-
Entferne nur die Abdeckung des oberen Rings, indem du sie mit der Hand nach oben ziehst.
My top saucer was REALLY stubborn. Don’t force it with your hand, use the spudger to separate it at the seam. Try not to poke your spudger in too deep, there are internals just inside the seam.
The second time around, I learned why it was so stubborn. The picture suggests that you should start at the base of the saucer and work your way around, but that’s backwards.
Start separating with your spudger at the distal side of the saucer and work your way toward the handle. Then for the last part, pull the piece up and away, like peeling a banana. See the second picture for the bottom half of the saucer, below. Do the same on the top.
-
-
-
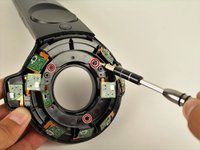
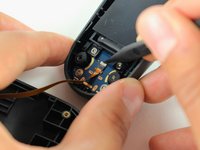
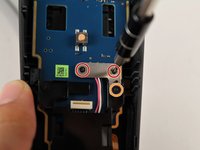
Entferne die drei silbernen 12,8 mm #00 Kreuzschlitzschrauben vom freiliegenden oberen Sensorpanel.
It’s Phillips 0, not 00.
You do not need to remove these screws to remove the bottom saucer. They provide stability to the two halves of the donut.
I had the same experience. Putting the screws back in made the bottom shell easier to remove.
I concur, you don’t need to remove these screws to take the bottom shell off.
I found mine had ph#000 screws size, not ph#00.
please do not remove the Phillips-head screws it is not necessary to remove them.
-
-
-
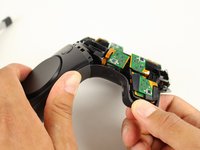
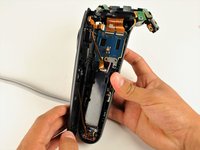
Ziehe die Abdeckung des unteren Rings vorsichtig mit der Hand ab.
From what I can tell, there are two clicks on each side? one is quite easy, then the other one seems to require considerable force pushing down and on the side, I had to do it one side at a time and found two YouTube videos performing this step to use as reference. I have the vive pro wands and not the originals, so this may explain the difference. This felt very wrong to me.
-
-
-
Entferne die beiden schwarzen 5,2 mm T5 Torx Schrauben auf dem grauen Rückgehäuse.
-
-
-
Drehe den Vive Controller so, dass der freiliegende untere Sensorring nach oben zeigt.
-
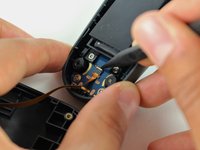
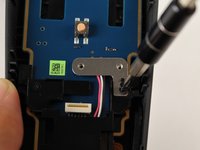
Entferne die drei schwarzen 5,2 mm T5 Torx Schrauben.
Leave the middle screw where it is (the one being unscrewed in the picture). That screw holds the two halves of the photodiode assembly together, not the case.
five screws… two at bottom
I concur with trevosklar, don’t need to remove center screw to remove front panel (pad cover).
-
-
-
-
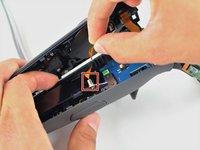
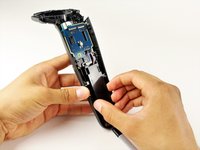
Löse das Frontpanel mit einem Nylonspudger ab, indem du mit dem Spudger um die Kanten des Griffs fährst.
-
Klappe die rechte Seite des Panels vorsichtig nach links.
-
-
-
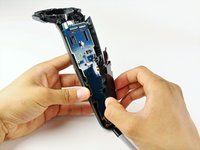
Trenne das obere Flachbandkabel sorgfältig ab, indem du es mit zwei Fingern nach oben weg vom Motherboard ziehst.
You do not have to remove the ribbon cables from the plugs…you can carefully work the battery holder around them and remove it…being very gentle. And the black part of the handle will stay attached to the cables and be in the way. But removing the cables does make it easier to access the area for the battery, just not completely necessary.
-
-
-
Trenne das mittlere Flachbandkabel sorgfältig ab, indem du es mit zwei Fingern nach oben weg vom Motherboard ziehst.
-
-
-
Hebe die weiße Lasche mithilfe eines Nylonspudgers um 90° an.
-
Trenne das untere Flachbandkabel ab, indem du es vorsichtig mit beiden Fingern nach unten ziehst.
Hallo what is the name of this conector because i Broker it
Yeah I did as instructed only to realize after that my gen 1 vive controller does not do that, and i desoldered the power button ribbon. That cable, does NOT detach on my model. destroyed.
-
-
-
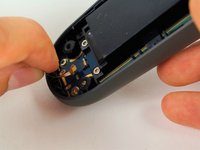
Entferne die beiden schwarzen 2,8 mm #00 Kreuzschlitzschrauben von der silbernen Platte.
-
Entferne die schwarze 5,8 mm #00 Kreuzschlitzschraube in der unteren rechten Ecke der silbernen Platte.
I don't have this metal piece in my first gen vive wand for some reason. Instead, there is just a piece of kapton tape covering the connector. It does not seem there are even screw holes for it.
You do not need to remove the top two screws circled in red, just the four around the battery case (as shown in Step 13 and 14). Skip Step 12 which involves removing the plate.
-
-
-
Entferne die silberne Platte mit den Fingern.
There is no plate on mine, only tape covering it.
Same with mine, also purchased 2018. It seems the silver plate part can be skipped for later models.
-
-
-
Entferne die schwarze 5,8 mm #00 Kreuzschlitzschraube oben links im Akkurahmen.
-
-
-
Entferne die beiden silbernen 4,2 mm T5 Torx Schrauben unten im Akkurahmen.
On my controller these were Philips 000 5.8mm screws, the same as in the previous step.
Second the above with a slight correction. Phillips 00.
-
-
-
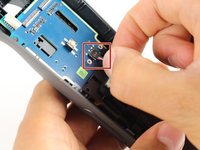
Trenne das dreipolige Kabel ab, indem du es mit den Fingern fasst und nach oben abziehst.
As Rob said, don't pull it! The connector comes out vertically, not horizontally. The ridges along the side prevent the connector from sliding out horizontally. To remove it, insert a small screwdriver under the cables and gently push it to wedge the connector out. Connecting it is easier, just press it down over the top to snap it in place.
-
-
-
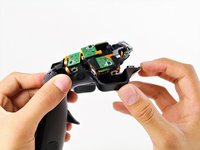
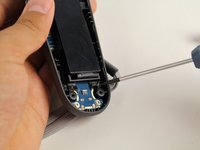
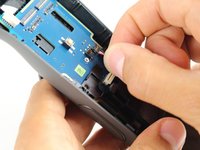
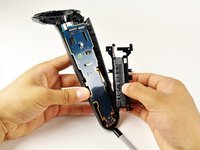
Hebe den Akkurahmen ab, um den Akku aus dem Vive Controller zu entfernen.
Suddenly, here the electronics of the saucer are gone, but there’s no previous step mentioning its removal. This is kind of important because loosening the ribbon cables attaching it to the mainboard is a bit finicky.
-


Um dein Gerät wieder zusammenzubauen, folge den Schritten dieser Anleitung in umgekehrter Reihenfolge.
Um dein Gerät wieder zusammenzubauen, folge den Schritten dieser Anleitung in umgekehrter Reihenfolge.
Rückgängig: Ich habe diese Anleitung nicht absolviert.
33 weitere Personen haben diese Anleitung absolviert.
Besonderer Dank geht an diese Übersetzer:innen:
100%


Diese Übersetzer:innen helfen uns, die Welt zu reparieren! Wie kann ich mithelfen?
Hier starten ›
Team

Cal Poly, Team S15-G5, Livingston Fall 2017 Mitglied von Cal Poly, Team S15-G5, Livingston Fall 2017
CPSU-LIVINGSTON-F17S15G5
4 Mitglieder
51 Anleitungen geschrieben
14 Kommentare
This helped me ALOT. i had a controller stop charging or powering on. Decided to use this guide to pull just pull power and re seed the connection for the battery. The Battery connection IS NOT CLIPPED IN. TAPE holds down the connection to the terminals. So it can easy come loose over jolts and shocks or normal use
With all the comments and steps, I easily took apart and rebuilt my controller. Thank you!!
Also, I used this cheap repair kit they sell at walmart if you dont have the tools and don't want to order them online.
My advice is to keep the connector on step 9 together and taped. I was trying to ease it out and the whole unit came right off… the connection and everything…My second controller I fixed in this way works 100%. Now I have to wait for my new controller from HTC.
Thanks! I had the vive when it was first released. my controller doesn’t have the silver brace over the battery connector only tape. It must have been revised. Re-seated the battery connector and it powered up
Mine also did not have the sliver plate over the battery connector but it did have the seats for the screws so maybe the plate was eliminated. I broke one plastic clip learning the process in step 4 but there are enough screws that it won’t matter. I was able to R&R the battery without disconnecting the ribbon cables in steps 8, 9 & 10 which would have been somewhat risky so I think it was safer to leave them connected. Thanks to Guido for the part numbers. I bought them from mobile-part.com but the ship time was over a month to the US thanks to covid. I should have checked eBay. Many thanks to all posters of this article and comments.
Update: Just wanted to report that the batteries I received from mobile-part.com work well and both controllers now show all 4 green lights again when fully charged. My controllers were purchased in Dec. 2016.
Intructions are excellent. One trick that I would add to make them complete is that when you buy new batteries they typically ship without the tray, so you will have to reuse the one that was removed from the controller. The battery is glued to the tray however and it also lacks battery removal taps. Prying or bending the battery is not recommended, as this could damage the battery and cause a runaway thermal event. The solution is simple and super low tech. Get a 12 inch long length of thread, ideally dental floss, and carefully and slowly pull the loop across the the glue strip. It takes less than 1 minute and, without needing a heat gun to loosen the glue, you will be able to remove the battery. Don’t worry about replacing the glue strip as the battery carrier holds it firmly in place without it.
Thanks so much for this guide. This was exactly what I needed.
Great guide. No faults at all. Well done. All works.
Where can I buy new t5 21 mm screws? Mine are getting stripped out!
jeremyvanwoerden - Antwort
Where can you get replacement batteries?
Mike Justice - Antwort
The middle bottom screw may have some form of warranty sticker on it if you have a Vive Pro wand (which is purple). Mine had this. Easy enough to remove and get on with it.
sodiboo - Antwort