Einleitung
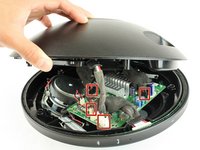
Wenn du ins Innere deines Lautsprechers gelangen willst, musst du erst die Frontabdeckung abnehmen. Diese Anleitung zeigt dir, wie das geht.
Was du brauchst
-
-
Setze ein Plastiköffnungswerkzeug in die Vertiefung an der Vorderseite des Gerätes ein und heble das Lautsprechergitter ab.
-
-
-
Entferne fünf 14,4 mm Torx T10 Schrauben.
There are NO torxscrews. You have to pull out the rubber grille grips that are inside the screw holes FIRST, then use a regular sized Phillips head screwdriver to remove the cover. No Torxscrewdiver needed. I found this out after I had already purchased one from you guys.
Mi bocina no tiene los 5 tornillos a la vista,tiene las cavidades ciegas, como lo abro???
-
-
-
-
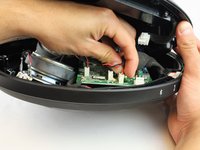
Löse die vier Verbindungskabel von Virder- und Rückseite.
-
Drücke die Klinke am Stecker ein und ziehe ihn ab.
-
Wiederhole für die anderen drei Stecker.
-


Um dein Gerät wieder zusammenbauen folge den Schritten in umgekehrter Reihenfolge.
Um dein Gerät wieder zusammenbauen folge den Schritten in umgekehrter Reihenfolge.
Rückgängig: Ich habe diese Anleitung nicht absolviert.
2 weitere Personen haben diese Anleitung absolviert.
Besonderer Dank geht an diese Übersetzer:innen:
100%
VauWeh hilft uns, die Welt in Ordnung zu bringen! Wie kann ich mithelfen?
Hier starten ›
Team

USF Tampa, Team 16-5, Blackwell Spring 2017 Mitglied von USF Tampa, Team 16-5, Blackwell Spring 2017
USFT-BLACKWELL-S17S16G5
3 Mitglieder
24 Anleitungen geschrieben
Ein Kommentar
Hi, I have the ONYX STUDIO with the silver ring that serves as the stand and the handle at the same time. After removing the front grill, I find the same five holes as it is shown on your pics but there are no screws. I can just see a bottom made of plastic. Do you have experience with that? Is that just some cover I can get thru using a screwdriver and I find the screws beneath?
I want to look inside as I am facing the problem with not working battery. As soon as I unplug the power source, it stops working.
Thank you for your comments.
Where can I find a new front panel for my speaker
consomme69 - Antwort
If I take this off can I put it back on
Burger King - Antwort