Zum Hauptinhalt wechseln

Honda Rear Tine Tiller FRC800K1A Rotary Tine Oil Seals Replacement

Was du brauchst

  1. Honda Rear Tine Tiller FRC800K1A Rotary Tine Oil Seals Replacement, Disconnect the spark plug wire: Schritt 1, Bild 1 von 2 Honda Rear Tine Tiller FRC800K1A Rotary Tine Oil Seals Replacement, Disconnect the spark plug wire: Schritt 1, Bild 2 von 2
    • Before you begin the repair, disconnect the spark plug wire.

    • Firmly grip the base of the connector and pull it away from the spark plug to disconnect it.

  2. Honda Rear Tine Tiller FRC800K1A Rotary Tine Oil Seals Replacement, Turn off the fuel valve: Schritt 2, Bild 1 von 1
    • Flip the fuel valve switch to the off position.

  3. Honda Rear Tine Tiller FRC800K1A Rotary Tine Oil Seals Replacement, Remove the side tine guards: Schritt 3, Bild 1 von 2 Honda Rear Tine Tiller FRC800K1A Rotary Tine Oil Seals Replacement, Remove the side tine guards: Schritt 3, Bild 2 von 2
    • Use a 12 mm socket and wrench to remove the six sets of side guard bolts and nuts, three on each side.

  4. Honda Rear Tine Tiller FRC800K1A Rotary Tine Oil Seals Replacement: Schritt 4, Bild 1 von 2 Honda Rear Tine Tiller FRC800K1A Rotary Tine Oil Seals Replacement: Schritt 4, Bild 2 von 2
    • Slide the side guard off of the curved main guard to remove.

    • Repeat the same process on the opposite side.

  5. Honda Rear Tine Tiller FRC800K1A Rotary Tine Oil Seals Replacement, Remove the rotary tine: Schritt 5, Bild 1 von 1
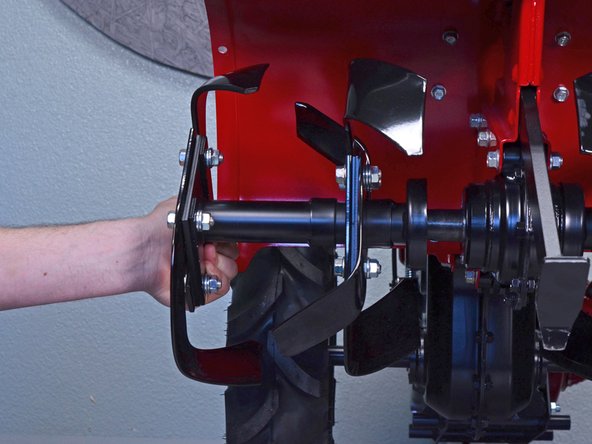
    • Use a 14 mm socket to remove the two rotary tine retaining bolts.

    • Repeat the same process on the opposite rotary tine.

  6. Honda Rear Tine Tiller FRC800K1A Rotary Tine Oil Seals Replacement: Schritt 6, Bild 1 von 3 Honda Rear Tine Tiller FRC800K1A Rotary Tine Oil Seals Replacement: Schritt 6, Bild 2 von 3 Honda Rear Tine Tiller FRC800K1A Rotary Tine Oil Seals Replacement: Schritt 6, Bild 3 von 3
    • Slide the rotary tine off its axle to remove it.

    • Repeat the same process on the opposite rotary tine.

  7. Honda Rear Tine Tiller FRC800K1A Rotary Tine Oil Seals Replacement, Remove the oil seals: Schritt 7, Bild 1 von 2 Honda Rear Tine Tiller FRC800K1A Rotary Tine Oil Seals Replacement, Remove the oil seals: Schritt 7, Bild 2 von 2
    • Wedge a large flathead screwdriver underneath the metal lip on the oil seal.

    • Firmly pry the seal away from the transmission.

  8. Honda Rear Tine Tiller FRC800K1A Rotary Tine Oil Seals Replacement: Schritt 8, Bild 1 von 2 Honda Rear Tine Tiller FRC800K1A Rotary Tine Oil Seals Replacement: Schritt 8, Bild 2 von 2
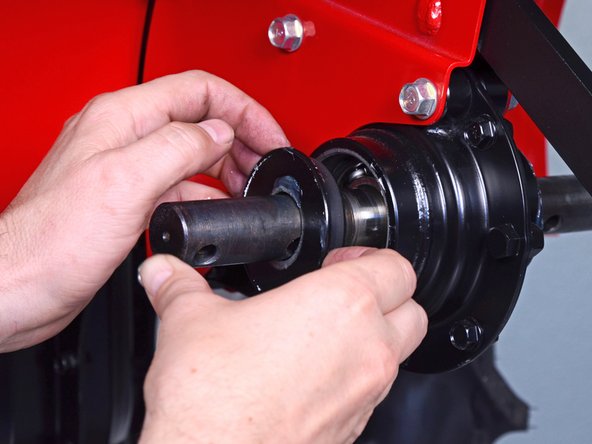
    • With enough room to grab the oil seal, pull it out of its housing.

    • Remove the oil seal.

    • Repeat the same process on the opposite rotary tine.

Abschluss

To reassemble your device, follow these instructions in reverse order.

Refill the transmission with 5.3 quarts of SAE 10W-30 oil.

2 weitere Nutzer:innen haben diese Anleitung absolviert.

Carsten Frauenheim

Mitglied seit: 03/10/20

114.572 Reputation

339 Anleitungen geschrieben

Team

iFixit Mitglied von iFixit

Staff

136 Mitglieder

17.298 Anleitungen geschrieben

0 Kommentare

Kommentar hinzufügen

Seitenaufrufe:

Letzte 24 Stunden: 1

Letzte 7 Tage: 10

Letzte 30 Tage: 53

Insgesamt: 1,579