Einleitung
This guide will show you alternative solder points to fix your HTC vive controller.
Was du brauchst
-
-
This is where you are at now?
-
We cant solder the ribbon back on, but we will hard wire that switch back to the board.
-
-
-
-
Carefully remove your main board from the controller. Its not necessary to disconnect the two large ribbon that goes to the array of sensors. If you do be very careful.
-
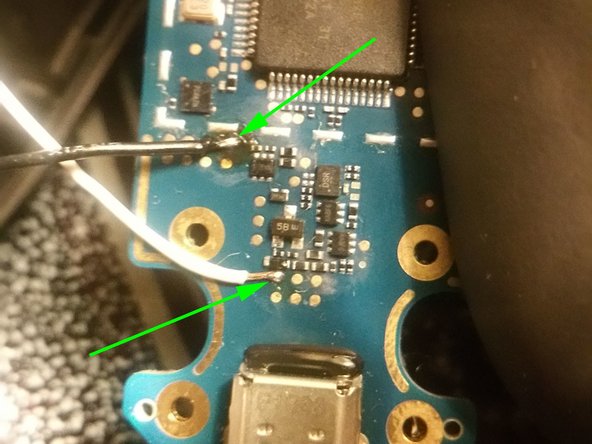
Locate the 6 soldering pads at the bottom of the controller near the USB port. Solder a wire to the first pad top left.
-
Locate the 8 solder pads near the bottom left of the main board. Solder a wire to the top right pad.
-
-
-
Solder the two wires to the right side of the power button as displayed in the picture. You may cut the ribbon, as you will no longer need that part.
-
This is your new functional power button. It will not display a green LED anymore but it will work as normal otherwise.
-
You may now put back your fixed controller together.
-


Reassemble your device with your new working button.
Rückgängig: Ich habe diese Anleitung nicht absolviert.
Eine weitere Person hat diese Anleitung absolviert.
5 Kommentare zur Anleitung
This is a cool little fix! Thanks for the guide! Although I couldn’t help but notice the cables in the two pictures you have are different colors, so I’m guessing they came from different guides. Which cable goes to the top right of the power button and which one goes to the bottom right? Additionally, is there a third cable we can wire to restore the LED functionality?
Hi Monkeh,
The wires are different color because the first set of wires I originally used I ended up cutting them too short.. when I took the second shots I had used different wires. There is no polarity on the switch, wires can go either way.
The LEDs is RGBW so it has 5 pins.. since this is a surface mount LED there isn’t much to solder to. So it would have to be replaced with one that you can solder to and back the main board . It is a 100% possible to get it working again, but I have no info about doing it for now. I’m not aware of any 3rd party fix.
I was so happy I could get my Vive Controller back to life at that point, I didn’t bother to get the LED working. This is why I left it out of the guide.
Hi I have the same issue my ribbon connection snapped somehow bashing the controller. Do you know of an replacement connection to save doing this crude fix. Does this allow the system button to still work? Also how did you know which alternative parts to solder out of curiosity do you have a schematic?
Hi Zach,
I don’t know of a real replacement for this.. This fix definitively brings the remote back to life, as there is no way to power on the remote without this button. I have found the alternate solder points by tracing the path from the switch to the board. The button works as normal after you wire it this way, except for the LEDs, those wont work anymore so the button wont light up.
I have been using my fixed controller for about a year now and I havent had any problem so far.
One thing, the battery connector, I would add a little dab of glue on it before you put back the remote together. That came off one day while playing, the remote went dead and wouldnt charge. It was the battery connector that came loose.
Sweet thank you for your reply. Imma try this saves me buying a donor vive controller.
Zach -