Einleitung
Along with the trackpad, the keyboard is one of the primary input devices for a laptop. If broken, a standalone USB keyboard can be a temporary workaround until the integrated keyboard is replaced.
Was du brauchst
-
-
Insert a plastic opening tool in the seam between the keyboard and laptop body.
-
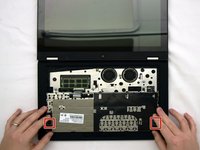
Carefully run the tool around the top and sides of the keyboard to pop out the 9 tabs holding in the keyboard.
-
-
-
-
Lift the keyboard up, then pivot it towards you to lay it facedown on the trackpad and palm rests.
My keyboard was also stuck down with double sided tape near the sides 1cm down from the top edge. These didn't want to let go easily, be careful pulling them away.
Also, on my keyboard there are metal latches under the keyboard. To remove the keyboard it needs to be slid towards the screen a few mm before you can lift it. When reassembling do the reverse, engaging the latches, or the keyboard will not stay down properly.
-
-
-
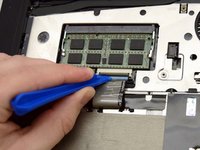
Locate the ribbon cable connecting the keyboard to the motherboard.
-
Use the tip of the opening tool to lift the black flap on the connector.
-
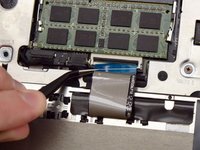
With the twezers, gently lift the ribbon cable out of the connector.
-
Ensure the cutouts on the end of the cable match the tabs on the connector.
The cable is not lifted . It should be pulled parallel to the line of the memory chips. The Lenovo service guide makes this clear.
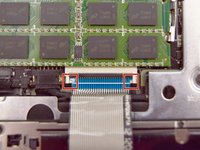
Getting the cable back i was tricky. in the end I almost had the keyboard vertical to east the bend on the connector as I pushed it back in gently - then it finally went in. When you push the retaining flap back down the white line on the ribbon cable should just be showing - then you have it in properly.
also you may think you’ve not got the cable in enough but actually when you flip the tab down if you can see about a.1.5mm of cable above the white line you should be good. just turn on the computer to check keyboard works before screwing back together
-


To reassemble your device, follow these instructions in reverse order.
To reassemble your device, follow these instructions in reverse order.
Rückgängig: Ich habe diese Anleitung nicht absolviert.
4 weitere Personen haben diese Anleitung absolviert.
Team

Western Carolina University, Team 1-1, Virtue Spring 2017 Mitglied von Western Carolina University, Team 1-1, Virtue Spring 2017
WCU-VIRTUE-S17S1G1
4 Mitglieder
6 Anleitungen geschrieben
2 Kommentare
Unfortunately my ribbon cable connector lock snapped and I'm having trouble ensuring all connector ports are established. Tried using electrical tape but doesn't seem to work. Be grateful for any advice