Was du brauchst
-
-
-
Akkufach mit 8 Schrauben lösen. Akku entfernen. Loch bohren. Löcher wegen der Luftdichtigkeit mit Heißkleber verschließen.
-
-
-
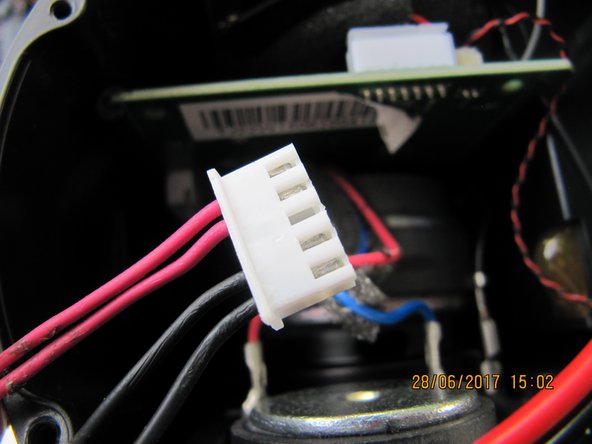
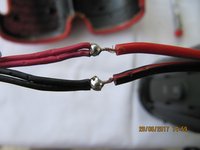
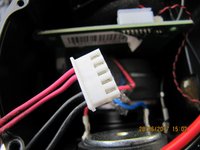
Anschlüsser + und - verlöten. Zur Stromversogung einen DC Hohlbuchse 5.5 x 2.1 verwenden. Kabelenden Isolieren.
-
-
-
Akku 8,4 Volt. 13200mAh 8,4V Akku Batterie-Pack Ladegeraet für Fahrradlampe-XML-T6
-
-
-
Solarstorm 2S2P 18650 Battery Case.
-
4xPanasonic NCR18650B 3,7V 3400mAh=14400 mAh
-
+ 5V USB ON/OFF Button
-


Arbeite die Schritte in umgekehrter Reihenfolge ab, um dein Gerät wieder zusammenzubauen.
Arbeite die Schritte in umgekehrter Reihenfolge ab, um dein Gerät wieder zusammenzubauen.
Rückgängig: Ich habe diese Anleitung nicht absolviert.
3 weitere Personen haben diese Anleitung absolviert.
6 Kommentare
hi
step 2: unscrew the screws …. thats th point, where are the screws. the body looks like glued.
Hi.
Don’t ask me, because I have this guide only translated not created. Try to contact the author on de.ifixit.com. I have translated it so, that I tried to don’t change the original text.
Martin
I didn’t get it quite clear: is there a original battery replacement or an improvised one? I am interested in replacing mine but I didn’t find the battery.
Hi.
See the comment higher.
Martin Kubica
WTF?!? Don’t do this. Buy a replacement battery online, and swap it out. Don’t drill holes, add glue, and try to cram in some battery that isn’t built for it!
Yeah, what the hell is it. Just use that youtube video of that company that sells batteries (it should come up as one of the first on youtube). Extra info:
1. Use a proper fit phillips screwdriver; apparently the screws are very tightly put in and you could damage the screwheads.
2. There are apparently nine and not 8 screws there were he mentions it; one should be under some tape.
3. Apparently that outer cover is glued pretty hard on the plastic. Be aware of that and use the best tool you can find that is plastic and maybe more than one, so you will avoid damaging anything.
4. Apparently the original battery has some type of glue put on the connector, which makes it harder to get the connector out. Try using plastic and not metal there as well, as you might damage the board it's connected to.
Note: I said apparently as this is what I read in comments. You might find it's different when you do it but keep these things I mind so you are prepared. And again: this guide is indeed bullshit.