Zum Hauptinhalt wechseln

Jabra Freeway Battery Replacement

Was du brauchst

  1. Jabra Freeway Battery Replacement, Front Panel: Schritt 1, Bild 1 von 3 Jabra Freeway Battery Replacement, Front Panel: Schritt 1, Bild 2 von 3 Jabra Freeway Battery Replacement, Front Panel: Schritt 1, Bild 3 von 3
    • Turn off the device before proceeding. Failure to do so may result in device damage or injury to oneself.

    • Remove the rubber pads from the bottom of the device using the spudger.

  2. Jabra Freeway Battery Replacement: Schritt 2, Bild 1 von 3 Jabra Freeway Battery Replacement: Schritt 2, Bild 2 von 3 Jabra Freeway Battery Replacement: Schritt 2, Bild 3 von 3
    • Remove the eight 6mm T9 screws.

    • Two of these screws are underneath the foam padding. This padding is glued on and will be destroyed in this process. Poking through the foam minimizes the damage to the device.

  3. Jabra Freeway Battery Replacement: Schritt 3, Bild 1 von 3 Jabra Freeway Battery Replacement: Schritt 3, Bild 2 von 3 Jabra Freeway Battery Replacement: Schritt 3, Bild 3 von 3
    • Gently lift the front panel off of the device and carefully rest it to the side.

  4. Jabra Freeway Battery Replacement, Battery: Schritt 4, Bild 1 von 2 Jabra Freeway Battery Replacement, Battery: Schritt 4, Bild 2 von 2
    In diesem Schritt verwendetes Werkzeug:
    Tweezers
    $4.99
    Kaufen
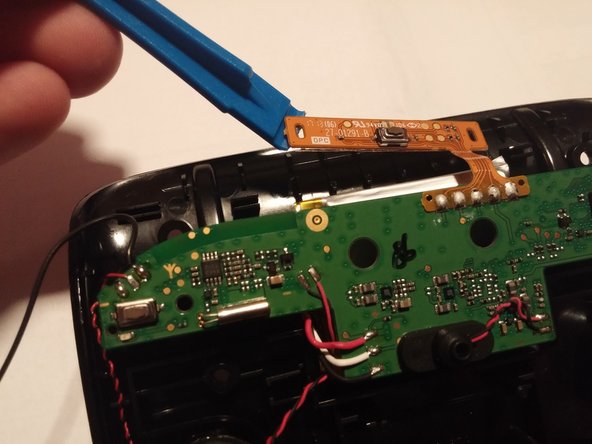
    • Remove the rubber gasket using tweezers.

  5. Jabra Freeway Battery Replacement: Schritt 5, Bild 1 von 2 Jabra Freeway Battery Replacement: Schritt 5, Bild 2 von 2
    • Remove the five 6mm T6 screws connecting the circuit board to the rear panel.

  6. Jabra Freeway Battery Replacement: Schritt 6, Bild 1 von 3 Jabra Freeway Battery Replacement: Schritt 6, Bild 2 von 3 Jabra Freeway Battery Replacement: Schritt 6, Bild 3 von 3
    • Remove the microphone from microphone slot.

  7. Jabra Freeway Battery Replacement: Schritt 7, Bild 1 von 3 Jabra Freeway Battery Replacement: Schritt 7, Bild 2 von 3 Jabra Freeway Battery Replacement: Schritt 7, Bild 3 von 3
    • Carefully use the plastic opening tool to lift the circuit board up.

  8. Jabra Freeway Battery Replacement: Schritt 8, Bild 1 von 1
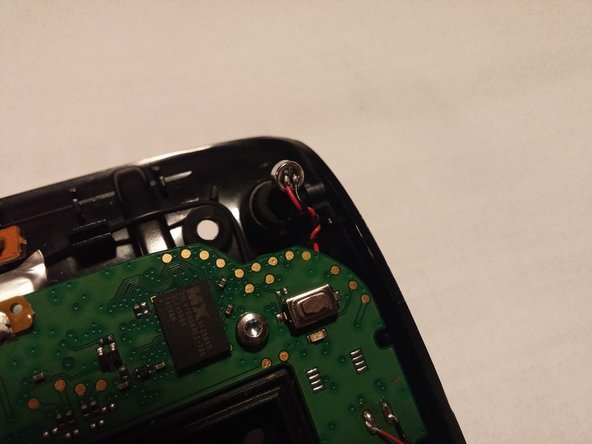
    • Desolder the three wires connecting the battery.

    • Please refer to the soldering technique guide for instructions on desoldering and soldering.

Abschluss

To reassemble your device, follow these instructions in reverse order.

6 weitere Nutzer:innen haben diese Anleitung absolviert.

Alec Wilson

Mitglied seit: 10/19/16

741 Reputation

5 Anleitungen geschrieben

Team

UMass Dartmouth, Team 4-8, Catania Fall 2016 Mitglied von UMass Dartmouth, Team 4-8, Catania Fall 2016

UMASSD-CATANIA-F16S4G8

2 Mitglieder

6 Anleitungen geschrieben

11 Kommentare

Hey Alec,

Why does your guide to replacing the battery in the Jabra Freeway say "no parts required"?

This would be much more useful if you provide a part number and source(s) for the replacement battery. And then maybe show removing the old battery and installing the new one.

Glenn C - Antwort

Hi,

Does anyone knows a source for the compatible battery. Since Jabra Freeway battery has 3 wires, cannot find it online. I could find compatible batteries from China websites but they were with 2 wires.

Devesh Singh Senwal - Antwort

I am sourcing replacement batteries for the jabra freeway should be in the end of april

scuba - Antwort

any luck finding a replacement battery yet for this device???

chcastle - Antwort

I’m looking for the batteries, 3 of them, right now 2018 06.

DavidNS - Antwort

Kommentar hinzufügen

Seitenaufrufe:

Letzte 24 Stunden: 2

Letzte 7 Tage: 8

Letzte 30 Tage: 33

Insgesamt: 6,771