Einleitung
Dieses Gerät ist für eine lange Lebensdauer gebaut, aber ab und zu können doch mal ein zu elne Bauteile ausfallen. Mit ein paar Reparaturen kannst du das Gerät lange in Betrieb halten. Diese Anleitung hilft dir, deine KitchenAid besser zu verstehen.
Was du brauchst
-
-
Drehe die Kreuzschlitzschraube #2 heraus, welche das silberfarbene Zierband festhält.
-
Entferne das Zierband.
-
-
-
-
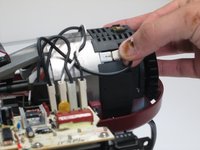
Finde den Geschwindigkeitsregler.
-
Entferne die beiden Kreuzschlitzschrauben #2, welche den Geschwindigkeitsregler befestigen.
-
-
-
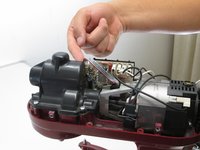
Löse die Kabel vom Antriebsmotor zum Regler.
-
-
-
Ziehe den Geschwindigkeitsregler heraus.
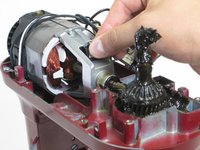
Somewhere between steps 4 and 7, you removed the planetary cover. This is just two more screws and must happen before the motor will lift out.
Oops, make that 4 more screws. Still, it's easy. Just a little gooey with the transmission grease, so mind you don't get any dirt or whatnot in there when it's open.
-


Um dein Gerät wieder zusammenzusetzen, folge den Schritten in umgekehrter Reihenfolge.
Um dein Gerät wieder zusammenzusetzen, folge den Schritten in umgekehrter Reihenfolge.
Rückgängig: Ich habe diese Anleitung nicht absolviert.
4 weitere Personen haben diese Anleitung absolviert.
Besonderer Dank geht an diese Übersetzer:innen:
100%
VauWeh hilft uns, die Welt in Ordnung zu bringen! Wie kann ich mithelfen?
Hier starten ›
Team

Cal Poly, Team 25-4, Maness Spring 2016 Mitglied von Cal Poly, Team 25-4, Maness Spring 2016
CPSU-MANESS-S16S25G4
4 Mitglieder
18 Anleitungen geschrieben
8 Kommentare
The instructions are to unplug the cords from the motor but the removed selector switch pictured shows the cords were removed from the selector switch. Is there a way to remove the cords from the selector switch without breaking them? donmilo@yahoo.com
The replacement part looks like a major part in the mixer and probably costs a bundle like most replacement parts… sometimes deems the replacement “not worthy” to repair!
It’s like a car that cost $25K but, all its parts if you buy them separately, it will cost you $150K !!!
The speed selector MSRP is $89.99 and can be found on places like eBay for $35-60. For only needing some simple tools and a little time, this fix saves you from the cost of buying a new one. These are designed to be repaired/refurbished.
The advice about kitchenaid600 switch was good. The form to get me able to say thanks was not.
I replaced the switchbox as the machine was having difficulty starting and switching speeds and finally would not turn on at all. Plugged it in after replacing and tested and it ran 12-15 seconds and I turned it off to install the grinder attachment and turned it on, nothing. Removed the grinder attachment and turned it on, nothing.
The head of my mixer fell off - there are 4 screws that replace it (some are missing so I can get some) but how do you put them in when the top is on? I'm confused.
Most likely there is NOTHING wrong with the speed control board. You have a dirty one. When you get to step 4, pivot the board out without disconnecting anything. Remove the 4 screws that attach the plastic cover to the board and CAREFULLY remove the plastic cover. Get a spray can of contact cleaner and spray the hell out of the slider slot and the black microswitch above it. Go to town on them, particularly the switch nub on the bottom of the microswitch. put the slider to full speed and the knob to full speed and reattach the plastic cover to the board. Check to see it slides freely and clicks like it should. Reassemble the mixer and enjoy its function. The reason these fail is crud gets in the slider and switch. Contact cleaner fixes them both for less than $20 a can!
Maybe start with unplugging it ?
Ryan F - Antwort