Einleitung
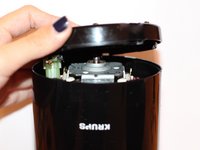
Um an die inneren Bauteile der Krups F203 zu gelangen, muss die Bodenplatte entfernt werden.
Was du brauchst
-
-
In jeder der vier rechteckigen Öffnungen in der Bodenplatte befindet sich ein E-förmiger Clip.
-
-
-
-
Zwänge einen Spudger zwischen die flache Seite des E-Clips und der Außenseite der Öffnung. Heble dann mit dem Spudger den Clip heraus.
Hello I need to remove the base as described here to repair th power cord in side. I got 2 of the clips cleared to lift off the base using the spudger, but just can’t get the other 2 released. Any ideas? Thanks
The red warning above is good as far as it goes, but should mention that not breaking the clips may be impossible. I was able to unclip 3 of the 4, but one snapped (the others were quite a struggle). Part of my problem was that this How-To’s photos show an F203 with all of its clips broken off, which makes for a misleading view of the disassembly, and shows that the author wasn’t able to separate the base successfully, either. The clips actually project from the bottom edge of the body tube about 1/4 inch (0.5 cm) into the base cap. I would recommend anyone attempting this iFixit have a roll of duct tape on hand to secure the base after the repairs are made, at least until you can buy a replacement.
Krups really don’t want you getting into their budget grinder; they’d rather you throw it away and buy a new one, of course.
Thanks to the author, even if the instructions are not very clear.
If anyone got this open without breaking the clips, please post a photo of the two parts in the clip region so that the geometry is clear. I was confused by ‘e-clip’, which is not the right terminology and means something else entirely.’
I broke all of the clips. Even after realizing the clip ledge is integral to the *inner* wall of the base. I still could not get the clips to release without jeopardy to the the outside edge of the base’s slots. One has to be able to proceed with conviction and with the right “spudger”.
I’m going to reconnect the base with epoxy and clamps. I’ll buy a new one in 15 years when the power cord breaks/wears again…!
I managed to pry it off without breaking clips. 1. clamp the grinder top between thighs upside down. 2. apply pulling force to the bottom with finger nails (but not too hard to hurt yourself obviously). 3.spudger prying the clip multiple times. When a tiny gap appears jam a triangle prying tip into it. 4. Proceed prying every other clip while keep applying pulling force all the while with finger nail.
Of course with a big vise this is supposedly easier.
-
-
-
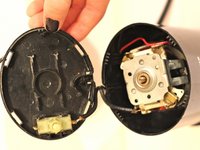
Entferne alle vier Clips, indem du jeden nacheinander ein Stück weit anhebst. Irgendwann sind alle Clips so weit heraus, dass du die Bodenplatte ablösen kannst.
Instead of taking the cover off, I heated the tip of a metal hanger and melted the small rectangular hole just larger enough to get a screwdriver in to give the screw a quick turn looser and then tighter again. It is now working again.
-


Um dein Gerät wieder zusammenzubauen, folge den Schritten in umgekehrter Reihenfolge.
Um dein Gerät wieder zusammenzubauen, folge den Schritten in umgekehrter Reihenfolge.
Rückgängig: Ich habe diese Anleitung nicht absolviert.
9 weitere Personen haben diese Anleitung absolviert.
Besonderer Dank geht an diese Übersetzer:innen:
100%
VauWeh hilft uns, die Welt in Ordnung zu bringen! Wie kann ich mithelfen?
Hier starten ›
Team

Baylor, Team 4-2, Williams Fall 2014 Mitglied von Baylor, Team 4-2, Williams Fall 2014
BU-WILLIAMS-F14S4G2
3 Mitglieder
10 Anleitungen geschrieben
11 Kommentare
Does anyone have a video tutorial explaining how the heck one removes the base?? I bought a spudger and it still doesn't help. It is awfully hard to loosen up.. I kept trying and trying but I stopped cause I'm concerned I might break the clips and the outside which the plastic is starting to stretch.. the clips are starting to lose their shape as well and worried I might break the spudger... Thanks
I am having the same experience as NeonAera posted. I could clear 2 of the 4 clips, but not the others and getting the same issue of distorting the outside wall of the base , if I continue to try and pry the clips with the spudger. Thanks
We had a jammed . I disassembled according to the guide, scraped out the rust I found, lubricated with WD40 and reassembled. Went from not moving to working great. I broke all 4 tabs (guess I lack patience…) but gorilla taped it back together and it's totally solid.
I’ve had the Krups coffee grinder for years, we use it daily so I thought it was worth attempting to repair it. I did not have the spudger tool, so I used a small Swiss army knife screwdriver tip to attempt loosening the E clips, no luck. I ended up breaking the clips to remove the base, then I was able to repair the damaged power cord. I reassembled the base, using black electrical tape to secure it. Barely noticeable! The comments were helpful, I felt better about breaking the e clips after reading that others were having a hard time with them. I think I’ll have a cup of coffee.
My coffee grinder was stuck. I pried off the base with the help of my wife, while using two slot screw drivers. We didn’t break any clips, but we certainly stressed and scored the sidewalls where I jammed the screwdriver to get some purchase on the base. Anyway, some oil and a twist on the driveshaft solved my problem.
I thought I would check-out this page to see it I was doing something wrong … apparently not. I am experienced with getting “E” clips to release, however, I think the clips might be jammed with coffee dust. I might try alcohol or WD-40 to clean the clips; if that doesn’t work, I’ll break the clips and then glue it back together … Goop would be reversible.
The clips were so difficult, I ended up taking the loss and using a small burr on a dremel to cut through the clips. After a half hour of moving, they weren't budging enough. Put black duct tape on it, and it honestly looks fine. We only pull it out once a week anyways, and it works now!
I wish Krups put as much effort in creating a reliable grinder as they did in designing the E clips that hold the unit together. It takes the destruction of the clips to get this thing open. Probably better use of time/money to buy another $18 grinder that will self destruct in 12 months.
I fixed it by melting the hole in the plastic at the bottom slightly larger so I could get a regular screwdriver in there. Just unscrewed and rescrewed - right as rain now…
ARE we supposed to see this ? ,your kidding me -TRY A BLOW UP VIEW :
rayd32 - Antwort