Einleitung
The WiFi module is the primary method for wireless network connectivity. If this module shows symptoms of malfunction, a USB-to-Ethernet cable adapter can be used to maintain network access until the module is replaced.
Was du brauchst
-
-
Insert a plastic opening tool in the seam between the keyboard and laptop body.
-
Carefully run the tool around the top and sides of the keyboard to pop out the 9 tabs holding in the keyboard.
-
-
-
Lift the keyboard up, then pivot it towards you to lay it facedown on the trackpad and palm rests.
My keyboard was also stuck down with double sided tape near the sides 1cm down from the top edge. These didn't want to let go easily, be careful pulling them away.
Also, on my keyboard there are metal latches under the keyboard. To remove the keyboard it needs to be slid towards the screen a few mm before you can lift it. When reassembling do the reverse, engaging the latches, or the keyboard will not stay down properly.
-
-
-
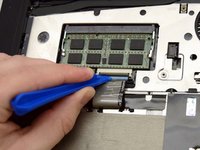
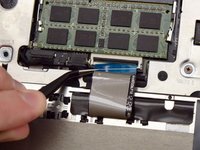
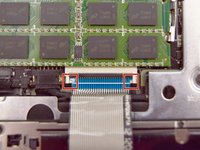
Locate the ribbon cable connecting the keyboard to the motherboard.
-
Use the tip of the opening tool to lift the black flap on the connector.
-
With the twezers, gently lift the ribbon cable out of the connector.
-
Ensure the cutouts on the end of the cable match the tabs on the connector.
The cable is not lifted . It should be pulled parallel to the line of the memory chips. The Lenovo service guide makes this clear.
Getting the cable back i was tricky. in the end I almost had the keyboard vertical to east the bend on the connector as I pushed it back in gently - then it finally went in. When you push the retaining flap back down the white line on the ribbon cable should just be showing - then you have it in properly.
also you may think you’ve not got the cable in enough but actually when you flip the tab down if you can see about a.1.5mm of cable above the white line you should be good. just turn on the computer to check keyboard works before screwing back together
-
-
-
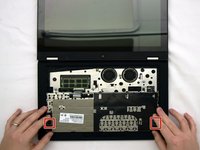
Locate and remove the screws holding the bezel to the laptop body:
-
Two 3 mm Phillips screws
-
Three 5.5 mm Phillips screws
I found my Nextek (+) 2.0 x 40mm fitted these well. PH000 wasn't bad but not quite the right fit
-
-
-
Flip the laptop over.
-
Locate and remove the screws holding the bezel to the bottom panel:
-
Ten 4.5 mm Phillips screws
These were not philips on my machine. A Torx T5 fitted well.
If you find it too tighten (especially for Torxes), press the body near the screw with thumb and index finger - it should help.
-
-
-
In diesem Schritt verwendetes Werkzeug:Tweezers$4.99
-
Flip the laptop back over.
-
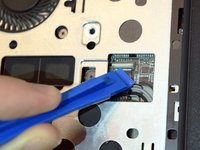
Locate the small trackpad ribbon cable and use the opening tool to lift the black flap on the connector.
-
With tweezers, gently pull the ribbon cable out of the connector.
Again pull the ribbon cable parallel to the circuit board not up away from it.
-
-
-
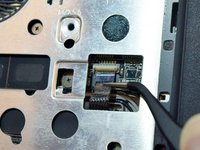
Locate the power board cable and disconnect it by pulling the cable head towards the front of the laptop.
I found it hard to get anything into the gap until I used a modelling knife set's pointer. I could ease this very gently into the gap which then created a narrow space i could use to ease the connector out. As staetd above take extreme care to use only light force so as not to damage the cable or socket. again the direction to ease it out is parallel to the circuit board.
Be VERY careful here. I accidentally pulled the socket off the board during this step. Now my laptop is toast. We're holding a memorial service for it later.
-
-
-
Lift the keyboard bezel off the laptop. The bezel is secured to the chassis by 10 plastic clips around the circumference that can be released with the plastic pry tool.
There are clips around the edge of the bezel so it does not just lift off. I used a thin plastic store card to go right around the edge to ease the bezel away. You could use your plastic opening tool from step 1, but I used store cards for that step too as I don't have a plastic opening tool.
I had to solve interesting problem when reassembling: there are two neodym magnets at both front corners. Those neodyms consists from two components: one larger is a part of the bezel and another smaller sits freely in their nests in the bottom plastic backs, but when you lift the bezel, you will find them clipped to their bigger brothers.
My problem was that the left smaller magnet wasn’t able to stay at the correct position - it tended to stay cca 3 mm further in direction of, touchpad so it wasn’t able to “sit to it’s nest” when reassembling the bezel and there stayed a gap between backs and the bezel near to the power button, where that left magnet is. After a few unpatient experiments I used a piece of double sided adhesive tape, which keeps the smaller magnet in it’s place and solved this strange problem perfectly.
-
-
-
Unplug the battery cable.
This proved anything but easy. The connector just wouldn't disengage. I had a good look atb the new battery and decided that the best place to push was with a small flatblade screwdriver from the gap suspiciously ;) deliberately provided in the battery in the direction of the WIFI board. It then came out fairly easily. It feels like Lenovo engineers may have a specific tool for this.
Thanks for your comment. It actually was the way it worked for me.
I used a flat head screwdriver, and pushed the middle square/rentengular piece out towards the wifi card. It came out easily then.
If you are removing the SSD drive then you dont necessarily need to remove the battery. I replaced my SSD at this step.
i didn’t bother with this step for SSD swap
Attention:
1) If your Yoga 13 is some of newer versions, then you can stop at previous step and swap the SSD, because the battery does not covering the SSD.
2) If you want to swap the SSD just to extend the storage, you don’t have to swap them - if you take a look at the following picture for step 11, you can see a place for second SSD at the upper right corner (near to the power connector). I added another 500 GB mSata SSD and it’s working with no problem (after you enter the boot menu via F2 during boot - save&exit makes new SSD visible).
I had both mSATA SSD slots outside the battery. I didn't have to remove the battery
-
-
-
Remove the screws holding the battery to the chassis:
-
Four 4 mm Philips screws
Best fit for these screws was a Philips PH000 screwdriver bit
BTW if you take a look at the upper right corner, you can see second SSD slot. So if you’re ok with fact that the original SSD stays where is it, you can just insert your new SSD card here and put everything back. It’s proven that the second slot works perfectly (for example, see here: https://youtu.be/At-Br20OAvg). It also neams that you don’t have to disconnect and remove the battery - actually it all ends on the step 9 (but the picture of that step is taken before the bezel is removed so I’m describing it here, where it’s clearly visible).
-
-
-
Gently lift the battery out of the laptop.
I took the opportunity to clean out the dusty fans with pressurised gas duster before putting it all back together.
-
-
In diesem Schritt verwendetes Werkzeug:Tweezers$4.99
-
Using the tweezers, unplug the gray and black antennae cables.
-
-
-
Using the tweezers, remove the ribbon cable connecting the WiFi module to the motherboard.
-
-
-
Using the tweezers, lift up on the retaining tab of the module retention bracket and slide the bracket to the left, then lift it free.
-


To reassemble your device, follow these instructions in reverse order.
To reassemble your device, follow these instructions in reverse order.
Rückgängig: Ich habe diese Anleitung nicht absolviert.
11 weitere Personen haben diese Anleitung absolviert.
Team

Western Carolina University, Team 1-1, Virtue Spring 2017 Mitglied von Western Carolina University, Team 1-1, Virtue Spring 2017
WCU-VIRTUE-S17S1G1
4 Mitglieder
6 Anleitungen geschrieben
4 Kommentare
I need to replace the wifi card in one of these laptops and I’d like to get a different brand. What is this form factor called?
I have the same issue. Couldn’t find anything on the internet. My BT is defective, because it sometimes disables my mouse. This computer was a beautiful and well build, with the great touchscreen, but wireless connections are total mistake from the early beginning. The integrated wifi likes not to find any network. Since 2019 I’m working with the usb WiFi module bought on aliexpress. It is far better than the installed, but sticks out the chassis and took one port.