Einleitung
This is a replacement guide for the CMOS battery for the Lenovo ThinkPad T430s.
The CMOS battery powers your laptop's BIOS firmware, which is what boots up your computer and configures data flow. You can tell if your CMOS battery has died if your laptop is slow, fails to boot up, if drivers disappear, and if your laptop's date and time are incorrect.
Before continuing with this guide, make sure you review the troubleshooting guide because sometimes things may become fixable without removing the CMOS battery.
Make sure to back up your data before replacing it so you don’t lose any data while you’re doing the replacement and if you do, you will have a copy of the data. Make sure to power off your laptop completely and disconnect from any external power source prior to beginning the process.
Was du brauchst
-
-
Flip your ThinkPad over so the back faces up.
-
With the Phillips #0 screwdriver, remove the seven 50 mm screws on the outer edge of the case.
-
Remove the two 70 mm screws in the upper corners of the case.
-
Remove the five 50 mm screws in the battery compartment.
-
-
-
In the RAM compartment, pry the black, white, and grey wires up from the Wi-Fi card with the pointy end of the spudger.
-
Remove the 30 mm screw holding down the Wi-Fi card with the Phillips #0 screwdriver.
-
Pull out the Wi-Fi card.
-
Remove the 60 mm and 30 mm screws in the RAM stick compartment.
-
-
-
Flip the ThinkPad right side up and open the lid.
-
Wedge the flat end of the spudger between the keyboard and the palm rest. Push the keyboard away from you until it pops out.
-
Lift the keyboard from the palm rest to expose the ribbon connecting the keyboard to the motherboard.
-
Pry the keyboard ribbon up from the motherboard with the flat end of the spudger.
-
Set the keyboard aside.
-
-
-
Remove the two 50 mm screws from the case covering the disk drive.
-
Thread the wires that come from the RAM compartment up through the hole in the motherboard. Unwind them from the computer case.
-
Wedge the flat end of the spudger in between the palm rest and the bottom case. Unsnap the edges of the palm rest and case until they disconnect.
-
Lift the palm rest up from the motherboard.
-
-
-
-
Pull the red, blue, and white wires in the left corner away from the motherboard.
-
Peel the snap securing the ribbon with the pointy end of the spudger.
-
Pull the ribbon back towards you.
-
-
-
Rotate the ThinkPad so the back side faces you.
-
With the Phillips #1 screwdriver, unscrew the two 70 mm screws from the corners.
-
Lift the screen and pull it out of the hinges. Set the screen down behind the rest of the ThinkPad.
-
-
-
With the pointy end of the spudger, lift the plastic snap holding down the SN4 LVDS cable. Pull the cable out of the clasp towards you.
-
Pry the SN4 LED cable out of where it connects to the motherboard.
-
Set the display aside.
-
-
-
With the pointy end of the spudger, lift the plastic snap securing the ribbon at the front of the ThinkPad.
-
Pull the ribbon out of the clasp towards you.
-
-
-
Unscrew the 90 mm screw, five 50 mm screws, and four 30 mm screws on the motherboard using a Phillips #0 screwdriver.
-
When you remove the screws, the small motherboard stick in the top right corner will pop out of the case. Pull it out.
-
Lift the motherboard out of the case.
-
-
-
Flip the motherboard over so the back faces up.
-
Loosen the four screws securing the heat sink to the motherboard. The silver metal rectangle on the front of the motherboard will fall off. Set it aside.
-
Lift the fan and heat sink away from the motherboard.
-
-
-
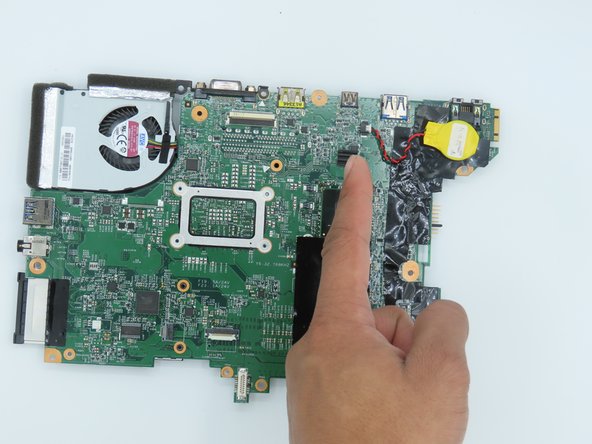
Flip the motherboard over and disconnect the CMOS battery from the motherboard by pulling the cable away from the connector.
-
-
-
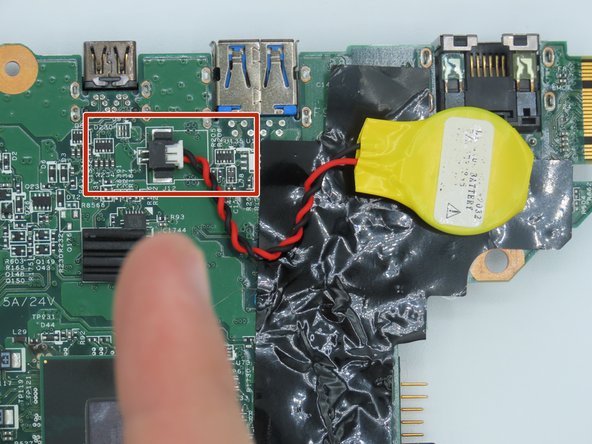
Use a nylon spudger to slightly push against the white bundled cable connector while evenly pulling the cable from the other side.
-
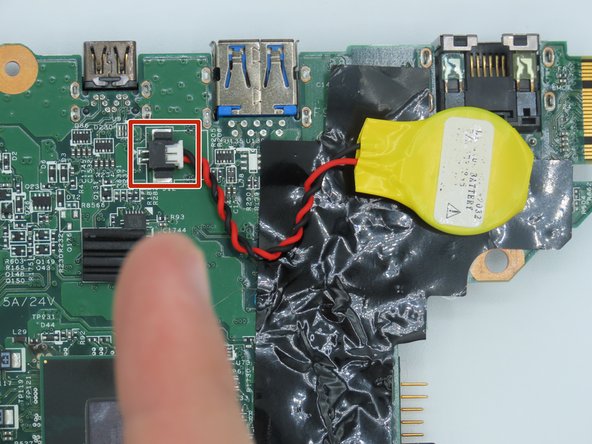
Remove the CMOS battery from the motherboard.
-


To reassemble your device, follow these instructions in reverse order.
To reassemble your device, follow these instructions in reverse order.

Team

University of Kentucky, Team 1-11, Kaufmann Spring 2023 Mitglied von University of Kentucky, Team 1-11, Kaufmann Spring 2023
UKY-KAUFMANN-S23S1G11
5 Mitglieder
5 Anleitungen geschrieben
4 Kommentare
Why is it necessary to continue after Step 4 where the cmos battery already appears to be accessible?
yes this is correct
Holy Crap! It's right under that square door right in the middle on the back! You only have to remove two screws!
exactly! sort of an odd guide